
Most roof leak prevention advice starts with the roof covering. Replace damaged sheets, patch cracked tiles, renew the membrane. That advice is often too narrow for a warehouse, strata complex or industrial site. Water usually finds the weakness around the covering, not necessarily through it. Flashings, service penetrations, gutters, outlets, overflows and poorly sealed transitions deserve the first inspection.
Australian evidence supports treating ingress as a building-maintenance risk rather than a rare storm event. A national housing summary reported that 3.4% of occupied private dwellings had a roof leak in 2019, with older buildings affected more often (Australian Government roof repairs and maintenance guidance). Commercial buildings have more penetrations, larger catchments and more complicated drainage, so a sensible prevention programme must account for age, wear, rainfall exposure and compliance.
Table of Contents
- Identifying the True Sources of Water Ingress
- Executing a Targeted Roof Inspection Methodology
- Upgrading Drainage and Architectural Cladding Systems
- Navigating Waterproofing Compliance and Membrane Standards
- Managing Storm Risk and Professional Escalation Workflows
- Adapting Maintenance Schedules to Variable Climate Patterns
Identifying the True Sources of Water Ingress
A stained ceiling doesn't tell you where the water entered. On a large commercial roof, rain can travel along purlins, insulation, decking, ductwork or structural members before it appears inside. Replacing the sheet directly above the stain may stop nothing if the actual entry point is a failed apron flashing or an unsealed pipe penetration several metres away.
Driving rain is particularly revealing. Independent Australian roofing guidance notes that leaks appearing only during driving rain often indicate problems with pointing or flashings rather than a failed roof covering (Australian roof maintenance guidance on flashings and leak tracing). Wind pushes water sideways and upwards into laps, corners and junctions that may remain dry during ordinary rainfall.
Where commercial roofs usually fail first
Start with the interfaces. These are the areas where two materials, planes or trades meet and where movement places stress on seals.
- Flashings: Check parapet caps, apron flashings, barge flashings, box gutter edges and wall junctions for lifting, corrosion, open laps and failed sealant.
- Penetrations: Inspect HVAC curbs, exhaust ducts, roof vents, skylights, cable trays, solar supports and pipe boots. Every penetration interrupts the waterproofing plane.
- Drainage transitions: Look at gutters, sumps, outlets, downpipe connections, overflows and changes in roof direction. A blocked or undersized transition can force water back beneath laps and flashings.
- Fixings and seals: Loose screws, deteriorated washers and enlarged holes allow repeated wetting. Guidance from Commercial Roofers on roof flashing types helps distinguish the role of different flashing profiles before a repair is specified.
NSW defect findings show why this matters beyond individual leaks. A Building Commission NSW strata defects survey found 53% of surveyed buildings had serious defects, while waterproofing was the most common defect type at 22% (commercial roof leak and waterproofing guidance). Those figures don't prove that every waterproofing defect is a roof defect, but they do show that water exclusion is a major building-quality concern.
Practical rule: Don't approve a full roof replacement until the contractor has mapped the entry path, inspected the drainage system and tested the surrounding details.
For internal reports, distinguish between a surface failure and a systemic failure. A surface failure may involve one loose fixing or a localised seal. A systemic failure appears as recurring leaks after heavy rain, multiple failed penetrations, ponding around outlets or widespread membrane deterioration. If the interior symptom is difficult to trace, a specialist service such as water leak detection Melbourne west can provide useful context for separating roof ingress from plumbing or concealed building leaks.
Executing a Targeted Roof Inspection Methodology
A roof inspection should produce decisions, not a photograph archive. For a strata committee or warehouse owner, the inspector needs a repeatable route, safe access controls and a defect record tied to location, severity and probable cause. “General wear” does not identify where water enters, why the detail failed or what should receive capital funding.
Start inside the building. Record stains, active drips, damp odours, damaged ceiling tiles and areas where insulation or stored goods may be affected. Mark each symptom on a roof plan, while recognising that water can travel sideways before it appears below the entry point.
A practical inspection sequence
-
Make the area safe. Have appropriately qualified personnel isolate electrical hazards, move stock and equipment away from active dripping, and prevent access beneath unstable ceiling materials. Roof access must follow site-specific controls, including edge protection and suitable access equipment.
-
Inspect during rainfall where safe. On a commercial roof, trace the wet path back to its source during rainfall, since a dry-weather visual rarely reproduces the failure. Observe whether water enters at a lap, flashing, penetration or drainage transition. Rainfall exposure often reveals movement and flow patterns that remain invisible in dry conditions.
-
Follow the water path uphill. Begin at the internal expression of the leak, then inspect the roof area above and upslope. Check for damp insulation, corrosion trails, dirt lines and discoloured sealant. A ceiling drip may sit well away from the failed detail.
-
Check parapets and perimeter details. Examine coping joints, parapet caps, wall flashings and corners. Focus on open joints and junctions where render, masonry or cladding meets metalwork. Different materials move at different rates, which can split sealant and open a concealed entry path.
-
Inspect every service penetration. HVAC curb seals, skylight perimeters, pipe boots, vents and cable penetrations require close inspection. Look for cracked sealant, loose metalwork, exposed fasteners and ponding around each detail. Where a roof carries many services, maintain a penetration register instead of relying on a general visual check.
-
Assess fasteners and laps. On metal roofs, check for loose or over-driven screws, failed washers, corrosion around fixings and displaced sheets. Guidance on roofing screws for metal roofs can help determine whether a repair needs compatible replacement fixings rather than another layer of sealant.
-
Evaluate the substrate and falls. Remove or lift finishes only where the agreed scope and safety controls permit. Check whether the substrate is sound, the membrane is bonded correctly, and insulation or decking has softened. Persistent ponding may indicate blocked drainage, inadequate falls or structural deflection, each requiring a different response.
-
Test and document the repair area. Clear debris before testing. Record the test method, affected detail, materials used and limitations caused by weather or access. Include photographs with location references so the next contractor can see what was examined, what was repaired and what remains uncertain.
Reading evidence instead of guessing
Moisture marks, rust streaks and failed sealant each provide evidence, but none proves the entry point alone. Compare the internal symptom with roof geometry, recent rainfall, drainage performance and nearby flashings, penetrations and laps.
Early records improve the professional response. Resources on how to find roof leaks before they spread support that practical approach. For commercial sites, record weather conditions, photographs, location references and the assets at risk. This evidence supports repair planning, maintenance budgets and, where relevant, an insurance notification.
Temporary patching has a legitimate role when water is entering during an active event. It should not close the job. A patch may conceal the original failure, retain moisture or redirect water into another part of the assembly. The final report should state whether the work was temporary, identify the likely cause of ingress and list the permanent work still required.
Upgrading Drainage and Architectural Cladding Systems
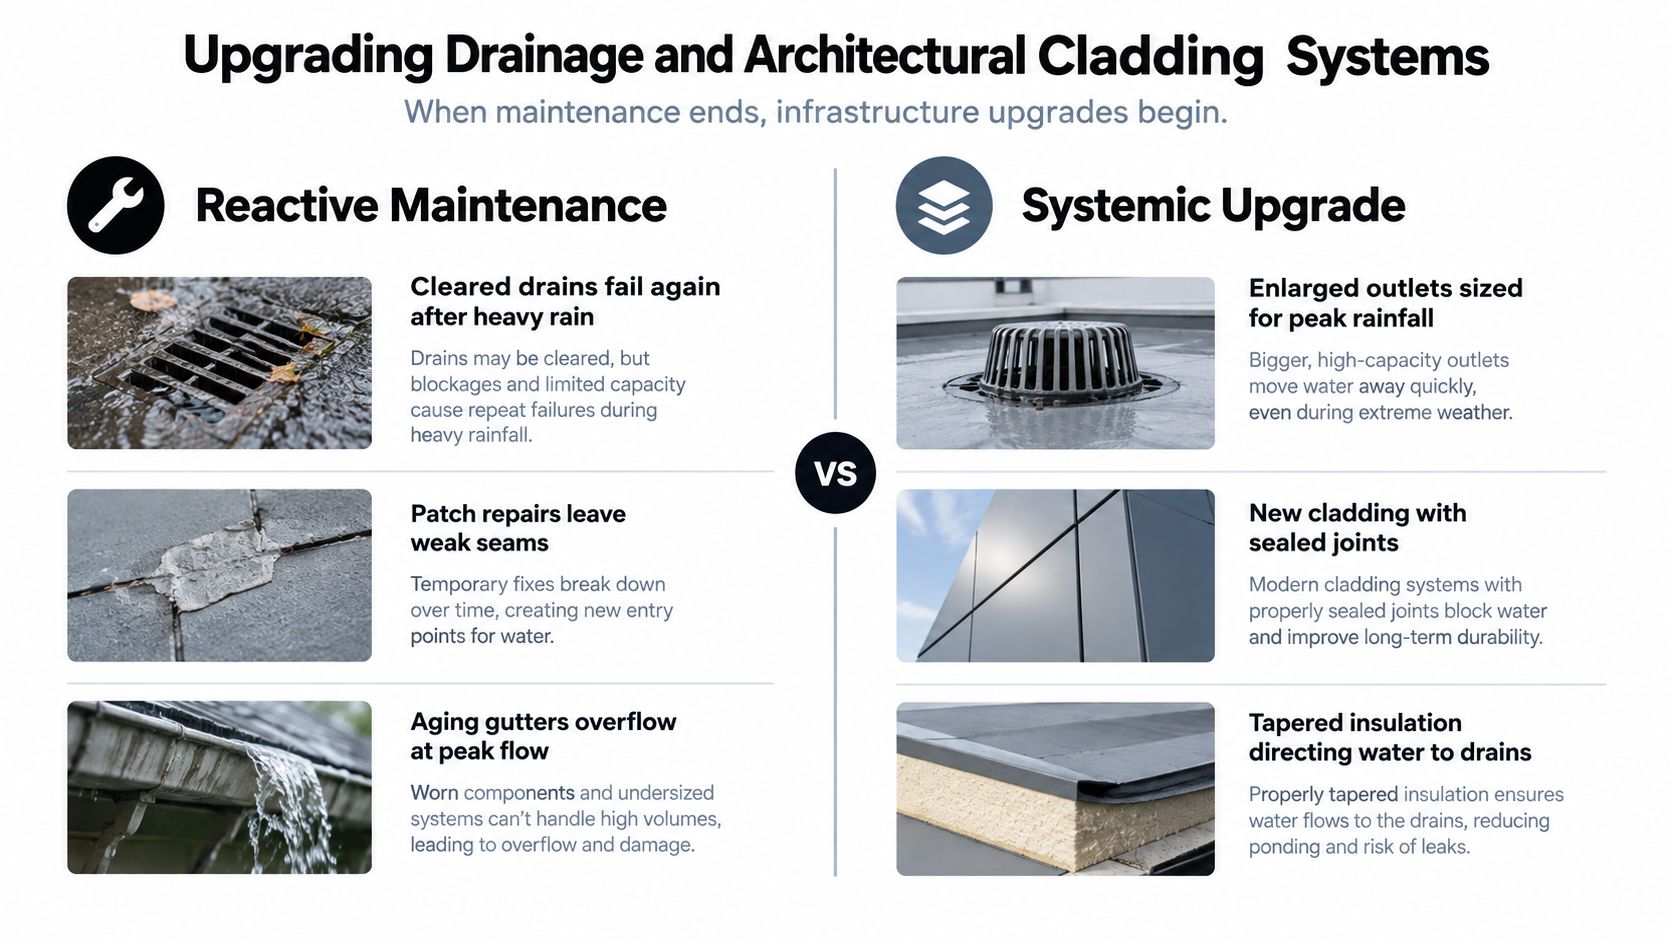
A new roof covering will not correct a drainage system that cannot handle the rainfall reaching it. Maintenance can restore intended performance, but it cannot make an undersized or poorly configured system suitable for its current catchment. Large warehouses, logistics facilities and buildings with later additions often send more water into old gutters, narrow outlets and awkward transitions.
Assess the proposed upgrade against capacity, overflow behaviour, access and maintainability. Appearance comes after those controls.
Drainage options and their trade-offs
Standard eaves gutters suit many pitched roofs when falls, outlets and downpipes are correctly designed and kept clear. They are comparatively easy to inspect, but exposed edges and external outlets remain vulnerable to blockage, impact and overflow after changes to the catchment.
Box gutters suit commercial roofs where planes meet walls or parapets. They keep flow within the building envelope, while demanding precise detailing, regular cleaning and effective overflow provision. Australian guidance identifies box gutters as designed to an Annual Exceedance Probability of 1%, equivalent to a 1-in-100-year ARI, under AS/NZS 3500:2021 Part 3 (Australian guidance on moisture ingress and drainage). Outlet sizing and overflow paths therefore form part of the design, not optional finishing work.
A drainage upgrade should resolve four points:
- Where does peak flow go? Water should reach outlets through properly formed paths, without depending on shallow or obstructed channels.
- What happens if an outlet blocks? Overflow should discharge safely and visibly, rather than enter wall cavities or internal finishes.
- Can the system be inspected? Hidden gutters need planned access, cleaning procedures and an assigned maintenance responsibility.
- Has the roof geometry changed? Plant, skylights, solar arrays and extensions can redirect water into areas the original drainage did not serve.
Choosing architectural cladding
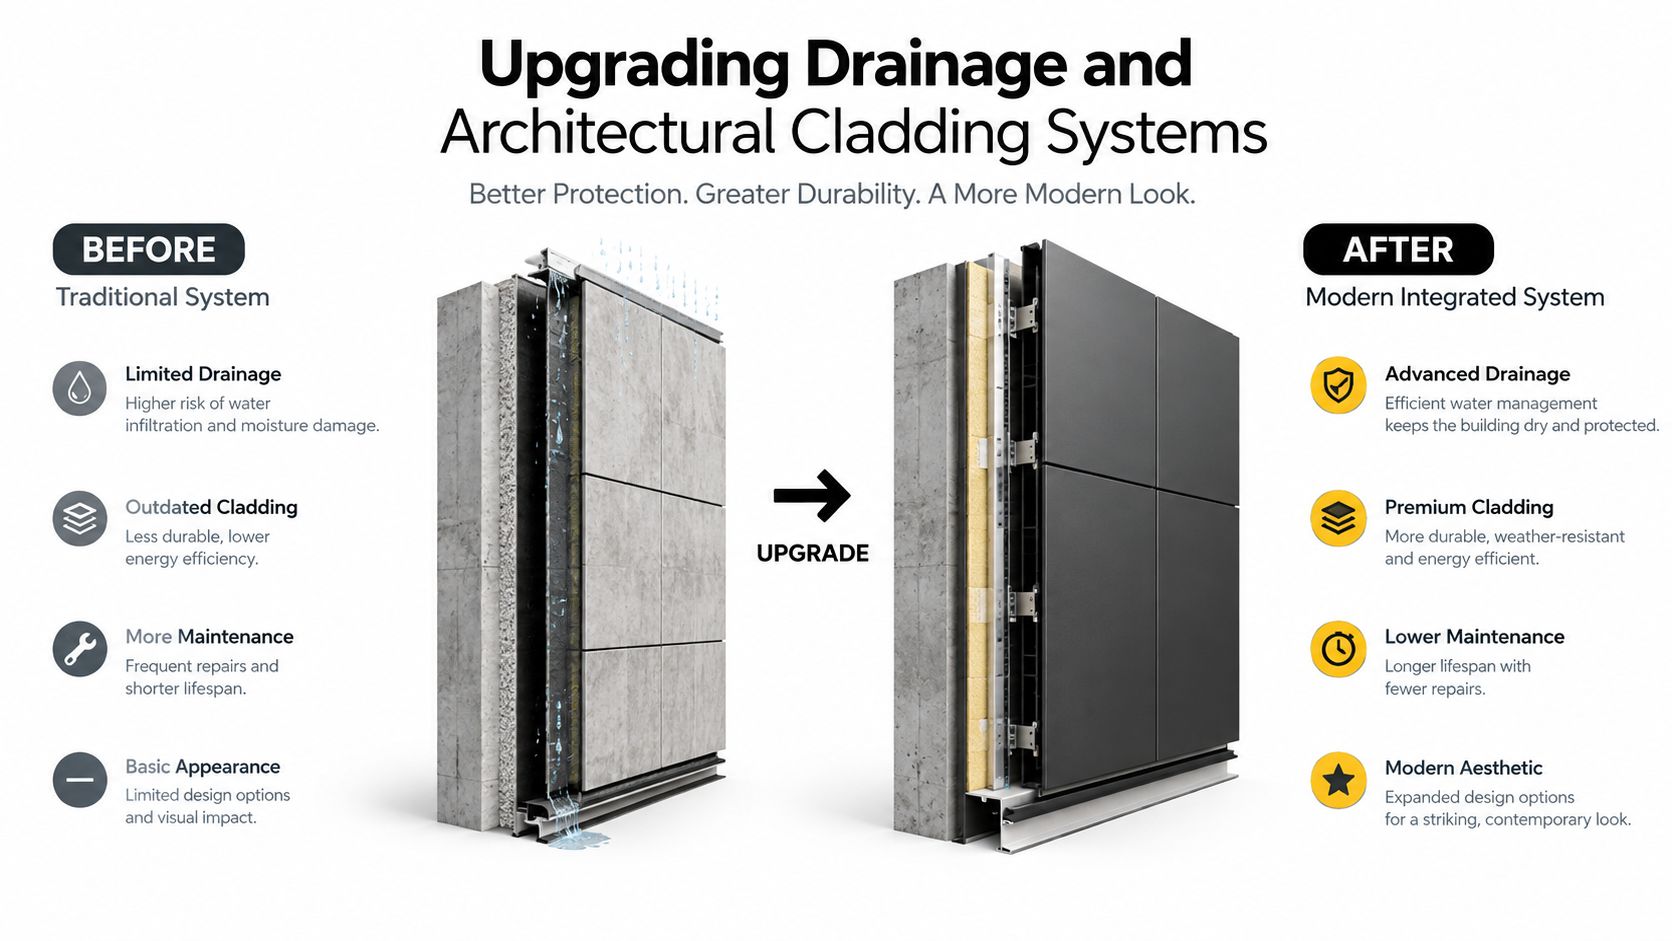
Standing seam, interlocking panels, nail strip systems and other architectural profiles can reduce exposed fixings and create cleaner water-shedding lines. VM Zinc, Equitone and Colorbond products suit different design, exposure and substrate conditions. None compensates for poor interfaces, inadequate falls or restricted drainage.
Concealed fixings can improve durability across the sheet face, but they place greater pressure on perimeter, joint and penetration details. Visible fixings are easier to inspect and replace, although washers and fastener holes remain recurring maintenance points. Selection should account for roof pitch, panel length, movement allowances, substrate, exposure and access for future repairs.
The common failure is specifying a premium cladding product while leaving the old drainage arrangement unchanged. Ponding at a parapet or an inaccessible outlet can continue beneath an improved surface. Treat cladding and drainage as one envelope system, with responsibilities defined for substrate preparation, flashings, joints, outlets and testing. That approach protects the asset during heavy rainfall and gives the maintenance team a system they can inspect.
Navigating Waterproofing Compliance and Membrane Standards
For horizontal external surfaces, waterproofing isn't merely a product selection. The National Construction Code requires roof, balcony, podium and similar surfaces to have a waterproofing membrane, while AS 4654.1 and AS 4654.2 set design and installation requirements for above-ground external waterproofing in Australia (Australian roof waterproofing solutions and standards guidance).
A compliant scope should show how the membrane will remain continuous when the building moves, drains and receives service penetrations. A generic statement such as “apply waterproof membrane to manufacturer's instructions” leaves too many decisions unresolved.
The installation controls that matter
First, verify the substrate. It must be sound, clean, suitably prepared and capable of receiving the proposed system. Moisture, contamination, movement and damaged decking can undermine an otherwise correct membrane installation.
Next, confirm the membrane selection against the exposure class and the actual service conditions. The contractor should identify compatibility with the substrate, adhesives, primers, flashings and finishes. Product data sheets and written installation requirements belong in the project record.
Movement joints and penetrations require bond-break details. Without them, membrane movement can concentrate at corners and junctions, causing splitting or debonding. Falls must direct water to drains, overflows and gutters, and the membrane needs to extend properly into those drainage components.
Use this sequence when reviewing a scope:
- Substrate inspection and preparation.
- Membrane selection for the exposure.
- Bond-break and movement details at joints and penetrations.
- Correct falls to drains and overflows.
- Membrane continuity into drainage components.
- Final inspection, testing and compliance documentation.
Contract administration rule: If the drawings don't show the drain, overflow, penetration and movement details, ask for clarification before the membrane is installed.
The most useful documentation includes substrate records, product identification, installation conditions, photographs of concealed details, test results, maintenance requirements and compliance statements. That paperwork protects more than the warranty. It gives a future manager enough information to distinguish a failed product from a failed detail or maintenance omission.
Where a site uses drone imagery for inspection planning, management should also confirm that the operator has appropriate Australian aviation credentials and operating controls. A CASA drone certification resource can help explain the aviation side, but drone images don't replace close inspection of seals, joints or membrane terminations.
Managing Storm Risk and Professional Escalation Workflows
Storm preparation is a roof-management task, not a last-minute response to a forecast. Allianz's winter risk reporting found that only 25% of surveyed Australians checked roofs or gutters ahead of winter, while storm-related incidents were the leading winter claim cause and exceeded $60 million in claims during winter 2025. See Allianz's 2025 Australian winter claims report for the reported claims and preparedness findings. The practical lesson is clear: blocked drainage, failed flashings and poorly sealed penetrations should be addressed before rainfall exposes them.
Six decisions during an active event
-
Protect people first. Cordon off active drips, sagging ceilings and slippery surfaces. Water near electrical equipment requires a qualified specialist.
-
Protect stock and plant. Relocate vulnerable goods, isolate affected equipment where authorised and use temporary collection measures without creating trip hazards.
-
Record the event. Photograph internal damage, roof areas, blocked drains, displaced flashings and temporary controls. Note the date, affected rooms and operational impact.
-
Call the right professional. Site staff can report symptoms and manage immediate protection. They should not access an unsafe roof, remove electrical components or apply an unapproved patch to a complex membrane.
-
Notify the insurer and preserve evidence. Follow the policy's notification process. Do not discard damaged materials or approve broad demolition before the cause and extent are documented, unless safety requires immediate action.
-
Turn the emergency into a permanent scope. The contractor should trace the entry path, repair the failed detail, test the work and identify drainage or cladding changes that prevent recurrence.
Engage a licensed and insured commercial roofer promptly when water is actively entering, the roof is unsafe, electrical systems are affected, the source remains unclear or storm impact has damaged the building envelope. Emergency tarping or patching can reduce further ingress, but it does not establish the cause or confirm a durable repair.
A temporary repair succeeds only when it creates safe time for proper investigation. It fails when it makes the next leak harder to trace.
Set up an escalation agreement before severe weather. Specify contact details, access procedures, after-hours authority, photographic reporting, temporary protection standards and the person authorised to approve permanent remedial work. Record how the contractor will distinguish emergency attendance from follow-up repairs, testing and compliance documentation. Clear authority reduces delays when multiple properties require assistance at once.
Adapting Maintenance Schedules to Variable Climate Patterns
A fixed calendar can miss the event that matters most. A roof may pass a routine visual check and then develop a blockage, loose flashing or failed seal during a period of intense rainfall. NSW government climate and weather data portals show active rainfall observation and reporting, while the Bureau of Meteorology maintains rainfall information that can support local planning (NSW climate and weather datasets).
Use rainfall exposure as a trigger for inspection, not just as background information.
A rainfall-led maintenance model
Before the higher-risk season, clear gutters, sumps, box gutters and downpipes. Check overflow paths, flashing laps, penetration seals and roof access points. Confirm that recent construction, plant installation or solar work hasn't redirected water.
After a major rainfall event, inspect known choke points first. Look for debris at outlets, ponding, displaced flashings, fresh rust trails and internal signs that weren't present before the event. A post-storm check is especially important where the roof has a broad catchment, mature trees nearby or a history of overflow.
During ordinary operations, ask site staff to report stains, musty odours, ceiling changes, dripping sounds and unusual moisture around plant rooms. Staff shouldn't diagnose the roof, but their observations can identify changes between formal inspections.
After repairs or upgrades, test drainage and membrane details, photograph concealed work and update the roof plan. Record the location of every penetration and outlet so the next inspection follows the same route.
The maintenance interval should reflect the property, not an arbitrary template. A clean, accessible pitched roof may need a different response pattern from a concealed box gutter serving several roof planes. Historic blockage, tree debris, recurring ponding and difficult access all justify more frequent checks or permanent design changes.
The commercial roofing and maintenance guidance is useful when building a written programme, but the schedule should also name the responsible person, inspection areas, escalation thresholds and evidence required after each visit. If clearing the same drain repeatedly doesn't prevent overflow, stop treating it as a cleaning task and investigate capacity, falls and outlet design.
Roof leak prevention works when the building owner connects three controls: sound details, effective drainage and timely decisions. Materials matter, but they don't overcome blocked outlets, unsealed penetrations or undocumented repairs. Use rainfall data to set triggers, use inspections to find hidden failures, and use professional escalation when the risk exceeds what site staff can safely manage.
Commercial Roofers offers commercial and industrial roof inspections, leak tracing, repairs, guttering, modern box gutter systems, waterproofing, architectural cladding and full roof replacement across Sydney and NSW. Their licensed, insured in-house crews can document defects, coordinate remedial work and help strata managers and warehouse owners move from temporary leak control to durable asset protection. Visit Commercial Roofers to arrange an assessment and discuss a roof leak prevention plan suited to your building.