

You can usually spot the job before anyone says a word. A warehouse owner in Western Sydney opens the invoice, sees another hot month, and realises the roof space is turning the building into an oven. The complaint is always the same, the air conditioning runs harder, the top floor stays warm, and the old insulation either never existed or isn't doing its job anymore.
That's where roofing insulation installation stops being a background trade and starts affecting compliance, condensation control, and operating cost. In Australia, the roof is one of the biggest levers in building performance, especially on commercial sheds, factories, and low-slope assets with large exposed spans. The work looks simple from the street, but the details under the sheet metal decide whether the result holds up for years or fails in the first wet season.
Table of Contents
- Why Commercial Roofing Insulation Installation Matters Now
- Choosing the Right Insulation Type for Your Roof System
- Understanding NCC 2022 Compliance and NatHERS Requirements
- Installation Methods That Prevent Condensation and Thermal Bridges
- Designing Tapered Insulation and Crickets for Flat Roof Drainage
- Calculating ROI and Managing Installation Costs
- Selecting a Qualified Contractor and Protecting Your Investment
Why Commercial Roofing Insulation Installation Matters Now
A warehouse owner in Western Sydney doesn't need a lecture about summer. The building tells the story every afternoon, roof sheets heat up, the top of the racking zone turns uncomfortable, and the cooling plant keeps chasing a load the roof never stops feeding. Australia's climate makes that problem stubborn, because the Bureau of Meteorology reports many inland and northern regions regularly exceed 35°C in summer, which raises cooling demand and puts the roof system in the firing line.
The policy side has changed too. The National Construction Code (NCC) 2022 lifted minimum thermal-performance expectations for new homes and many commercial building elements, including roof and ceiling systems, and the Australian Government has stated that buildings account for about 25% of Australia's greenhouse gas emissions (American Chemistry Council reference PDF). That puts roof insulation squarely inside compliance-driven design, not just comfort work. For commercial owners and developers in NSW, it matters even more when the project includes metal roofing, reflective membranes, or re-roofing works.
Why the roof keeps getting ignored until it fails
Heat rises, but commercial roofs do more than collect heat. They also lose warmth in winter, and that matters in Sydney's mixed climate, where buildings need to hold their internal conditions through swings in temperature. Roof and ceiling insulation is still one of the most cost-effective ways to reduce heat gain and heat loss, which is why good installers treat it as part of the building envelope, not as a standalone product.
Practical rule: if the roof is being replaced, re-sheeted, or extensively refurbished, insulation should be assessed at the same time. Leaving it as an afterthought usually means more disruption later.
The useful way to read this guide is simple. First, choose the insulation type that suits your roof system. Then make sure the installation sequence controls condensation and thermal bridging. After that, check how drainage, compliance, and access affect the final design. That order saves money and avoids the kind of callback that comes from a roof that looks finished but performs poorly.
Choosing the Right Insulation Type for Your Roof System
The right product depends on the roof you're trying to protect, not on the brochure. On Sydney warehouses and factories, the choice usually comes down to rigid foam boards, glasswool batts, or reflective foil systems. Each has a place, and each fails in predictable ways when it's used in the wrong assembly.
Rigid boards, including PIR, XPS, and EPS, are the strongest fit for flat and low-slope commercial roofs where compressive strength and moisture resistance matter. They work well under membrane systems and above-deck assemblies, especially when the roof sees maintenance traffic or needs consistent thermal layers. Glasswool batts are more common in pitched metal roofs, where framing depth allows the insulation to sit neatly between members. Reflective foil systems are useful as part of a broader assembly, especially where radiant heat is a major issue, but they do not replace a properly designed thermal layer on their own.
What matters more than the product name
The specification should be driven by four checks. First, the required thermal resistance. Second, how the material handles moisture. Third, whether it can survive foot traffic or roof maintenance without crushing. Fourth, whether it fits the membrane or roof cover being installed. A product that performs well in a laboratory can still be a poor choice if it creates voids, bridges, or incompatibility with the waterproofing layer.
| Commercial Roof Insulation Types Comparison | ||||
|---|---|---|---|---|
| Insulation Type | R-Value per 100mm | Best For | Moisture Resistance | Relative Cost |
| Rigid foam boards, PIR, XPS, EPS | Varies by product | Flat roofs, low-slope roofs, above-deck systems | Strong | Higher |
| Glasswool batts | Varies by product | Pitched metal roofs, framed cavities | Moderate, depends on detailing | Lower to moderate |
| Reflective foil systems | Not a direct substitute for bulk insulation | Radiant control in mixed assemblies | Depends on installation and detailing | Lower to moderate |
Sydney's climate usually rewards assemblies that control both heat and moisture, not one or the other. That's why rigid boards are often the better answer on commercial flat roofs, while batts stay practical in pitched metal roofs where access and framing are different. In both cases, the best material still needs proper continuity, because a great product with sloppy joints is still a weak roof.
The cheapest board on the quote can become the most expensive choice if it crushes, gaps, or doesn't suit the membrane above it.
Understanding NCC 2022 Compliance and NatHERS Requirements
Compliance is no longer a background concern on roof projects. The NCC 2022 raised the minimum thermal-performance bar for roof and ceiling systems, so insulation now sits inside the design conversation from day one, especially on new builds and major refurbishments. That change matters in NSW commercial work because the roof is often the largest exposed surface, and it's one of the first parts of the building checked when the thermal envelope is being documented.
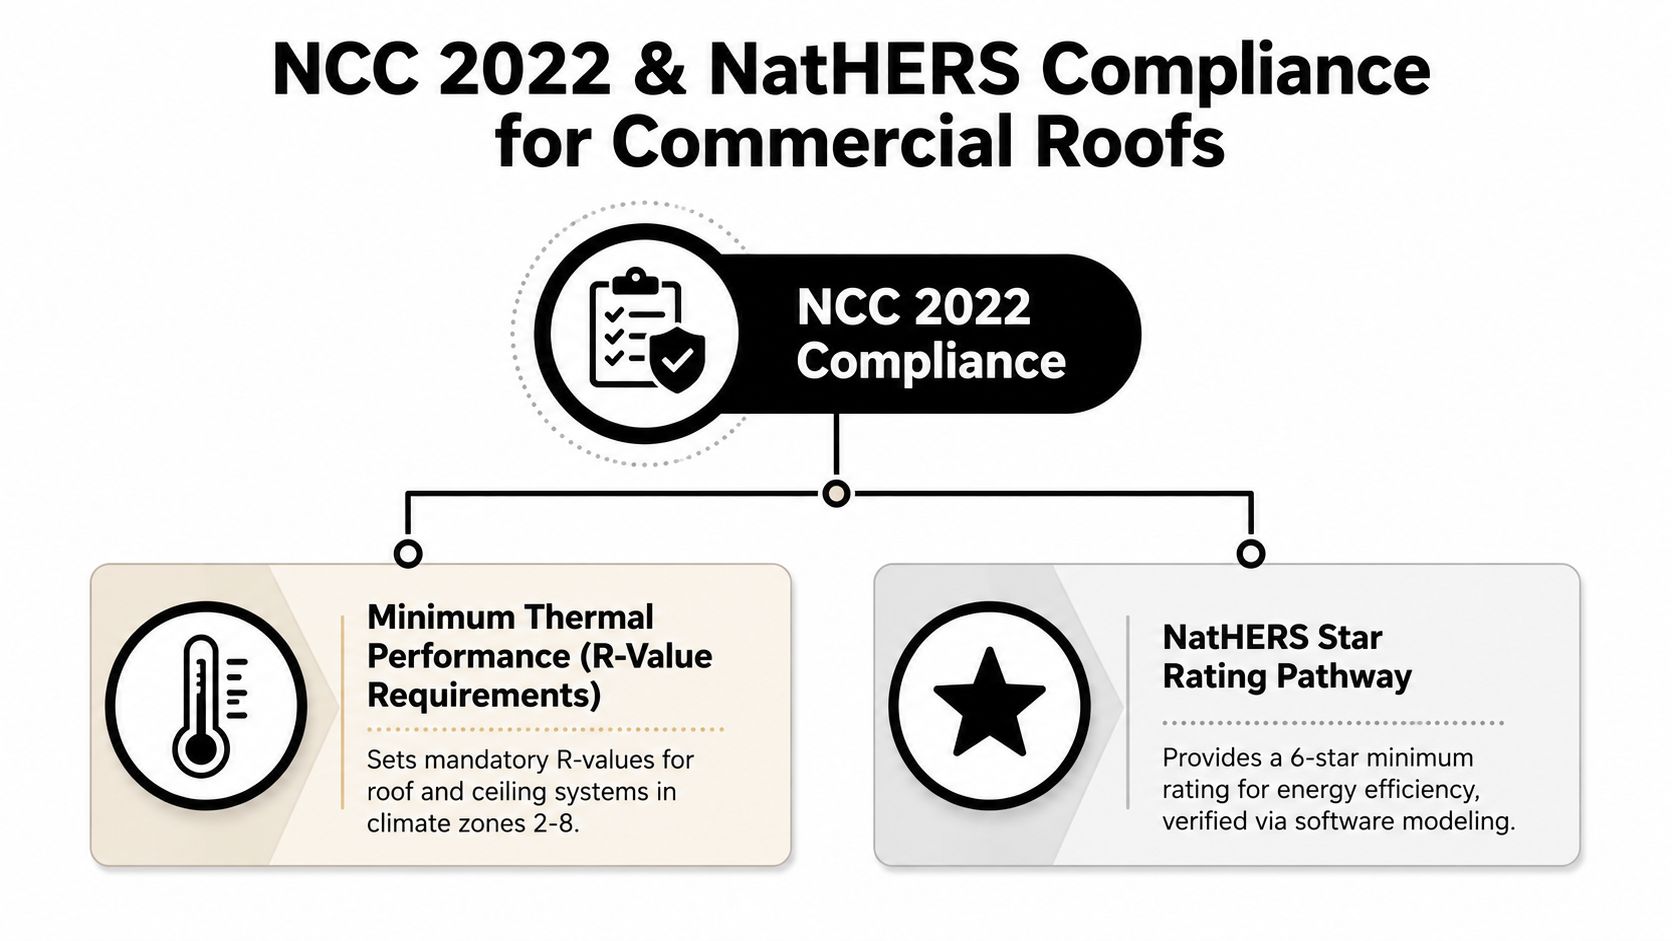
The Nationwide House Energy Rating Scheme (NatHERS) uses a 0-to-10 star scale, and under the NCC pathway, new homes generally need to reach a 7-star equivalent performance (BLS insulation worker overview). While NatHERS is a residential benchmark, the logic spills into commercial practice because the same thermal principles drive envelope performance, documentation, and approval pathways. Roof insulation becomes part of the evidence chain, not just a material schedule.
What owners need to keep on file
For warehouse and industrial owners in NSW, the practical task is documentation. If the project is new construction, an extension, or a significant refurbishment, the insulation spec should match the thermal model or compliance pathway. If the roof is being replaced, the installer should be able to show what was fitted, where it was fitted, and how penetrations, junctions, and vapour control were handled.
The NCC and Australian guidance both treat roof insulation as a priority measure in older stock, especially where original insulation is thin, damaged, or missing. That matters on commercial assets because the upgrade is often bundled with a re-sheet, a membrane replacement, or a plant-room modification. If the thermal layer is left vague in the paperwork, the project can end up with a roof that passes visually but struggles to satisfy the compliance file.
Commercial roofing standards in Australia are easiest to manage when the insulation scope is written clearly from the start. The owner, builder, and roofer should all know whether the roof is being treated as a retrofit, a compliance-driven upgrade, or a full envelope redesign. That clarity keeps the project moving and reduces the usual arguments about whose scope was supposed to include the vapour barrier, the board thickness, or the penetrations.
Installation Methods That Prevent Condensation and Thermal Bridges
Most insulation failures on commercial roofs are not product failures. They're sequencing failures. The roof gets closed up before the substrate is checked, or the crew leaves a gap at a junction, and the building pays for it later in condensation, cold spots, or hidden heat loss.
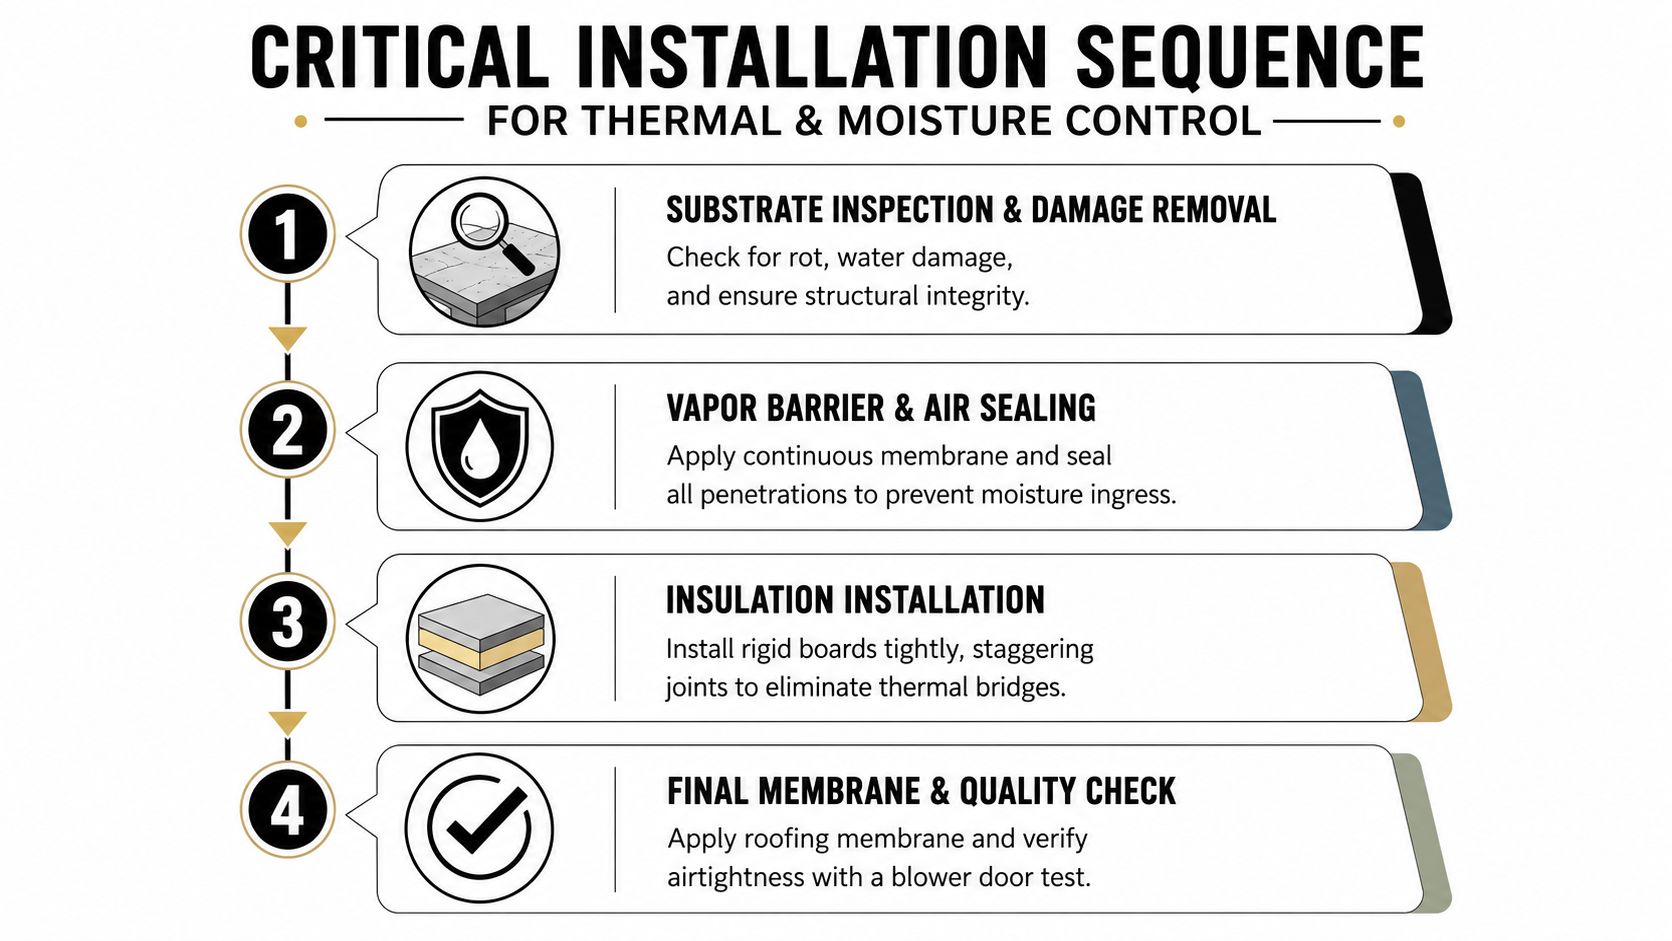
The starting point is always the substrate. Damaged or moisture-affected material has to come out, the roof deck needs cleaning and inspection, and the installer has to confirm that the underlying structure is sound before any boards or batts go in. Australian thermal guidance from the ABCB and NCC puts a heavy emphasis on airtightness and condensation control, because unsealed junctions can undermine the claimed R-value even when the insulation product itself is correct. The job is not finished when the board is in place. It's finished when the assembly can hold air and moisture where it belongs.
The installation sequence that holds up
On retrofit work, the cleanest result usually comes from a continuous vapour or air control layer, then insulation, then a sealed roof covering or membrane. Above-deck rigid foam systems perform best when the boards are installed in multiple layers with joints offset vertically and horizontally, because that reduces thermal bridging and stops line-of-joint leakage from becoming a heat path. PNNL roof-assembly guidance supports that sequence for the same reason, the roof works better when the layers overlap and the penetrations are controlled.
In pitched roof retrofits, the hard part is ventilation. Independent guidance for pitched roofs notes that insulation may need to stop up to 50 mm short of rafter depth to leave room for ventilation channels under the roof covering, and it warns that inconsistent insulation depth increases thermal-bridge risk (Historic England cold roof guidance). That trade-off is where many DIY jobs go wrong. People pack every gap they can find, then wonder why condensation appears or why the roof space feels damp.
If the roof needs to breathe, don't block the path and call it an upgrade. Control the vapour, leave the ventilation path, and keep the insulation thickness consistent.
For practical installs, the small details matter. Seal service penetrations. Check for compression points. Keep the batts or boards tight, but not crushed. If the installation looks tidy yet leaves irregular depth or open joints, the thermal bridge will show up later in energy use, moisture, or both.
Roof insulation and tin roof detailing matters most when the roof is old, accessible space is limited, and the upgrade has to work around existing metal framing and penetrations. That's where neat workmanship matters more than fast hands.
Designing Tapered Insulation and Crickets for Flat Roof Drainage
Flat roofs get talked about like they're only thermal surfaces, but the drainage design is just as important. On warehouses, logistics centres, and strata assets, insulation often does double duty. It shapes the roof so water moves instead of sitting there and finding a weak point.
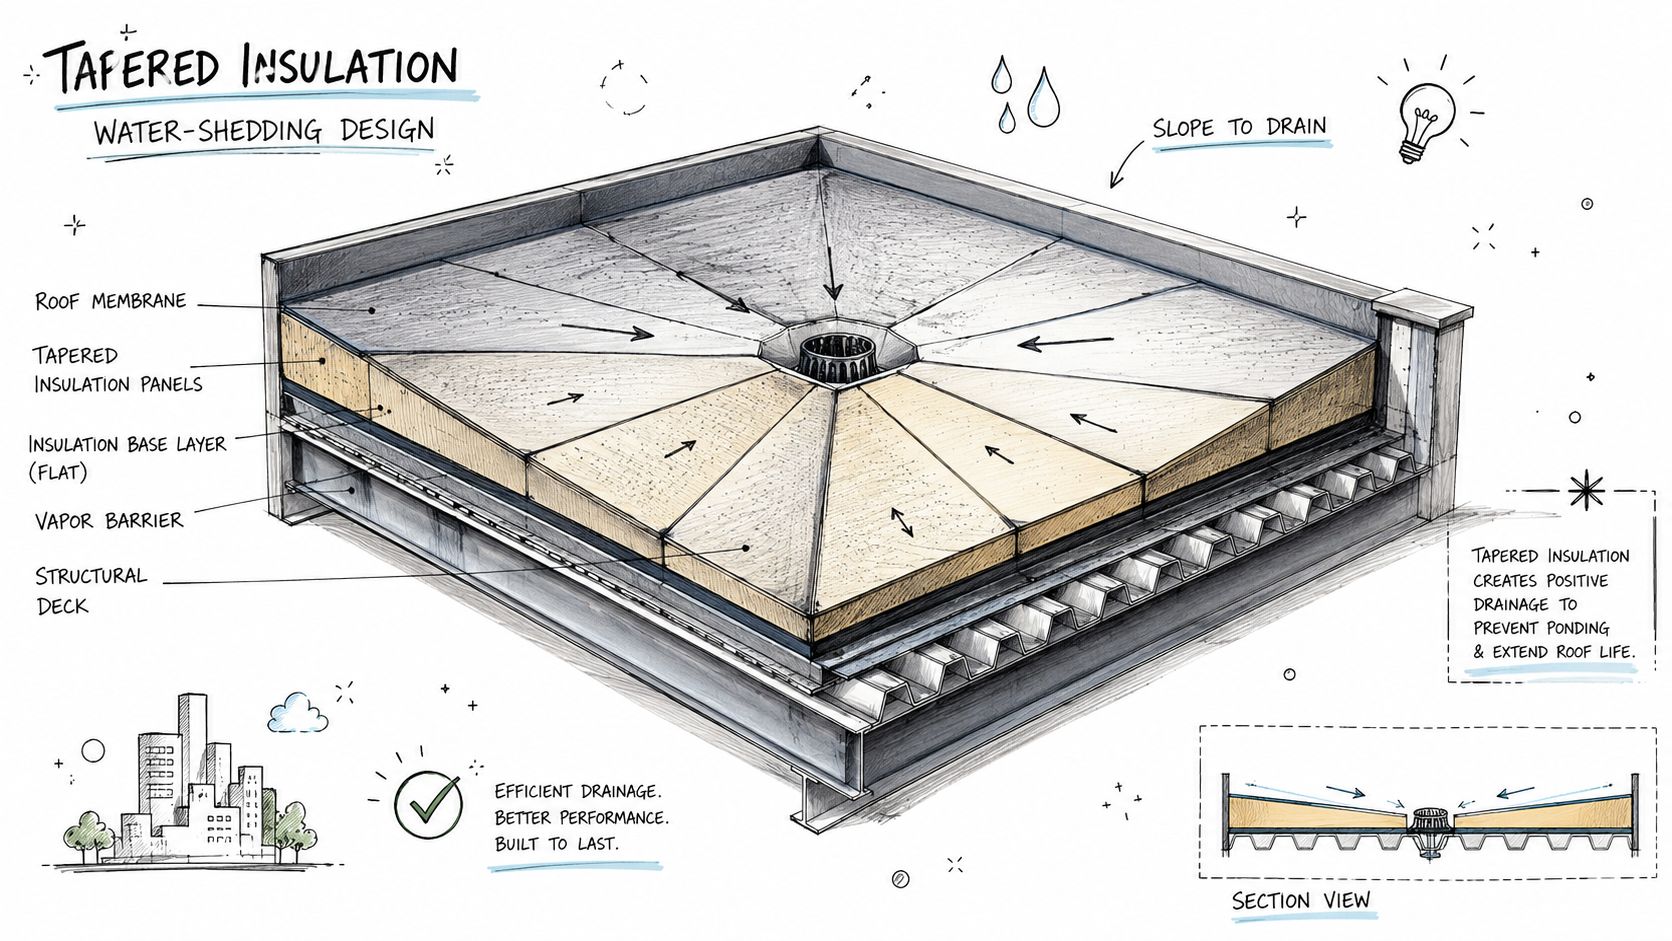
Tapered insulation creates positive drainage towards outlets. That's the right answer when the roof has shallow falls, complicated plant layouts, or historic ponding issues. The mistake is treating it like a generic board layout and hoping the water will behave. It won't. Water always follows the path of least resistance, and if the insulation geometry isn't designed for that, the roof will pond around penetrations, walls, and changes in plane.
Crickets are drainage tools, not filler pieces
A cricket is the small sloped section that diverts water around obstructions. Industry guidance says the cricket slope should be twice the roof-field slope, for example 1/2-inch per foot crickets for a 1/4-inch per foot tapered roof. NRCA guidance also says cricket width should be one-quarter to one-third of the overall roof length to improve water diversion (BNP Media tapered insulation fundamentals). Those details matter because a cricket that is too shallow, too narrow, or built without a drainage plan just creates another low point.
The job gets more efficient when the design is done before materials are ordered. Proper tapered layouts reduce rework, which also reduces waste. They also cut callbacks, because the roof stops trapping water at the exact places where leaks usually begin. On large commercial roofs, that means fewer inspections, fewer emergency callouts, and fewer arguments about whether the leak came from the membrane or the slope.
Commercial gutter and drainage design becomes critical when the roof insulation and the water path are being designed together. If the drainage layout is ignored until the end, the roof often ends up with a thermal solution that fights the water plan.
Calculating ROI and Managing Installation Costs
The financial case for roof insulation is stronger than many owners expect because the roof is one of the building's biggest energy leaks. Research and government guidance in Australia consistently show that roof and ceiling insulation has some of the fastest payback among efficiency upgrades because heat rises and the roof is a dominant pathway for energy loss in winter and heat gain in summer (BLS insulation worker overview). That doesn't mean every project pays back the same way, but it does mean the roof is usually a sensible first target when cooling costs and comfort complaints start climbing.
Cost depends on more than the product. Roof complexity, access, height, penetrations, and whether the work can be staged around operations all affect the quote. A flat warehouse roof with clear access is one thing. A live industrial site with plant equipment, fragile services, and weekend-only access is another. The cheapest proposal often leaves out the bits that create the actual cost, like substrate prep, vapour control, edge details, or disposal of damaged material.
What to compare in the quote
- Scope clarity: the proposal should say exactly what is being installed, where it starts, and what gets excluded.
- Access assumptions: the roofer should spell out lifts, fall protection, staging, and shutdown requirements.
- Compliance documentation: the quote should include the documents needed for approval and handover.
- Warranty coverage: materials and workmanship should be separated, not blurred together.
Business disruption matters too. A good contractor plans noisy work, material drops, and roof access around production schedules, instead of forcing the site to adapt at the last minute. That's especially important for warehouses and factories where a single day of disruption can cause more pain than the insulation itself costs to install.
The best quote is rarely the lowest number. It's the one that shows the full scope, the compliance path, and the practical steps needed to finish without surprises.
Selecting a Qualified Contractor and Protecting Your Investment
A roof insulation job only performs as well as the crew that installs it. That's why the contractor question matters as much as the product question. For commercial and industrial roofs, the right team understands not just sheet metal and membranes, but thermal continuity, vapour control, drainage behaviour, and the paperwork that sits behind a compliant handover.
Start with proof of commercial experience. A contractor who mainly handles small domestic work may know insulation products, but still miss the realities of warehouse spans, plant penetrations, strata coordination, or live-site staging. Ask for examples of similar roofs, not generic roofing photos. The difference shows up in the detailing, especially where the roof meets walls, skylights, gutters, and mechanical equipment.
The proposal should answer these questions
- What exactly is the system? Board type, thickness, fixings, membranes, control layers, and drainage details should all be listed.
- Who is responsible for compliance paperwork? The owner should not be left chasing certificates after the roof is finished.
- What warranties apply? Materials, labour, and workmanship need to be clear and separate.
- How will maintenance be handled? A good installer explains access, inspection points, and what to watch for after handover.
You also want a contractor who talks plainly about trade-offs. If a pitched retrofit needs ventilation space, the roofer should say so. If a flat roof needs tapered build-up to drain correctly, that should be in the scope before anyone starts ordering material. The best firms don't promise that insulation fixes every roof problem. They explain where the assembly works, where it needs support, and what conditions could shorten its life.
Protecting the investment after installation is mostly about inspection and restraint. Don't let other trades cut through the vapour layer without repair. Don't stack services over compressed insulation and assume the R-value is unchanged. And don't treat the roof as “done forever” once the last sheet goes down.
If you want a commercial roof that performs in Sydney conditions, not just one that looks neat on completion day, talk to Commercial Roofers. We handle commercial and industrial roofing across NSW with compliance in mind, from insulation upgrades to full roof replacement and drainage detailing. If your site needs a practical review before the next hot season or major refurb, get in touch and have the roof assessed properly.