
You're standing in the car park after a storm, looking up at a gable end that's rattling. A length of metal along the sloped edge has lifted at the corner, the tenant below has sent you a photo of a fresh ceiling stain, and the roofer's quote just says barge capping roof repair as if that's self-explanatory.
It isn't. That edge strip decides where wind-driven rain goes, whether wind can get under your sheets, and whether cut metal ends rust in the open. Treat it as decoration and you'll keep paying for leaks. Treat it as a wind and water control detail, check its fixings, laps and metal compatibility first, and the finish choice becomes easy.
Table of Contents
- What Barge Capping Is and Why It Is Regulated
- What Barge Capping Does on the Roof
- Common Materials and Profiles to Specify
- Compliance Rules and Permitted Fixings
- How to Install Barge Capping Step by Step
- Signs of Barge Capping Failure and Their Causes
- Aesthetic Options for Strata and Commercial Roofs
- Confirm the Specification Before You Order Capping
What Barge Capping Is and Why It Is Regulated
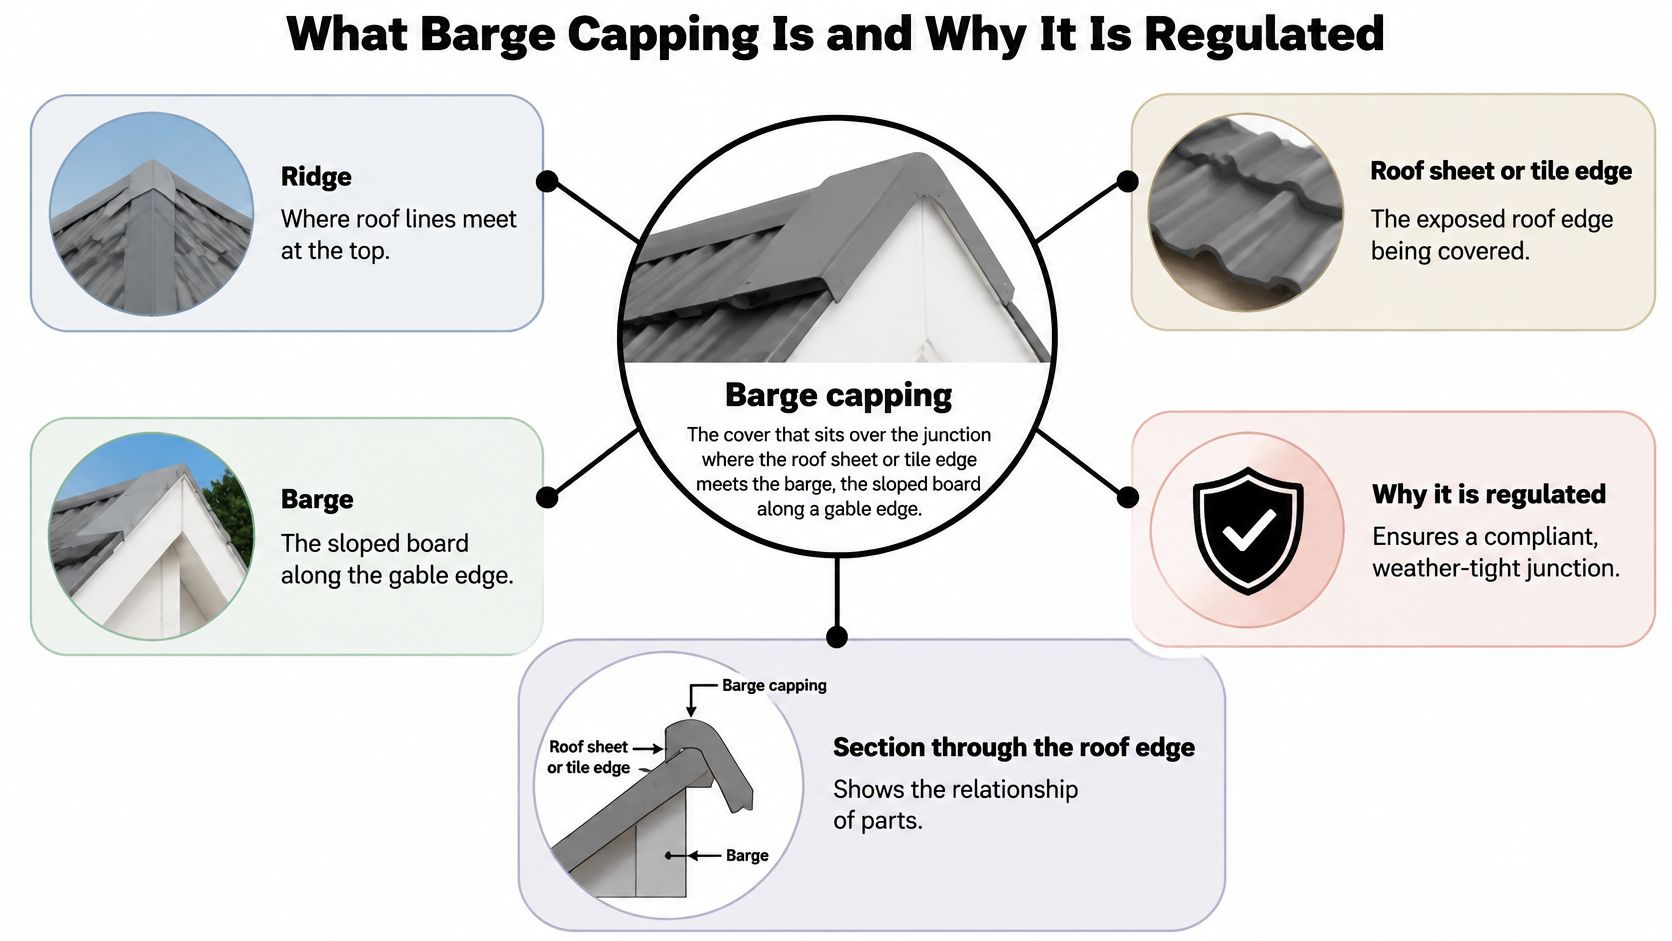
Barge capping is the cover that sits over the junction where the roof sheet or tile edge meets the barge, the sloped board along a gable edge. It runs in one line from the ridge at the top, where roof planes meet, down the verge to the eaves. The fascia sits below it at the corner, and the capping wraps that exposed edge so rain and wind can't enter sideways.
Think of the drip lip on a shopfront awning. It doesn't hold the awning up, but it decides where water falls and whether wind can lift the front edge. Your barge capping does the same job at roof scale, only with greater exposure and higher consequences when it fails.
Why Australia Regulates the Edge
In Australia, it's a regulated roof-edge component, not cosmetic trim. The National Construction Code housing provisions for roof tiles require roof tiles at the ridge, hip, barge and valley, including capping tiles, to be fixed according to prescribed wind-class requirements. That inclusion tells you the edge carries structural and weatherproofing weight.
People mix up three terms. Barge capping is the folded metal cover on sheet roofs. Barge tiles are the shaped tile units on tiled roofs. Verge flashing is the wider edge detail, which may include the capping, closures and fascia junction. Using the right term on a quote prevents the wrong product arriving on site.
The capping doesn't carry the roof, but it controls the edge where wind and rain attack first.
You can make three useful checks from the ground before anyone climbs up:
- Every gable covered: Is there capping on each sloped gable edge, with no bare sheet ends?
- Continuous line: Does it run unbroken from ridge to eaves, without short, mismatched patch pieces?
- Corners closed: Do the bottom corners look sealed and tight against the fascia, rather than open or lifting?
If any answer is no, you've found a likely entry point. Don't approve a colour or a price until someone confirms how that edge is fixed for your building's wind exposure.
What Barge Capping Does on the Roof
Say a warehouse gable is sheeted neatly but the capping order is delayed, so the builder leaves the verge for later. The cut sheet ends sit exposed. Rain doesn't need to fall straight down to cause trouble. Wind pushes it sideways up the wall, across the verge and into the open laps, where it tracks along the underside of the sheet. Weeks later, the first brown stain appears on the ceiling below, well inside the building and nowhere near an obvious hole.
That's the job in miniature. Like a hat brim, the capping shields an edge that's vulnerable precisely because water there moves sideways, not down.
The Five Jobs in Order
First, it sheds wind-driven rain at the gable verge. The folded cover turns water back onto the roof plane or drips it clear of the fascia, instead of letting it enter the lap between sheet and barge. On an exposed industrial estate, this is usually the function that matters most.
Second, it helps restrain edge sheets against wind uplift. Suction is strongest at corners and perimeters. A properly fixed capping ties the perimeter together and reduces the chance of an edge lifting, flapping and progressively tearing fixings loose.
Third, it covers cut sheet ends and the fascia. A cut edge left open is where coating damage and corrosion start, and exposed timber or thin fascia metal weathers fast.
Fourth, it keeps birds, leaves and pests out of the open profile. Sparrows and mynas find an uncapped trapezoidal rib quickly, and nesting material then holds moisture against the sheet.
Fifth, a well detailed capping allows thermal movement without breaking the seal. Metal expands on a hot afternoon and contracts overnight. Clips and correct laps accommodate that movement. Rigid, over-tight fixing through both layers doesn't, and it will oval holes or back screws out over time.
Be clear about the limit. Capping doesn't replace the sheet fixings, the underlay or sarking, or the gutter. It can't fix a roof that's already leaking through cracked sheets, failed laps in the field of the roof, or a blocked box gutter. Putting new capping over a failed roof plane just gives you a tidy edge on a leaking building.
For a committee or an owner, I would put it this way. Name the one function your building needs most. A coastal strata block may need corrosion protection at cut ends. A tall, exposed warehouse needs uplift restraint. That ranking decides what you inspect first and what you'll pay to upgrade.
Common Materials and Profiles to Specify
Profile comes before finish. A flat cap suits simple sheet roofs and small sheds. Box and ogee profiles give a stronger shadow line and more stiffness on warehouses, so they sit flatter over long runs. Snap-on and concealed-fix profiles hide screws for cleaner commercial facades, and the hidden fixings also keep fastener heads out of the weather. On tiled buildings the choice is made for you: barge caps in clay or concrete matched to the tile.
Profile Only Works With Compatible Metal
For sheet-metal roofs, order the piece as a purpose-made, machine-folded flashing matched to the roof profile. A folder gives a consistent fold line and lap depth that site bending struggles to repeat along a long edge. AS 1562.1:2018 for metal roof and wall cladding governs the material and fixing requirements for capping, and the National Construction Code requires cappings to use materials compatible with the roof cladding and associated components, because incompatible metals can set up galvanic corrosion in wet service. Run every lap in the direction of roof fall so wind-driven rain sheds over the joint, and confirm fastener spacing against the project's wind design before you sign off the shop drawing.
That means you can't pick metal from a catalogue alone. Roof profile, substrate, wind exposure and fastener type set the design together. For the wider context on how this piece fits with other edge and junction pieces, our guide to roof flashing types and where each one is used is worth a read before you lock a specification.
| Material | Typical use | Strengths | Watch-outs |
|---|---|---|---|
| Pre-painted steel (Colorbond) | Sheds, warehouses, factories | Wide colour range, cost-effective | Cut edges can rust if not sealed; match to cladding colour |
| Zincalume steel | Industrial sheet roofs | Unpainted, economical, matches many roofs | Scratches and cut edges corrode earlier; check compatibility with fixings |
| Aluminium | Coastal and lightweight structures | Light, corrosion resistant | Less rigid, can dent; allow for expansion |
| Zinc (e.g. VM Zinc) | Architectural and heritage-style facades | Long life, develops a protective patina | Higher cost; needs compatible fixings and isolation from incompatible metals |
| Copper | Premium facades and feature edges | Long life, distinctive patina | Premium cost; galvanic risk where it contacts steel |
| Clay or concrete ridge and barge tile | Tiled houses and strata buildings | Matches the tile roof | Brittle; needs mortar or metal clips |
Specification rule: Match the metal family to the roof sheet first, then argue about colour.
Copper against steel is the classic mistake. It looks premium on a sample board, then the steel below corrodes where copper-laden runoff or direct contact sets up a galvanic cell. Aluminium near salt spray performs well, but a thin, wide aluminium cap on a tall warehouse can oil-can and dent from ladder contact if the profile lacks stiffness.
I would apply a simple selection rule. Choose the lowest-cost compatible option for sheds and warehouses, because you'll replace access-damaged lengths over the building's life. Choose zinc or copper only where appearance and longevity justify isolating fixings and neighbouring metals properly. On tiled strata buildings, stay with matched tile caps and compliant clips or pointing, since a folded metal cap forced over a tile verge rarely seals cleanly at every rib.
Before fabrication, write down five lines: roof material, capping material, compatible fasteners, lap direction and wind design. If a supplier can't fill those in, the order isn't ready.
Compliance Rules and Permitted Fixings
Compliance starts with wind classification, not with a screw you happen to have in the ute. Standards Australia's AS 2050:2018 covers installation of roof tiles for domestic, commercial and light-industrial buildings in wind classifications N1 to N6 and C1 to C4, spanning six non-cyclonic classes and four cyclonic classes, and it specifically includes requirements for barge capping tiles. That's a wide performance range. A fixing pattern that's fine for a sheltered low-rise block won't suit an exposed cyclonic site.
For metal roofs, the design and installation standard covers matters such as minimum thickness and fixing to the applicable wind design. The National Construction Code housing provisions are often used as the reference for roof-edge details, but on a commercial project you should confirm which Code volume and which wind design apply with the building certifier and the engineer. Don't assume a housing detail transfers unchecked to a large warehouse edge zone.
Permitted Fixings for Tiled Edges
For tiled edges under AS 2050, fixing type, size and embedment are set by the building's wind class rather than by one universal minimum. Write the fixing schedule from the wind design, then check the delivered nails, screws or clips against it.
| Fixing method | What the wind design must set | Typical use |
|---|---|---|
| Galvanised clout nails | Nail diameter, length and embedment into the batten | Timber battens |
| Self-embedding-head screws | Gauge, length and embedment into the batten | Timber battens and tile edges |
| Corrosion-protected metal clips | Clip type, corrosion protection and spacing by wind class | Tile edge retention |
| Flexible pointing material | Product compliance with AS 2050 and suitability for the verge | Bedding at verges |
At the verge, the same fixing that resists uplift also holds the lap against wind-driven rain, so a loose edge is both a structural and a leak path. Shallow embedment in a batten, or an unprotected clip in coastal air, is not a near miss. It is a non-compliant fixing waiting for the right gust.
Three practical steps keep a strata manager or owner out of trouble:
- Confirm wind class first: Get it from the engineer or certifier before work starts, not from the installer's habit.
- Write the fixing into the specification: Method, size, penetration or clip type, and spacing should appear in the quote and the final record.
- Keep the paperwork with the building file: Retain the certificate of compliance and product details so the next repairer knows what was installed.
Our overview of roofing standards in Australia helps committees see where tile, metal and wind standards intersect.
A nominated spacing is only compliant when it matches the wind class on that specific building. If an installer quotes one spacing for every job regardless of height, terrain or edge-zone pressure, I would ask for the design basis in writing before approving it.
How to Install Barge Capping Step by Step
Good installation is mostly measurement and restraint at corners. The sequence below reflects standard practice, and it never replaces the project engineer's wind-uplift design. Before anyone steps on the roof, confirm fall protection, safe access and that the sheets and battens below can carry foot traffic and fixing loads.
Measure, Fix and Fold
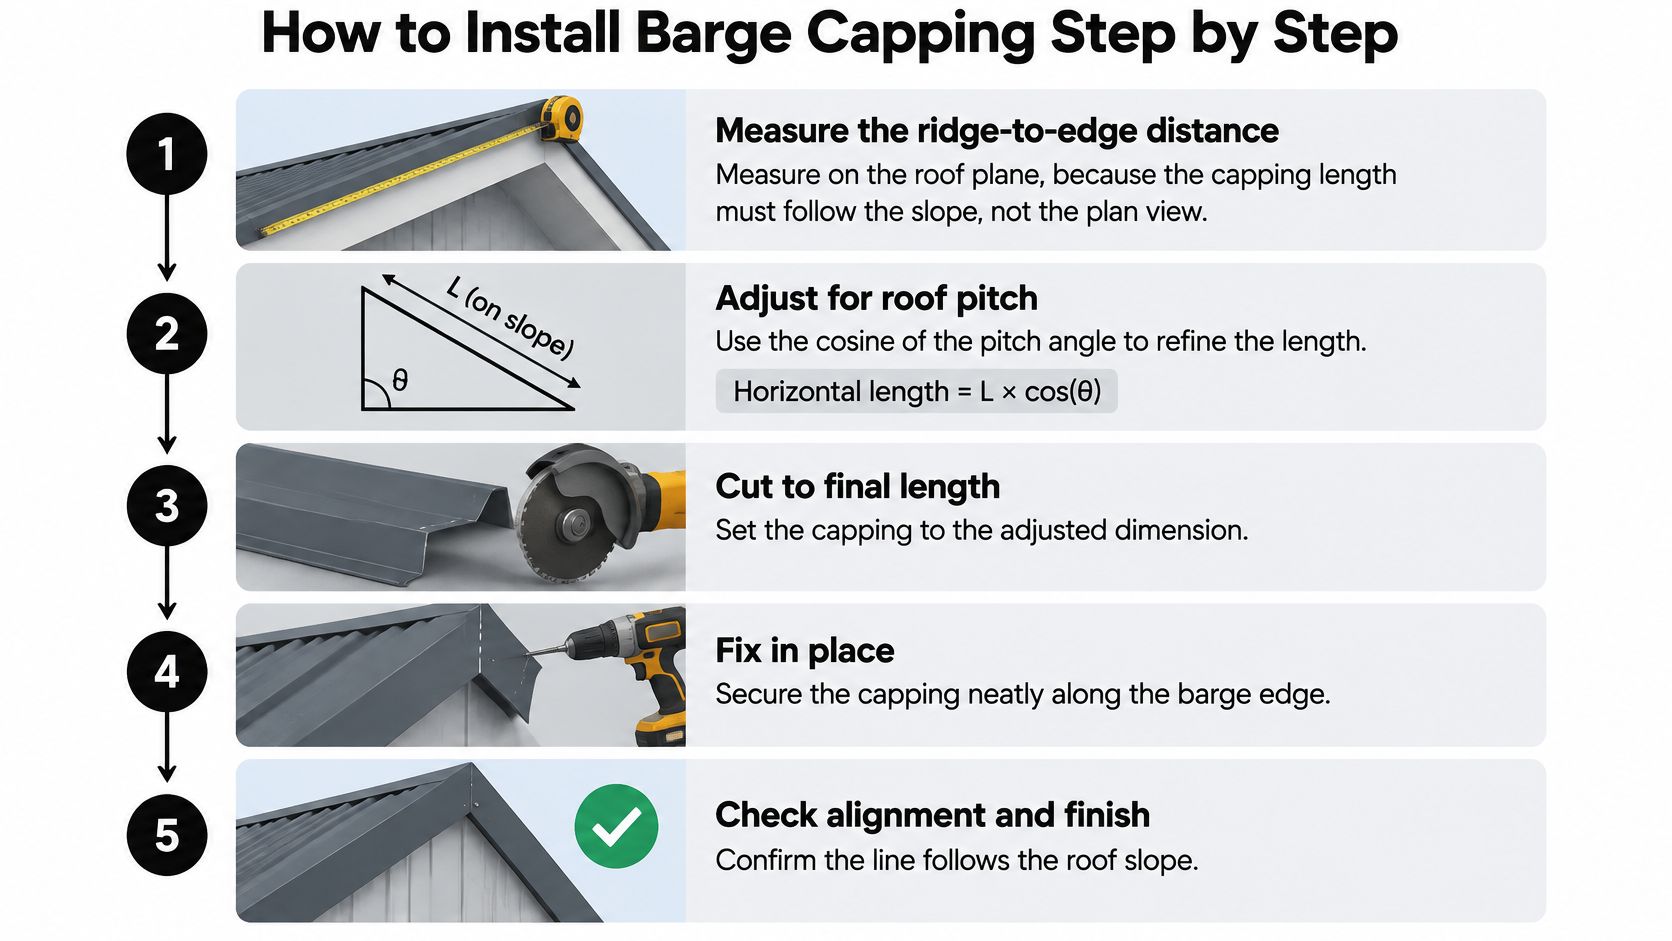
Measure the ridge-to-edge distance along the barge line. The capping follows the slope, so a plan-view measurement taken from drawings will come up short. Measure the actual line the piece must cover, at the pitch it must cover it.
Convert that measurement to the true sloped length. Divide the horizontal ridge-to-edge dimension by the cosine of the roof pitch. On a low pitch the correction is minor, and on a steep gable it grows enough to leave a fabricated piece short if you skip it.
Add extra length for on-site trimming before ordering. Ordering to the exact millimetre leaves no room to true up a ridge junction or a corner that isn't perfectly square. The final cut belongs on the roof, not in the order form.
Secure the barge mould at each fascia-to-barge corner. Rivet it to both adjoining members. The National Construction Code provisions referenced for this detail sit within roof cladding guidance where barge moulds at corners are fixed to both members, because an unrestrained corner is where water enters and suction starts local deformation.
Fix the capping at the designed spacing. The manufacturer's data sheet nominates a screw gauge and spacing, but that layout is only right once the engineer has matched it to the building's wind classification, edge-zone pressures, substrate thickness and capping profile. A printed spacing that ignores edge-zone pressure is a starting point, not a specification. Choosing the right screw type for the substrate matters too, as covered in our guide to roofing screws for a metal roof.
Lap each joint in the direction of roof fall. Keep laps long enough and close-fasten them so wind-driven rain can't be pushed uphill into the joint and the lap can't open under uplift. A lap facing the wrong way works like a scoop in a storm.
Form anti-capillary folds at edges and laps. Fold the metal edge the way the product system specifies so it breaks the surface tension path that lets water creep along the underside of the sheet. The fold is invisible from the ground and decisive in driving rain.
Inspect and photograph the finished edge. Check the line from the ground for waviness, then inspect corners, laps and fixings from safe access. Photograph each corner and joint for the handover record, so a later leak investigation starts with evidence rather than memory.
If the corner isn't restrained and the lap faces the weather, tighter screws elsewhere won't save the detail.
Cut with shears, nibblers or a cold-cut saw suited to coated steel, not an abrasive disc that burns the coating and showers hot particles over the roof. Deburr and touch up cut edges as the product system requires, clear swarf the same day, and don't leave loose offcuts to rust on the sheets. These habits cost little. Skipping them creates stains and corrosion that owners then blame on the capping material.
Signs of Barge Capping Failure and Their Causes
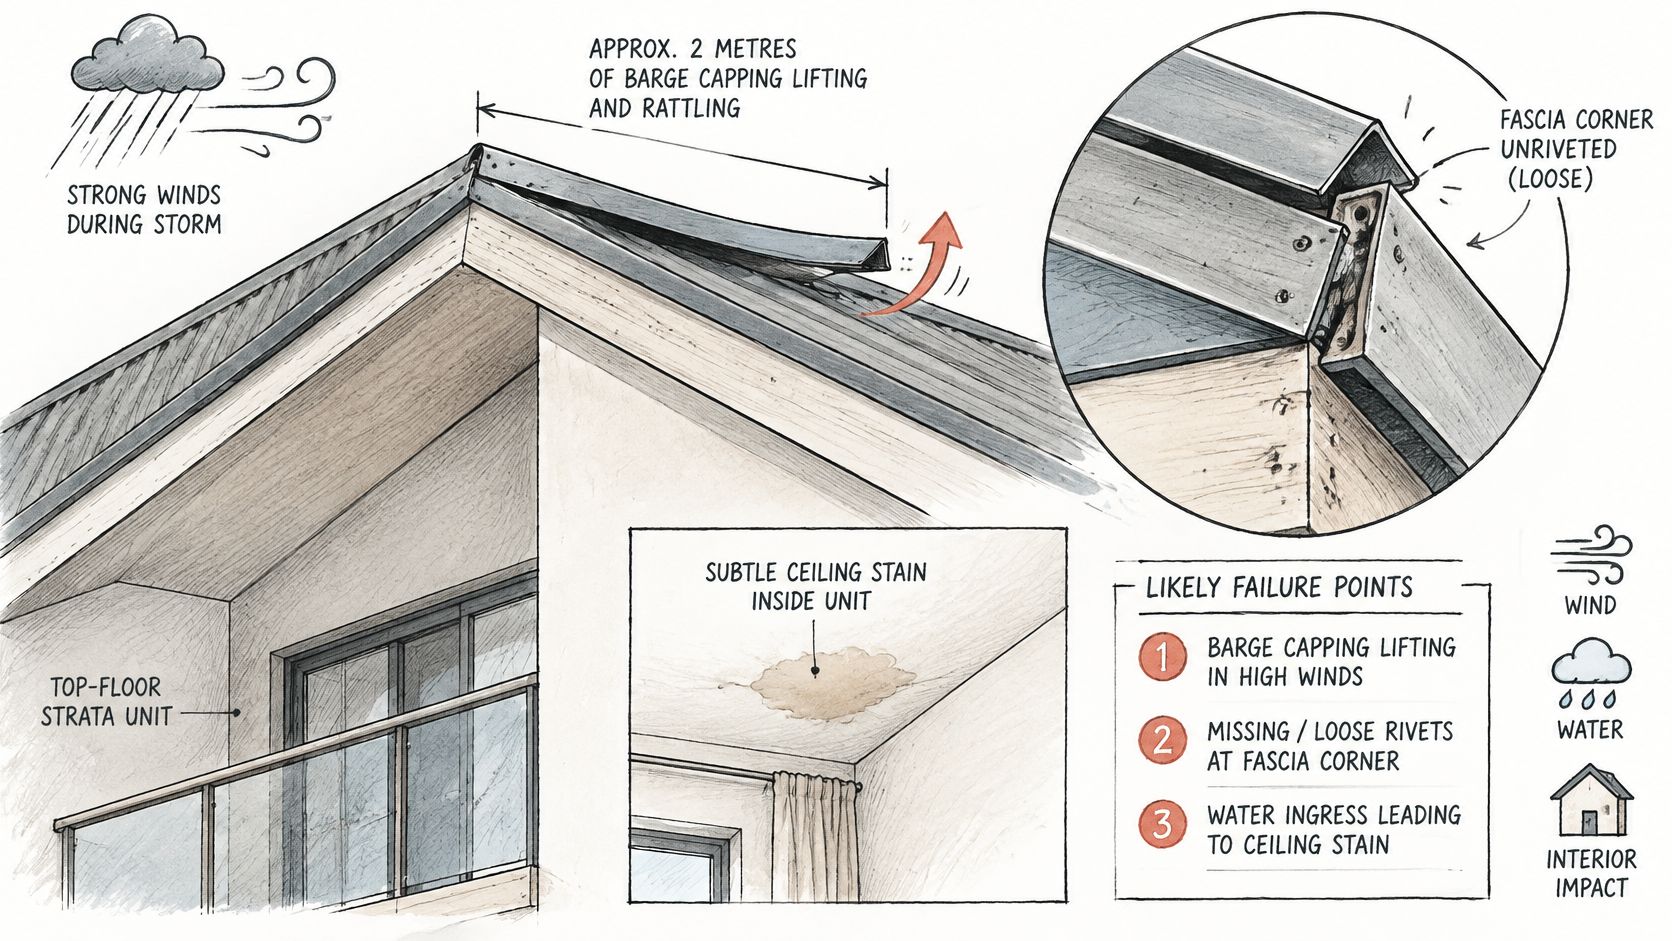
Say a strata block weathers a night of strong wind. Two metres of capping on one gable now lift and rattle, and the top-floor unit below shows a ceiling stain along the external wall. A close inspection finds three faults together. The fascia corner was never riveted, fixings sit wider than the wind class allows, and one lap faces against the roof fall. Wind lifted the free corner, rain entered the reversed lap, and the stain inside is the last step in that chain.
Read symptoms that way, as clues to a cause, not as isolated defects to patch with sealant.
| Symptom | Likely cause | First action |
|---|---|---|
| Capping lifted or rattling after wind | Fixings pulled out, spacing too wide or corner unrestrained | Inspect fixings and corners; re-fix to the engineer's spacing |
| Rust streaks or pitting on the capping | Galvanic reaction or unprotected cut edges | Identify the metal pairing; repair or replace with a compatible material |
| Water stain on the ceiling below the gable | Lap too short or facing the wrong way, or missing anti-capillary fold | Check lap direction and folds; reseal joints |
| Gaps at fascia corners | Corner not riveted to both members | Rivet the corner and check for deformation |
| Birds or debris under the capping | Open ends or missing closures | Fit end closures and inspect the underside |
| Fasteners backing out over time | Thermal movement with no slots or clips | Replace with suitable clips or slotted fixings |
Moisture exposure makes small edge faults deteriorate faster, particularly where salt and damp air sit under a lifted cap. That's why protecting roofs from coastal moisture through routine inspection and cleaning is worth including in a maintenance plan, even though your building's fixing design still has to suit Australian wind requirements.
For a building manager, I would keep the check order short. Look at corners and fixings first, because restraint fails there. Then check laps and folds, because they explain most gable-end water entry. Then check the metal pairing, because repeating rust after a repaint usually signals incompatibility or unsealed cut edges. If the same sign repeats after a repair, stop patching and get a written roof inspection report that separates capping failure from sheet or underlay failure underneath.
Aesthetic Options for Strata and Commercial Roofs
Choose the finish after the material and fixings are settled. A premium colour can't rescue a reversed lap, and concealed fixings won't hold a corner that was never designed for the wind zone. Once performance is locked in, the edge is one of the cheapest ways to make a commercial facade read as cared for.
The following options show how profile and colour change the street view without changing the roof underneath.
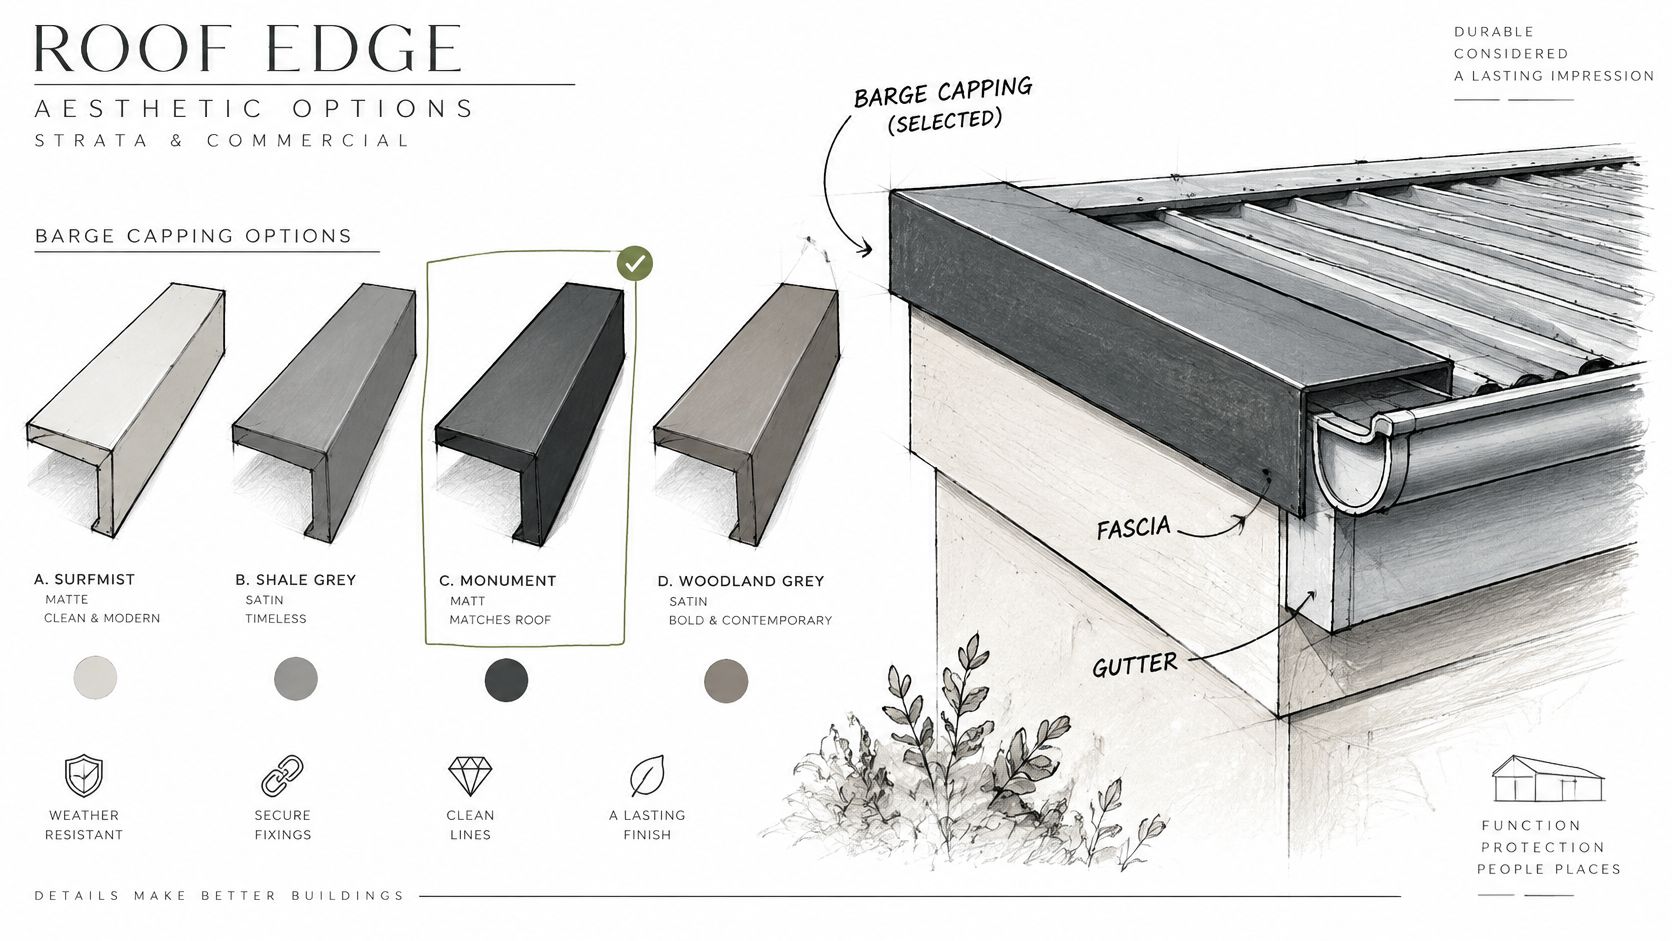
Four Decisions That Change the Look
Colour should match the fascia, gutter and cladding so the edge reads as one continuous line. A contrasting cap can work on a designed facade, but an accidental mismatch just looks like a repair. Surface is next. Pre-painted steel gives the widest colour range and a consistent finish. Zinc and copper develop a patina over time, which some owners prefer and others read as staining, so show the committee aged samples, not just bright new metal.
Fixing visibility affects how finished the building looks from the street. Concealed or snap-on profiles give a clean line on retail and strata facades, while exposed screws are honest, cheaper and easier to inspect on a warehouse. Profile scale matters more on taller buildings. A shallow cap that's crisp on a single-storey shed can disappear on a three-storey block, so use a deeper profile where the edge needs to read at street level.
This short video helps owners visualise how a folded edge profile sits against the sheet and fascia before they commit to a scale.
Say a three-storey strata block replaces patchy, unpainted zincalume with a colour-matched box profile and concealed fixings. The wind design and laps stay the same, but visible screw corrosion disappears and the gable line matches the gutters. That's a governance decision as well as a visual one. Facade and colour changes on strata buildings usually need owners corporation approval, so check the by-laws and approval process before ordering, not after the metal arrives coloured.
Confirm the Specification Before You Order Capping
Don't order folded metal on a verbal description. Run this checklist and make the installer fill every line in writing:
- Roof and cladding type: Sheet profile or tile type, plus substrate and batten material.
- Wind class confirmed: Recorded by the engineer or certifier for this building, not copied from a previous job.
- Compatible capping material: Metal family, finish and fasteners checked against the sheets and neighbouring components.
- Fixing method and spacing: Taken from the applicable fixing requirements and confirmed for edge-zone pressures.
- Lap and fold detail: Lap direction with roof fall, joint treatment and anti-capillary folds included in the shop drawing.
- Access and safety plan: Fall protection, safe sheet access and photographic handover records agreed before work starts.
If you're comparing suppliers, the principles behind sustainable procurement with Hutter Architects are useful here. Specify durability, compatibility and repairability up front, rather than buying the cheapest length and paying twice through early corrosion or rework.
The first decision, though, isn't which capping to buy. It's whether the fault sits in the capping, its fixings, or the sheets and underlay underneath. A roof inspection with a written report answers that question and gives a committee a documented basis to approve repair or replacement. We offer roof inspection services, and where the building needs safe future access, roof safety systems such as anchor points, walkways and access platforms can be planned with the repair. If old material must come off, it's removed following safety standards so business operations aren't disturbed.
I would not approve any barge work without two documents. Ask for a written fixing schedule tied to the wind class, and an inspection report with corner and lap photos. If those are clear, ordering the right profile in the right metal becomes a straightforward fabrication job.
If your gable edge is rattling, rusting or letting water into the top floor, Commercial Roofers can inspect the barge capping, fixings and sheets underneath, then give you a written report and a compliant fixing schedule before any metal is ordered. Visit Commercial Roofers to request an inspection for your Sydney commercial or strata building and get the edge detail sorted on evidence, not guesswork.