You're usually not dealing with a dramatic gush through the ceiling. It's more often a brown stain over a tenancy corridor, a drip over pallet racking after rain, or a musty patch near an office wall that keeps coming back after someone “fixed” it last year.
That's why learning how to detect roof leaks on a commercial or industrial site isn't really about finding one wet spot. It's about working out where water entered, how far it has travelled, what building elements it has already affected, and what it's likely to cost you if you let it sit. For a property manager in Sydney, the risk isn't limited to the roof repair. It's stock damage, slip hazards, tenant complaints, downtime, mould, and awkward insurance conversations when the leak clearly wasn't new.
Table of Contents
- Your Pre-Inspection Safety and Preparation Checklist
- Finding the First Clues Inside Your Building
- A Systematic Exterior Inspection for Commercial Roofs
- Using Advanced Diagnostics to Pinpoint Hidden Leaks
- Documenting Findings and Engaging Professionals
Your Pre-Inspection Safety and Preparation Checklist
Safety is paramount. A leak inspection isn't worth an injury, and on a commercial roof the hazards usually include height, brittle materials, live services, poor access, and wet surfaces.
Start with site risk, not the leak
Before anyone goes up, confirm whether access is safe that day. If the roof is wet, wind is up, or the access route is compromised, the inspection waits. That applies even if the tenant is pushing for an urgent answer.
Use a site-specific approach. Commercial roofs vary too much for generic advice to be reliable. A warehouse with older skylights, a strata block with multiple plant platforms, and an industrial site with asbestos-clad sections all need different controls.
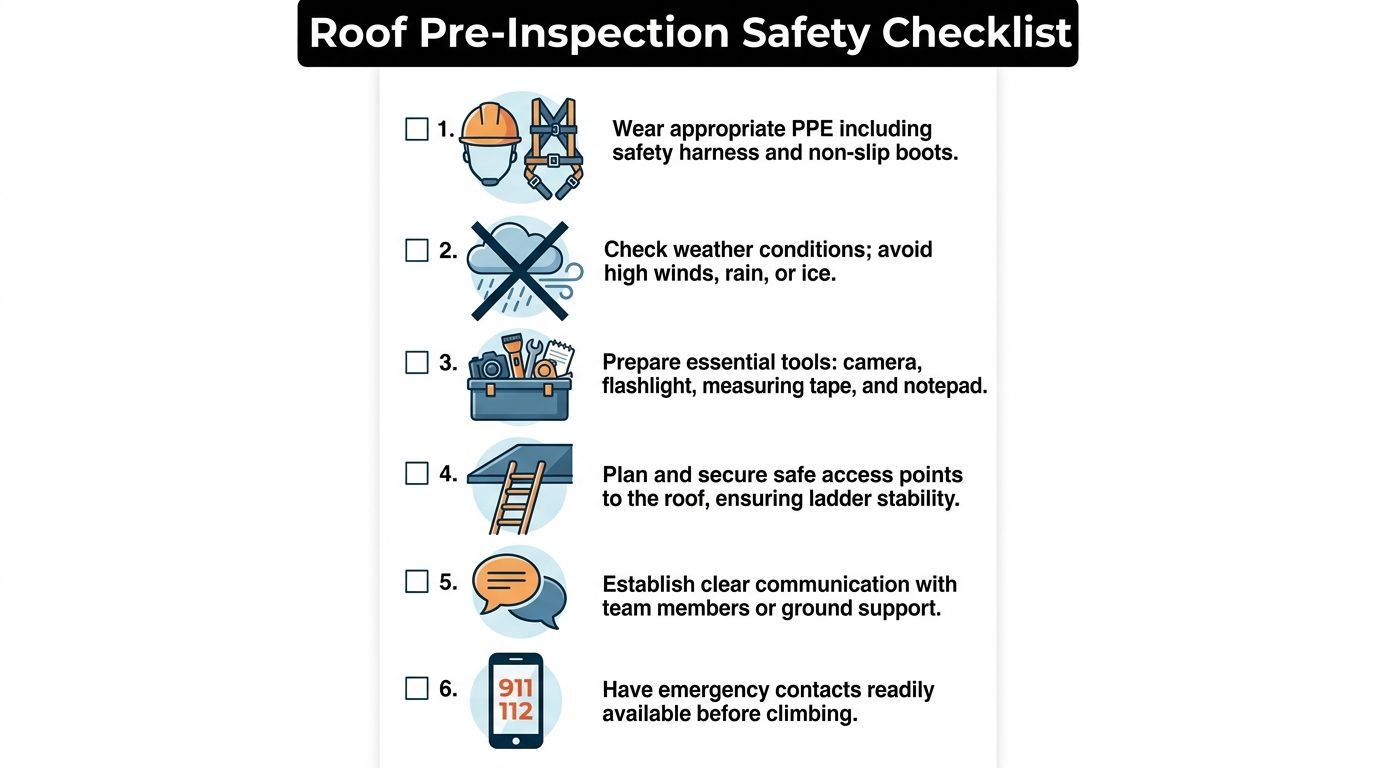
Practical rule: If you don't know the roof type, load limits, access points, and fall risks, you're not ready to inspect it.
If you're still at the stage of lining up the right trade, it helps to understand what a local commercial contractor should inspect and report on. A guide to choosing a commercial roofer near you in Sydney can help you filter out residential-style leak chasing that doesn't suit industrial buildings.
Gather the documents before anyone climbs
The best leak inspections usually start in the office, not on the roof. Pull together anything that narrows the search area or explains prior failures.
Useful records include:
- Roof plans and reflected ceiling plans so you can match internal leak signs to roof penetrations, box gutters, expansion joints, and parapets.
- Previous maintenance reports because repeat leaks often occur at the same curb, flashing line, or drainage point.
- Photos from earlier repairs which show patch history, membrane joins, sealant work, and whether repairs were localised or broad.
- Tenancy incident notes including when the leak appears, which wind direction or rainfall pattern seems to trigger it, and whether it affects operations or stock.
A lot of wasted time comes from treating every leak as a fresh problem. On commercial sites, it often isn't. It's a known weak point that was patched without addressing the pathway.
Bring the right inspection kit
You don't need a ute full of gear for a preliminary visual check, but you do need more than a phone torch.
A basic commercial inspection kit should include:
| Tool | Why it matters |
|---|---|
| High-lumen torch | Lets you inspect ceiling voids, plant bases, laps, and underside staining |
| Camera or phone with timestamp | Creates a record for repair briefs and insurance files |
| Chalk or marking crayon | Marks suspected external points for follow-up |
| Tape measure | Helps map defects against plans |
| Notepad or digital form | Captures location, weather, and defect type while it's fresh |
| Moisture meter if available | Helps confirm suspicious internal materials before invasive work |
Also check access equipment, PPE, and communication arrangements before the inspection starts. If someone goes onto the roof, there should be a clear plan for entry, exit, and emergency response.
Finding the First Clues Inside Your Building
It is 6:30 on a Monday. The tenant opens the warehouse, finds a wet aisle, two damaged pallets, and a ceiling tile starting to bow over a pedestrian path. By the time anyone looks up, the problem is already bigger than a roof defect. It is stock loss, a safety risk, and a question your insurer may ask later if the signs were visible and left to run.
Internal evidence gives you the fastest read on business impact. It also helps narrow the search zone before anyone starts opening ceilings or sending crews across a large commercial roof.
Read the building from the inside out
Start with the complaint location, then work outwards in a pattern. On commercial and industrial sites, the first report is often incomplete. A tenant may only notice the drip over reception, while the more useful clue is a damp service corridor, rust on a portal frame, or cartons going soft in racking two bays over.
Common internal indicators include:
- Ceiling stains and active drips in offices, corridors, warehouses, plant rooms, and amenities
- Peeling paint or bubbling finishes on walls, bulkheads, and set plaster surfaces
- Musty odours that point to trapped moisture, mould, or long-term saturation in concealed spaces
- Sagging ceiling tiles or plasterboard that create a safety issue and may require immediate isolation
- Rust marks on steel elements or staining around fixings, conduits, and suspended services
- Damaged cartons, packaging, or stock under what appears to be a small leak path
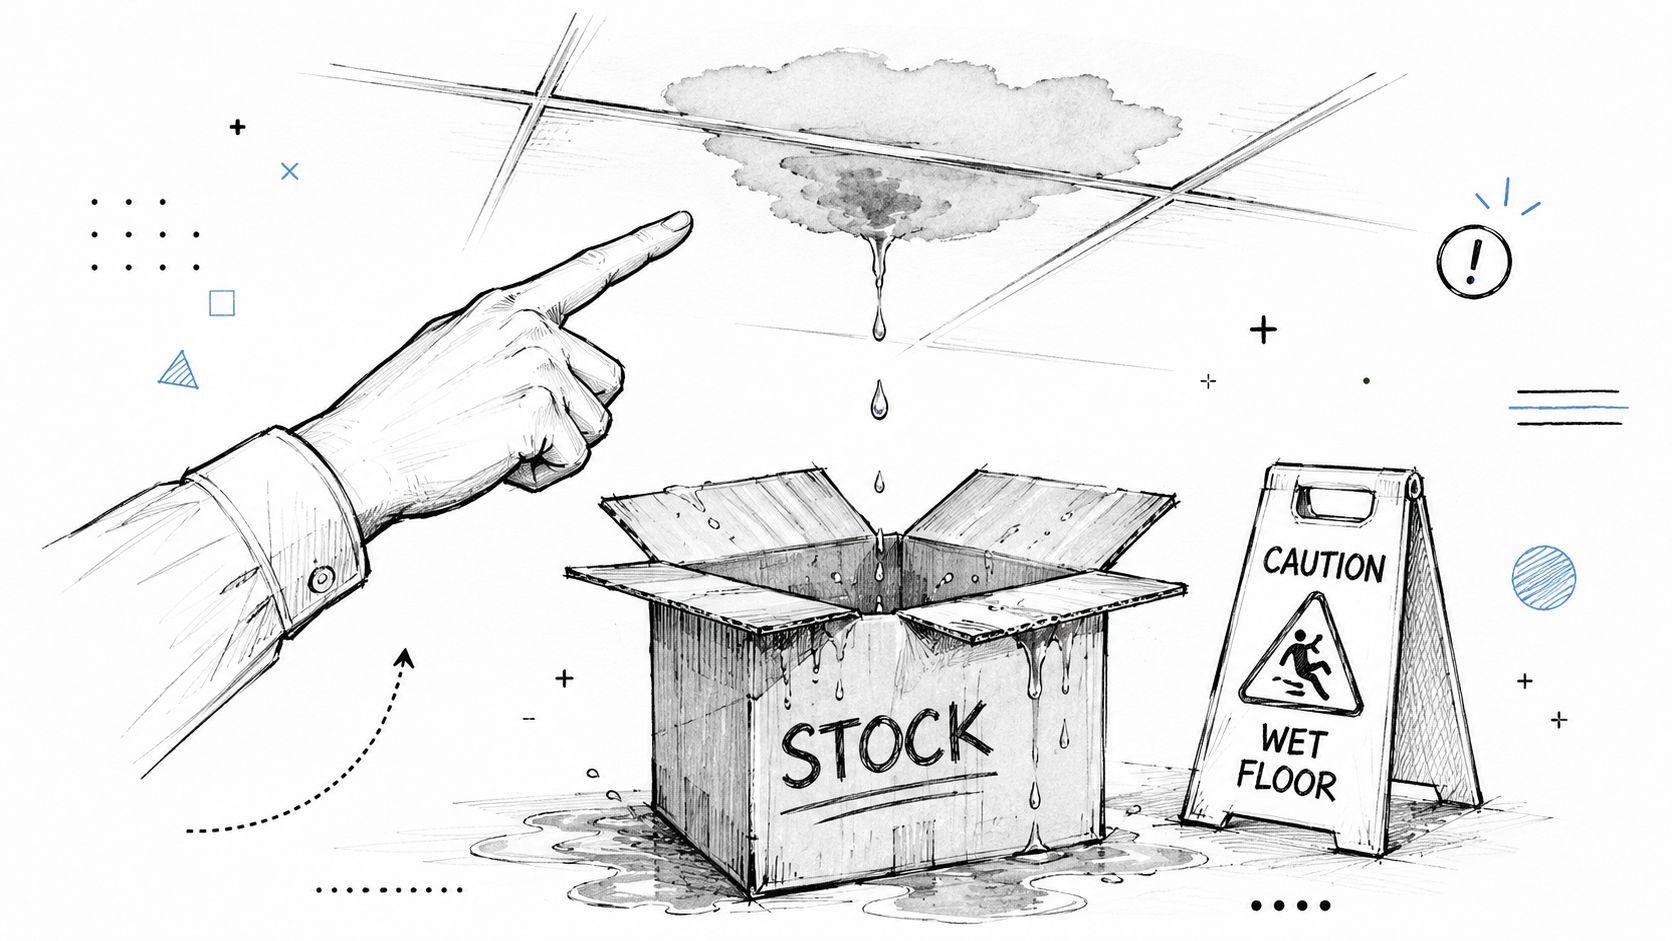
In Sydney industrial buildings, I often see the roof leak itself treated as the minor cost. The expensive part is the disruption around it. Staff shift product away from the area, access routes get blocked off, electrical contractors are called in to make circuits safe, and tenants start documenting every incident for a lease or insurance dispute.
Trace the path, don't trust the drip point
The drip is only the release point. Water can enter metres away, then travel along purlins, cable trays, insulation facings, roof deck flutes, conduits, or the underside of sheet laps before it shows itself indoors.
That is why delayed action gets expensive. The longer a leak runs, the more likely you are dealing with secondary damage such as mould, saturated insulation, corroded fixings, ceiling replacement, stock write-offs, and arguments over whether the damage was sudden or the result of poor maintenance.
Use this internal tracing process:
- Mark the exact symptom location on a plan, bay grid, or reflected ceiling plan.
- Check the ceiling void or underside of the roof if safe access is available. Look for wet insulation, stained framing, corrosion, residue lines, and fresh water tracks.
- Follow the fall and the structure. Water usually runs along the easiest path created by slope, framing, and services.
- Log nearby penetrations and building elements such as ducts, pipework, cable trays, access hatches, skylights, and internal box gutters.
- Check whether the issue lines up with known drainage paths. Blocked or undersized outlets often present indoors before anyone notices ponding outside. A quick review of commercial roof gutter and drainage failure points helps frame what to look for.
- Compare all affected areas if more than one tenancy, room, or aisle has signs of moisture. Separate symptoms can still trace back to one failed detail.
One clear stain can mislead you.
I have seen teams patch the roof directly above a ceiling mark, only to find the entry point was a failed penetration flashing several metres upslope. I have also seen active leaks blamed on the membrane when the underlying issue was condensation around poorly insulated services. The internal inspection is where you sort those possibilities before spending money on the wrong repair.
If your building was constructed before 1990, treat ceiling access and any planned intrusive inspection carefully. Asbestos-containing materials may be present in insulation, linings, backing boards, pipe lagging, or old service penetrations. Property managers should not authorise cutting, drilling, or disturbing suspect materials without checking the asbestos register and using the right licensed contractor where required.
The goal inside the building is simple. Identify the impact, reduce immediate risk, and give the roof inspection a defined target area. That shortens downtime, improves the repair brief, and puts you in a stronger position if the insurer asks what was done once the first signs appeared.
A Systematic Exterior Inspection for Commercial Roofs
A warehouse manager in Wetherill Park sees one ceiling stain over aisle 7 and wants a quick patch above it before the next delivery run. That approach is how small leaks turn into stock claims, disrupted tenancies, and arguments with insurers about delayed action. On commercial roofs, water often enters at one detail, travels along purlins or insulation, and shows up well away from the defect.
Inspect the roof in a set sequence from the identified risk zone outward. Start at the high side of the affected area, then work across laps, penetrations, terminations, drainage points, and plant supports. Random walking wastes time and often produces the wrong repair brief.
Commercial leaks rarely come from the field of the roof alone. The trouble usually sits at a change in direction, a change in material, or a point where another trade has penetrated the system.
Metal roofs and sheeted systems
On metal roofs, the centre of the sheet is often sound. The weak points are the details.
Check these first:
- Penetration flashings around vents, flues, pipes, supports, and conduits. Look for split rubber boots, lifted aprons, cracked sealant, failed rivets, and poor termination at the upslope side.
- Fasteners and washers that have backed out, lost compression, or distorted the sheet profile.
- End laps and side laps where sealant has failed, laps were installed poorly, or wind-driven rain can track uphill.
- Corrosion points at cut edges, previous patch repairs, ponding areas, and locations where dissimilar metals meet.
- Skylights, ridge details, and transition flashings where movement opens small gaps over time.
Thermal movement matters on long commercial sheet runs. A roof can look serviceable in dry weather and still leak badly during a southerly change because the flashing has opened up by a few millimetres around a curb or penetration. That is enough to send water under the sheeting.
Membrane roofs and low-slope areas
Membrane roofs need a slower inspection. Foot traffic, later service work, and standing water all leave clues, but the leak entry point may still be a small detail rather than an obvious tear.
Focus on:
- Seams and welded joints on TPO, PVC, and similar systems
- Punctures and cuts caused by service contractors, dropped tools, or unsecured equipment
- Blisters, ridging, and local movement that can indicate trapped moisture or bond failure
- Parapet upturns, corners, and termination bars where water can get behind the membrane
- Drain surrounds, sumps, and local low points where debris and settlement keep water in contact with the system longer than intended
Recurring ponding is not just an appearance issue. It shortens the service life of details, increases the chance of concealed wet insulation, and makes later leak tracing more expensive.
Edges, drainage points and rooftop plant
Drainage failures deserve the same attention as the roof covering itself. Box gutters, sumps, outlets, rainwater heads, overflow provisions, and downpipe entries are common starting points for commercial leaks, particularly on older industrial buildings with limited falls. If drainage looks marginal, review these commercial gutter and drainage failure points before approving isolated patch repairs.
Then inspect every item fixed to the roof in the affected zone. HVAC units, condensate lines, cable trays, solar mounts, access hatches, pipe supports, and satellite brackets create leak paths when penetrations were flashed poorly or later disturbed by other trades. I see this regularly on multi-tenant sites where service contractors solve their own access problem and leave the property manager with the water ingress bill.
A simple comparison helps keep the inspection disciplined:
| Roof area | Typical failure pattern | What usually gets missed |
|---|---|---|
| Penetrations | Split flashing, failed sealant, loose terminations | Water entry behind the visible seal line |
| Parapet edges | Cracked capping joints, poor membrane turn-ups | Water tracking behind wall finishes |
| Gutters and outlets | Blockage, corrosion, poor falls | Backflow into laps or wall junctions |
| Plant curbs | Movement, patch repairs, incompatible sealants | Multiple small leaks around one unit |
Small defects cause large claims.
On older industrial properties, check the asbestos register before any intrusive inspection or sample taking. Roof sheeting, backing materials, penetrations, and plant upstands may involve asbestos-containing products. If there is any doubt, do not cut, drill, scrape, or disturb the area during an informal roof check.
Using Advanced Diagnostics to Pinpoint Hidden Leaks
A warehouse leak rarely lands where the failure started. Water can travel along insulation, purlins, cable trays, and deck ribs before it shows itself over stock or a walkway. On commercial sites, that is why guesswork gets expensive fast. You pay for repeat callouts, patch repairs in the wrong location, and avoidable disruption to tenants or operations.
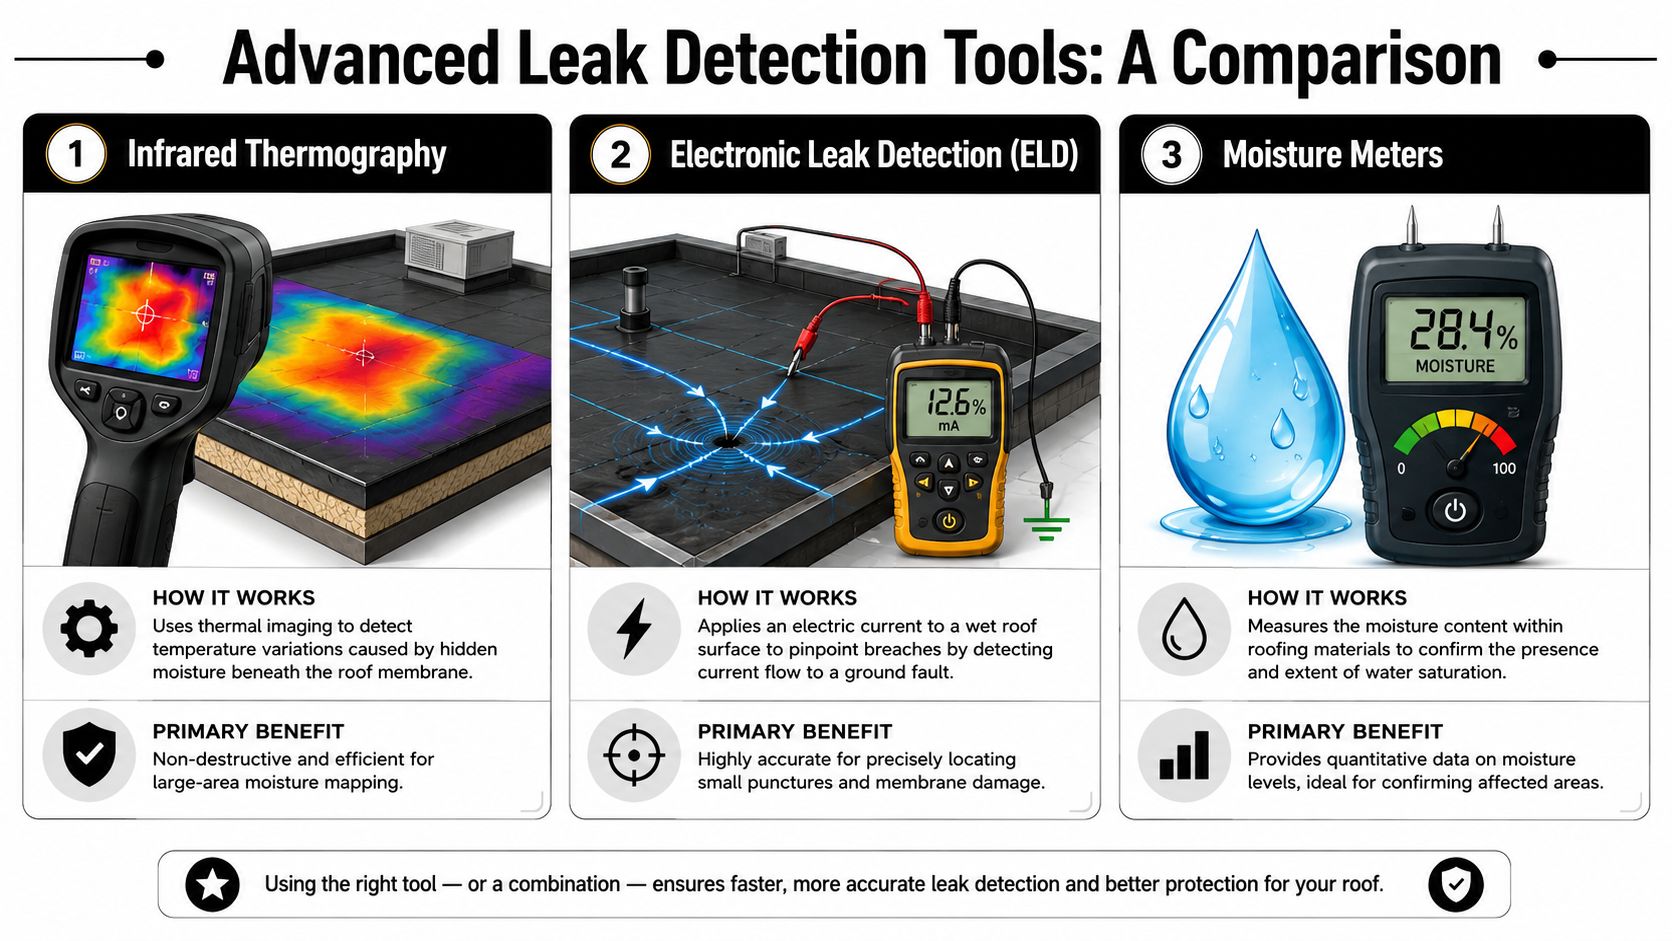
Advanced diagnostics help narrow the source before anyone starts cutting, stripping, or replacing large sections. For Australian commercial and industrial roofs, the right method depends on the roof system, recent weather, access constraints, and whether you need to protect an insurance position with clearer evidence.
When infrared thermography makes sense
Infrared thermography is a screening tool for broad flat or low-pitch roof areas where trapped moisture may be present but the entry point is still uncertain. It reads temperature variation across the roof surface, which can help identify wet insulation or moisture-affected sections when conditions line up.
It works best after the roof has taken on enough heat during the day and begins to cool. Timing matters. So does the roof build-up.
Use IR where you need to:
- scan a large roof area efficiently before approving invasive testing
- prioritise suspect zones on a complex industrial roof
- compare moisture patterns across multiple sections after recurring leaks
- build a stronger scope of works before major repair or replacement decisions
IR also has limits that property managers need to understand before relying on it. Reflected heat, shaded areas, recent rain, ballast, surface contamination, and complex assemblies can all distort readings. A thermal image is not a repair scope on its own. It is a way to focus the next step.
Where electronic leak detection is strongest
Electronic leak detection is more precise on suitable membrane roofs, particularly where a small puncture or failed seam is suspected but not visible. Industry guidance from the National Roofing Contractors Association on electronic leak detection for low-slope roof systems explains why this method is used to trace breaches in non-conductive membranes under the right site conditions.
For a property manager, the business benefit is straightforward. If the roof is a candidate for ELD, you may be able to confirm one localised breach instead of approving broad replacement based on suspicion.
ELD is usually the stronger option when you need to:
- pinpoint a membrane breach accurately
- verify if a previous repair sealed the defect
- separate isolated damage from wider moisture issues
- record exact defect locations for contractors and insurers
If your site includes transitions between membrane areas and sheeted sections, diagnosis also needs to account for how those systems fail differently. This guide to commercial metal roofing repair considerations is useful on mixed commercial roofs where the leak path crosses between materials.
Verification matters more than the gadget
No diagnostic method removes the need for confirmation on site. Good contractors use these tools to reduce uncertainty, then verify findings with moisture meters, targeted opening-up, or controlled flood testing where appropriate and safe.
That matters on older Sydney industrial buildings, especially where asbestos risk changes what can be disturbed and by whom. It also matters for insurance. If a claim later turns on whether the issue was storm damage, deferred maintenance, or a long-term moisture problem, a verified diagnostic record carries more weight than another round of sealant.
A practical rule applies here:
If the leak has repeated, spread, or remained uncertain after a standard inspection, stop approving trial-and-error repairs. Authorise targeted diagnostics and confirm the result before larger money is spent.
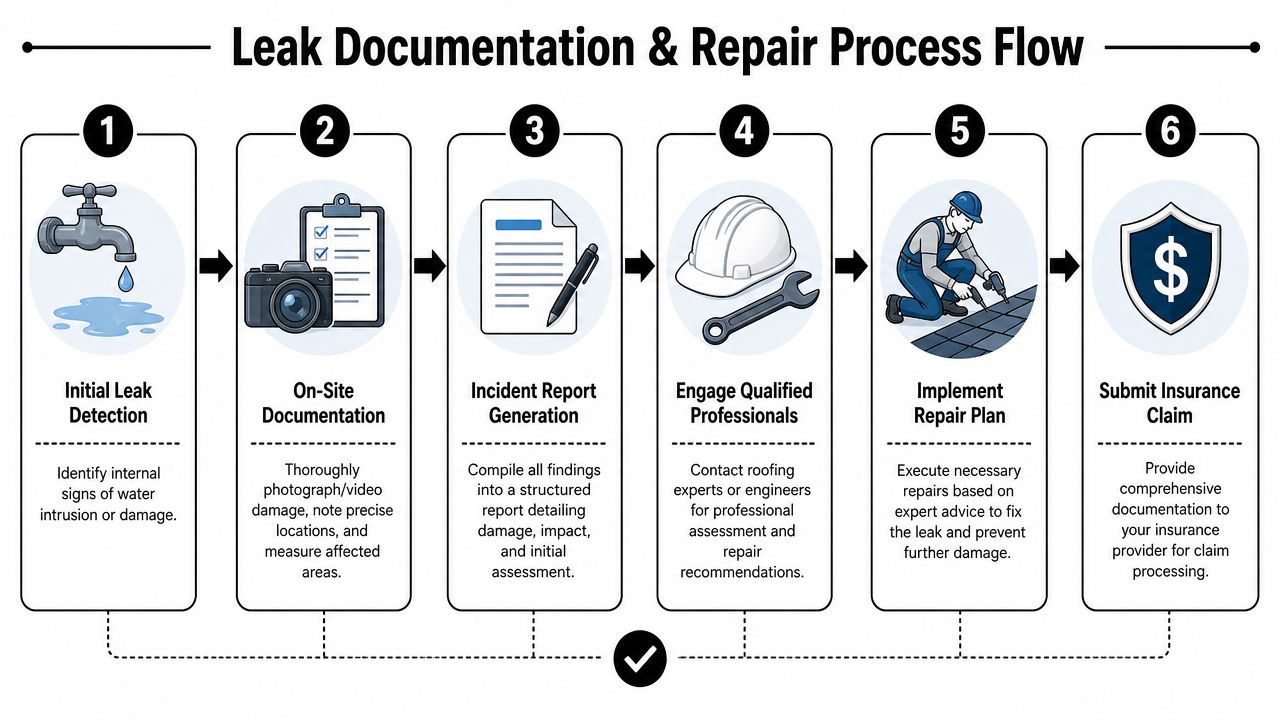
Documenting Findings and Engaging Professionals
A Sydney warehouse leak rarely stays a roof problem for long. By the time water reaches stock, trips an RCD, or forces a tenant to shift operations, the repair cost is only one part of the loss. The record you keep in the first 24 hours often shapes the insurance discussion, the contractor's scope, and how much downtime follows.
Build a record that supports repairs and claims
Document the leak as if a different contractor, your insurer, and the building owner will all need to review it later. In practice, they usually do.
Your file should show four things clearly. Where the water showed up, where it may have entered, what it affected, and what was done on the day to make the site safe. If any one of those is missing, people start guessing. Guessing leads to repeat callouts, disputed scopes, and arguments over whether the issue was storm-driven, maintenance-related, or allowed to worsen over time.
Include:
- Dated photos and short videos of internal damage, external defects, access points, and any temporary protection
- A roof plan or marked-up sketch showing suspected entry points, drainage runs, plant, penetrations, and the matching internal symptoms below
- A timeline covering when the leak was first noticed, what the weather was doing, and whether the issue is constant, intermittent, or tied to wind-driven rain
- Operational impact notes such as affected stock, isolated work areas, slip hazards, tenant complaints, damaged ceilings, or shutdown risk
- Previous repair history including patching, sealant work, contractor attendance, and whether the same area has failed before
For larger commercial sites, add one more item. Record the business consequence in plain terms. List the tenancy involved, the area made unusable, any stock at risk, and whether critical plant or electrical infrastructure was exposed. That gives owners a basis for approving the right repair scope early, instead of defaulting to the cheapest patch and paying for it again next storm.
Know when to stop investigating
Property managers can do the first round of evidence gathering. They should not keep pushing once the leak pattern suggests a broader roof failure, concealed moisture spread, or a safety issue.
Bring in professionals when you see any of the following:
- Multiple leak symptoms across one roof zone
- Recurrence after patch repairs or sealant work
- Ponding, sagging, or visible structural movement
- Water near switchboards, lighting circuits, data rooms, or production equipment
- Signs that moisture has moved into insulation, wall cavities, or ceiling assemblies
- Unclear roof build-up, uncertain substrate condition, or limited safe access
At that point, the job changes from finding a drip to managing risk. A qualified commercial roofer should inspect, confirm the failure point, and set out what needs immediate make-safe work versus what can be programmed. If the cause is still uncertain, the contractor may need targeted opening-up, moisture testing, or other verified diagnostic work already discussed earlier in this guide.
Written reporting matters here. A contractor's mark-up plan, defect photos, and test notes give the next crew a fixed reference point. They also reduce the common commercial problem where three separate contractors attend the same leak over 12 months and each starts from scratch.
Asbestos changes the process
On older NSW commercial and industrial properties, leak detection can cross into asbestos compliance very quickly. Sheeting, gutters, flashings, backing materials, and associated products may all be suspect on older sites.
If asbestos is possible:
- Stop any invasive inspection work until the material is identified.
- Check the site asbestos register and past maintenance records before anyone cuts, drills, scrapes, or removes components.
- Keep staff and unrelated trades away from the area if there is any risk of disturbance.
- Use appropriately licensed asbestos professionals where assessment, removal, or remediation is required.
NSW requirements are set by SafeWork NSW, and asbestos registers are mandatory for many workplaces with asbestos-containing material. Review the current guidance from SafeWork NSW on asbestos in workplaces.
Small mistakes can quickly become expensive. A contractor who treats an asbestos-clad roof like a standard metal leak can turn a repair job into a contamination event, a regulator issue, and a much larger claim.
The practical takeaway is straightforward. Detect early, inspect systematically, document everything, and escalate before secondary damage spreads. That is how commercial properties avoid turning a manageable defect into an expensive interruption.
If you need a commercial roofing team to inspect, document, and repair a persistent leak properly, Commercial Roofers works across Sydney on warehouses, factories, strata buildings, and other commercial sites. They handle leak detection, reporting, repairs, asbestos roof replacement, and broader roofing works with in-house crews and a strong focus on safety, compliance, and minimal disruption.