
A commercial roof leak usually announces itself at the worst time. You arrive after overnight rain, a tenant has sent photos of a stained ceiling tile, stock has been moved away from a drip, and someone wants to know two things straight away. Where is the water getting in, and how fast can it be fixed without shutting the place down?
On commercial sites, that second question matters as much as the first. A leak above an office is inconvenient. A leak above a warehouse aisle, electrical room, retail tenancy, plant area, or common corridor can become an operations problem within hours. The right response isn't random patching. It's a methodical roof leak detection process that starts inside, moves outward in stages, keeps people off the roof unless they need to be there, and creates a clean record for repairs and insurance.
Table of Contents
- The Unseen Costs of a Commercial Roof Leak
- Interior Clues The First Signs of Water Ingress
- A Phased Inspection From the Ground Up
- Advanced Testing Methods to Pinpoint Elusive Leaks
- Safety Protocols and When to Call Commercial Roofers
- Documenting Findings for Repairs and Insurance Claims
The Unseen Costs of a Commercial Roof Leak
A leak rarely stays in its lane. What starts as a brown mark on a suspended ceiling can lead to moved tenants, wet insulation, damaged plasterboard, stained fitout finishes, and urgent callouts for electricians or maintenance crews. In warehouses and industrial buildings, the bigger issue is often interruption. People stop using part of the floor, stock gets shifted, and access equipment has to be brought in around normal operations.
For strata managers, the pressure is different but just as real. One complaint from a top-floor occupant can quickly become several if water tracks through wall cavities or common property. The leak point on the roof might be small, but the consequence spreads through multiple lots and multiple trades. That's why guessing is expensive.
A rushed patch can also muddy the picture for repair scope and insurer discussions. If no one records where the water first appeared, what conditions were present, or which roof area was inspected, the next contractor has to start again. Time goes missing. So does budget certainty.
The cost of a leak isn't just the repair invoice. It's access disruption, tenant frustration, and the extra labour created when the first response is unorganised.
If you're trying to understand likely repair exposure once the source is confirmed, this guide to commercial roof repair cost ranges and drivers is a useful next read. But before anyone talks numbers, the leak has to be isolated properly. That starts inside the building, not on top of it.
Interior Clues The First Signs of Water Ingress
The first useful evidence is usually indoors. Before anyone looks at sheet laps, membrane seams, or box gutters, check where the building is telling you there's a problem.
What to look for at ground level
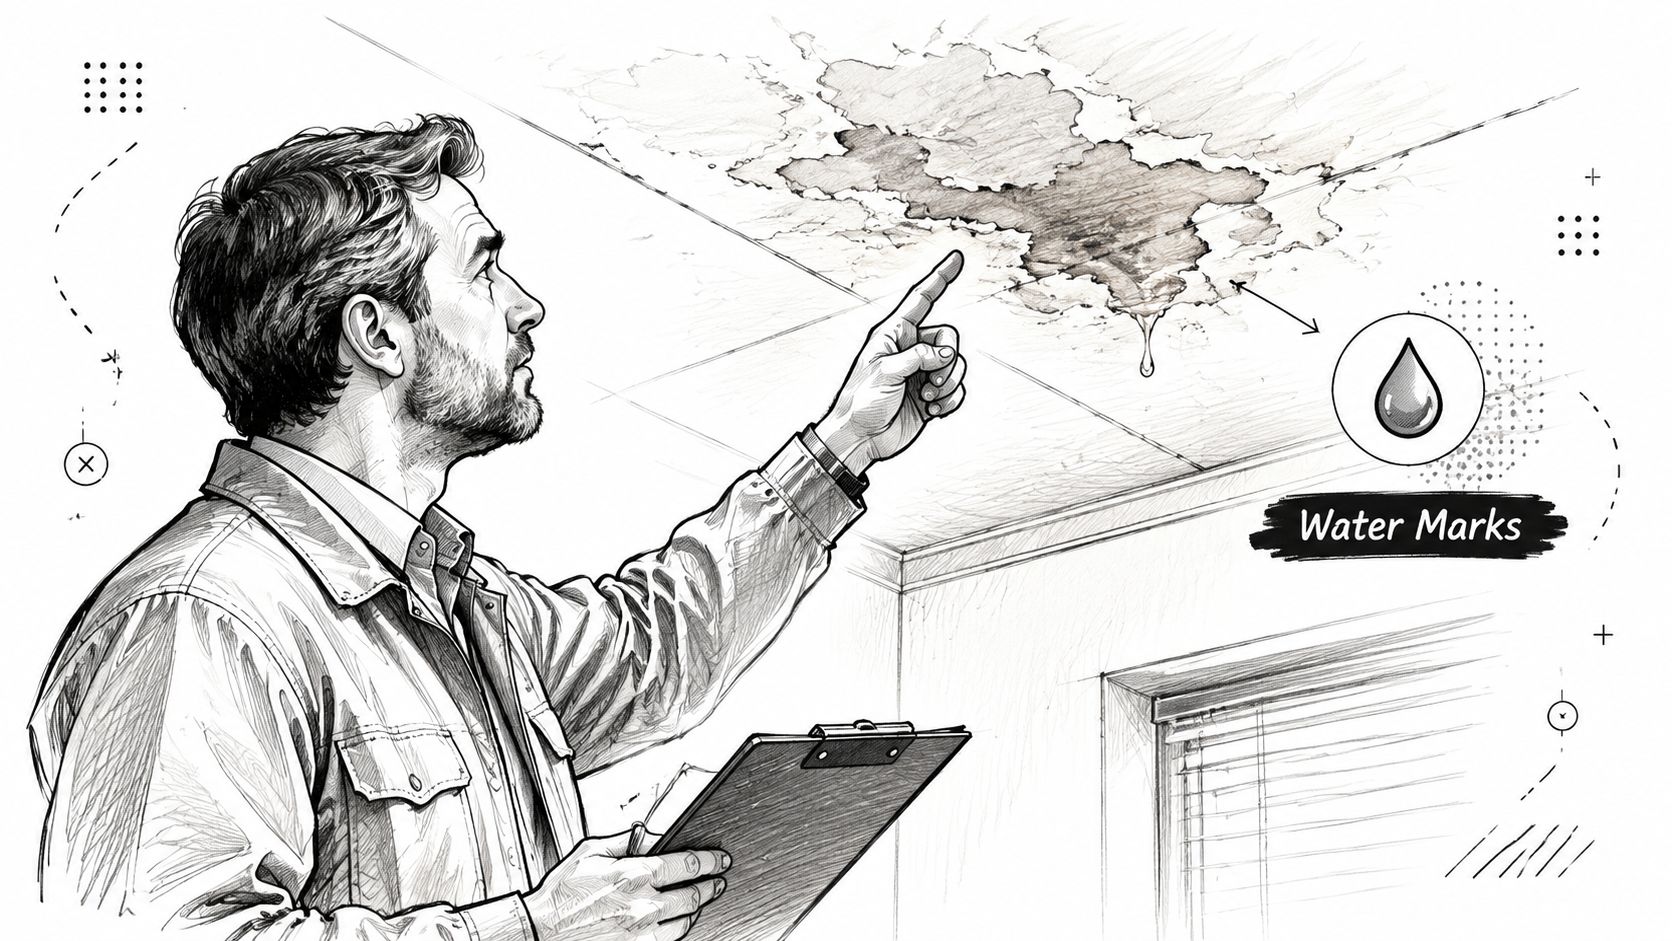
Water stains are the obvious sign, but they aren't the only one. On commercial properties, subtle changes often show up first around service penetrations and junctions.
- Ceiling tile discolouration: A yellow or brown ring often means water has entered, dried, and returned more than once. That usually points to a recurring issue rather than a one-off splash.
- Bubbling paint or swollen plasterboard: This suggests moisture has been sitting behind the finish long enough to break adhesion.
- Musty odour in one zone: If one office corner, stairwell, or plant room smells damp, moisture may be trapped above the ceiling or within a wall cavity.
- Marks around lights, diffusers, vents, or access panels: Water often follows services before it becomes visible. The fitting may not be the entry point, but it can be the exit point.
- Drips during wind-driven rain only: That pattern can indicate lateral tracking, failed flashing, or water being pushed under laps rather than a simple puncture above the stain.
A common mistake is to assume the drip is directly below the source. Sometimes it is. Sometimes water has travelled along purlins, ductwork, cable trays, or ceiling grids before dropping.
How to record the first evidence safely
Do the internal check before anyone moves tiles or opens cavities. The original condition matters.
Use a simple sequence:
- Take a wide photo first. Show the room, aisle, tenancy, or corridor.
- Then shoot close-ups. Capture stain edges, active drips, bubbling finishes, and affected fixtures.
- Note time and weather. Rain intensity, wind direction, and whether the leak appears only during storms can help later.
- Mark the spot on a floor plan. Even a quick sketch is enough if it identifies the room and nearest structural grid or wall.
Practical rule: Start with the evidence you can reach from the floor. Ceiling spaces, electrical fittings, and roof access come later, and only when it's safe.
What these clues usually mean
Interior clues help narrow the search area. A fresh drip with no staining can point to a recent breach. Long-term moulding or repeated staining suggests the building has been taking water for some time. Water around a skylight shaft or service riser often shifts the investigation toward roof penetrations. Dampness near a parapet wall can suggest coping, capping, or wall-to-roof junction issues.
The point isn't to diagnose the whole roof from inside. It's to give the external inspection a starting map so the search is disciplined, not random.
A Phased Inspection From the Ground Up
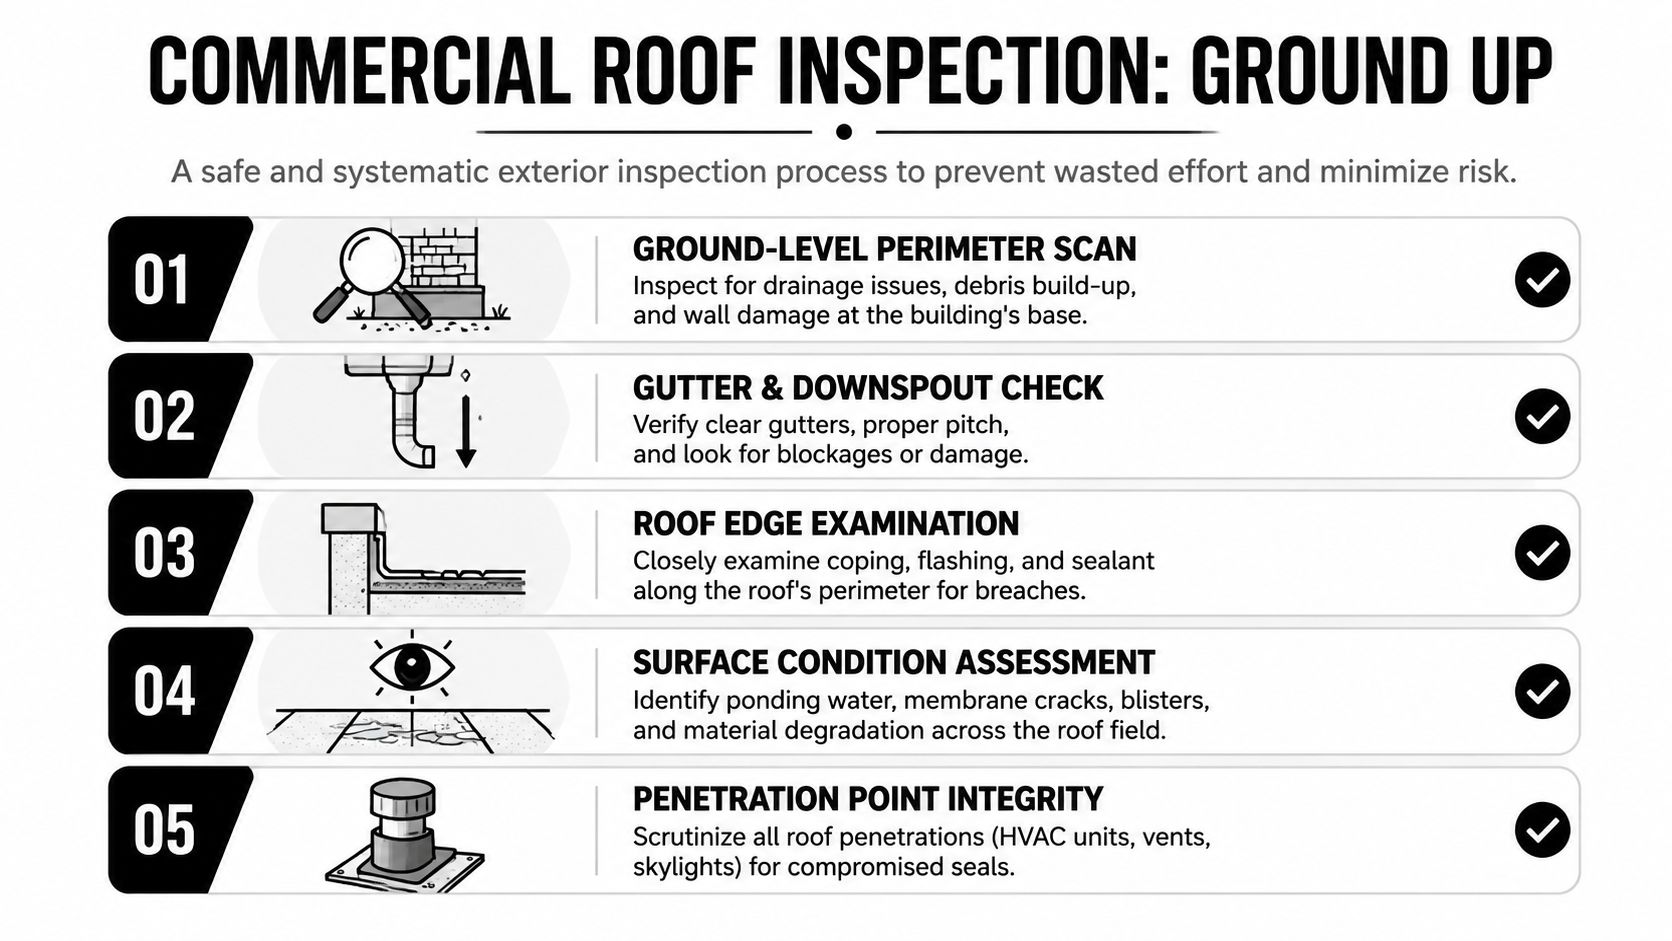
Good roof leak detection on a commercial building follows a sequence. You don't start by walking the entire roof and hoping something stands out. You work from the safest, least disruptive checks toward the higher-risk ones.
A ground-up process also reduces false assumptions. Water can enter at the roof, at a wall junction, around cladding, through blocked drainage, or at penetrations. If you skip the lower-risk checks, you often miss the actual path.
A simple phased checklist helps keep the inspection organised.
Start at the perimeter, not the ladder
Walk the building first. Look at downpipe discharge, overflow points, staining on walls, ponding near the base, and debris patterns that suggest drainage trouble above. On warehouses and strata blocks, overflow staining below a box gutter can tell you more in one minute than a long walk across roof sheets.
Then line up the interior report with the outside. If the leak showed up near a tenancy front corner, don't inspect the opposite end of the building first. Stay disciplined and work the zone.
A quick primer on roof flashing types used on commercial buildings is worth reviewing if you want to understand why certain junctions fail more often than open roof areas.
Gutters and downpipes
Commercial gutters fail differently from domestic gutters. Box gutters, sumps, spreaders, overflow provisions, and long downpipe runs all affect how water moves off the roof.
Check for:
- Debris build-up: Leaves, silt, loose fasteners, and nesting material can obstruct flow and back water up under laps or flashings.
- Incorrect fall or standing water: If water sits where it should drain away, the roof edge becomes a likely leak zone.
- Rust staining or joint separation: On metal systems, these often show where water has been escaping repeatedly.
- Overflow marks: Staining beneath gutter lines or near parapets can indicate surcharging during storms.
On active sites, drainage problems are often mistaken for membrane or sheet failure. The roof covering may be sound, but if water can't leave the roof properly, it will find another path.
Exterior walls and cladding
Not every "roof leak" starts on the roof plane. Wall cladding joints, parapet caps, window heads at upper levels, and service penetrations through walls can all admit water that later appears at the ceiling.
Look for gaps at cappings, failed sealant at junctions, staining below horizontal breaks, and signs that water has been tracking behind cladding. If the internal damage sits near an external wall, don't ignore this phase. Water ingress at the wall-to-roof junction is common on commercial buildings with multiple material transitions.
If the water appears near the perimeter inside, inspect the wall and edge condition before assuming the field of roof is at fault.
Before going higher, it helps to see the inspection flow in action.
The roof plane
Once access is safe and authorised, inspect the roof surface by system type. Different roofs fail in different ways.
| Roof type | What usually stands out | What needs closer checking |
|---|---|---|
| Metal roofing | Loose fasteners, corrosion, displaced laps, sealant failure | Sheet sidelaps, penetrations, ridge and apron flashings |
| Membrane roofing | Blisters, splits, punctures, ponding marks | Seams, terminations, outlets, areas around plant |
| Tile roofing | Broken or slipped tiles, debris valleys | Sarking condition, valley lines, flashing transitions |
On metal roofs common across NSW warehouses, look for movement at laps and penetrations. On membrane roofs, broad flat areas can hide moisture below the surface even when the top layer looks intact. On older tiled commercial sections, the visible issue may be one thing while the actual problem sits in the flashing below.
Flashings and penetrations
Much time should be allocated to these specific areas. In Australia, faulty flashing is the single most prevalent cause of roof leaks, accounting for nearly 30% of incidents, and improper installation is linked to approximately 90% of all roof leaks according to this Australian roofing analysis on common leak causes. On practical sites, that means flashings around vents, skylights, flues, HVAC units, parapets, and material transitions deserve priority before broad surface repairs.
The same source notes that 90% of leaks fall within 1 square metre of where the ceiling stain appears, which is why targeted inspection around the corresponding zone is usually more productive than roaming the whole roof. For commercial properties, that can save a lot of access time and reduce disruption to tenants or warehouse operations.
Focus on these high-probability points:
- Service penetrations: Pipes, conduits, supports, and equipment mounts.
- Skylight and hatch flashings: Especially where sealants have aged or movement has opened joints.
- HVAC curbs: Plant vibration and weather exposure often break down detailing over time.
- Material change junctions: Where metal meets membrane, wall, concrete, or another profile.
Don't spray sealant over everything and call it repaired. If flashing has failed because it was detailed poorly, surface patching often buys very little time.
Advanced Testing Methods to Pinpoint Elusive Leaks
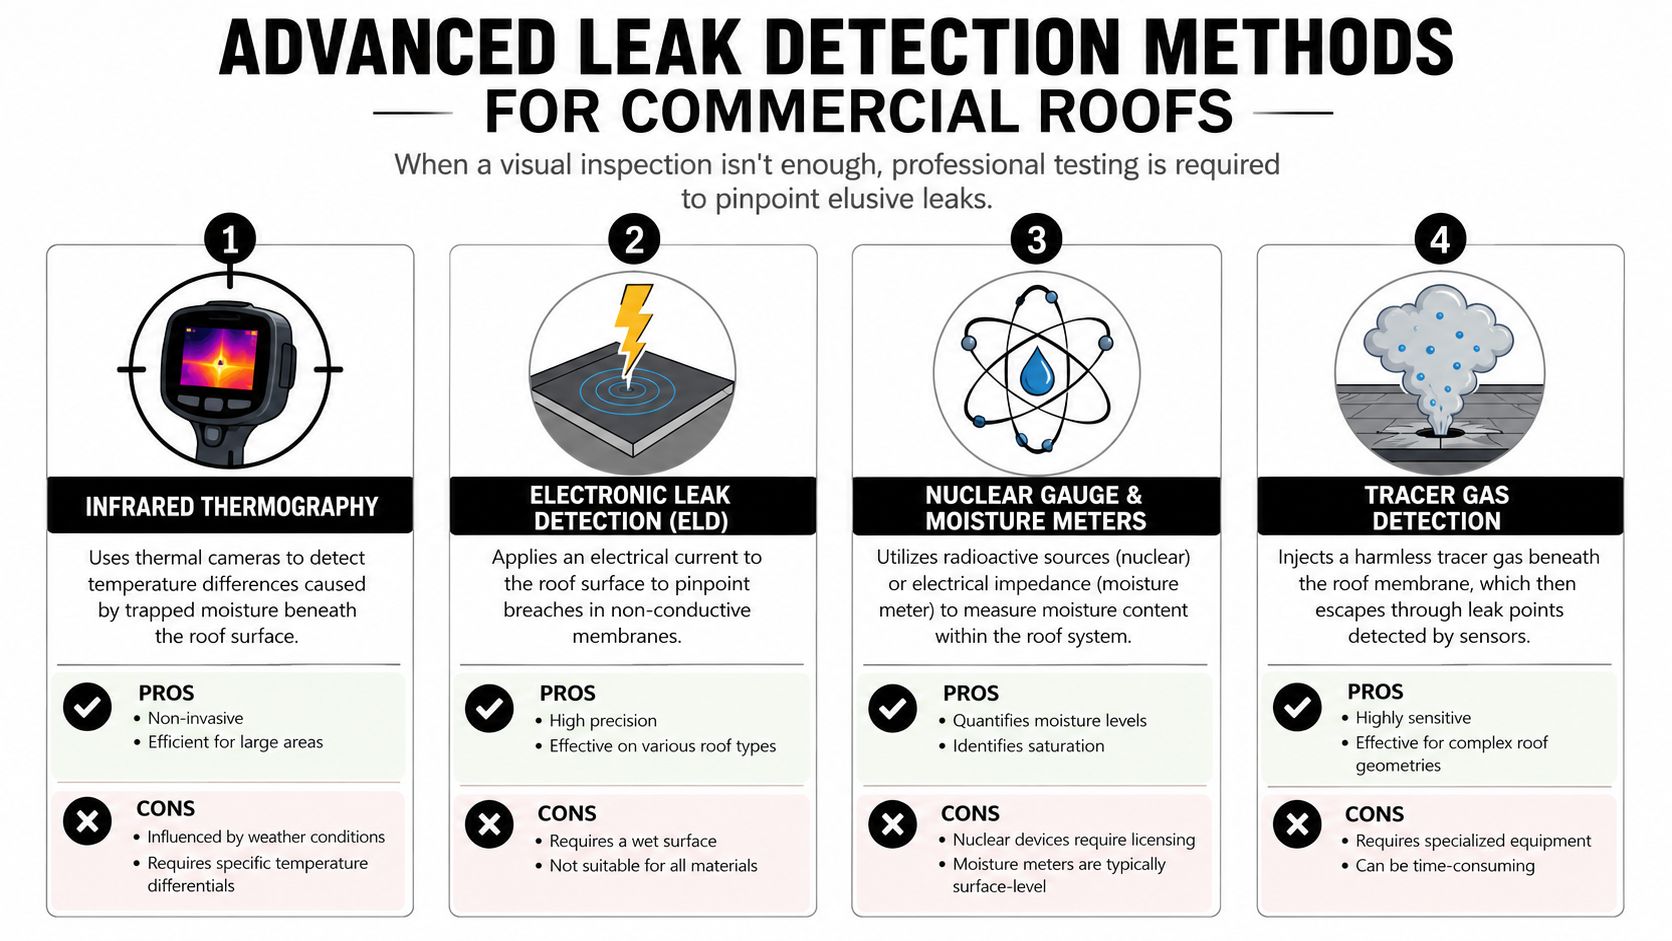
Some leaks reveal themselves during a visual inspection. Others don't. On large commercial roofs, especially flat or low-slope systems, hidden moisture can sit well away from the point where water appears indoors. That's when testing methods matter.
Property owners often waste money. They pay for a method that doesn't suit the roof type, weather conditions, or building use. The best approach depends on whether you're dealing with a warehouse, strata complex, retail roof, plant-heavy site, or broad membrane field.
Controlled water testing
Water testing still has a place when it's done properly. The method matters. In Australian commercial practice, the test should start at the lowest roof plane and move upward in 1-metre vertical sections, with a 5 to 10 minute dwell time per section to allow water migration. Used with internal monitoring, this approach delivers an 85% to 90% success rate in isolating hidden membrane breaches, based on the method described in this guide to systematic roof leak testing.
The same source also points out where teams go wrong. Spraying water upward into tile or sheet overlaps creates false positives because it forces water where rainfall wouldn't. On metal roofing systems common in NSW, failing to spray downward to mimic natural rainfall can reduce diagnostic accuracy by approximately 20%.
Water testing is useful when:
- the suspected area is already narrow
- internal observers can watch in real time
- the roof geometry is straightforward
It becomes less reliable on complex multi-plane roofs or during active wind-driven rain.
Thermal imaging and moisture mapping
For large flat commercial roofs, thermal imaging is often the fastest non-invasive way to identify wet insulation or trapped moisture below the surface. Combined with moisture mapping, it achieves a 92% to 95% detection success rate for hidden water ingress in flat membrane and metal systems according to this Australian review of leak detection methods.
But it isn't magic. The same source states accuracy can drop to 60% to 70% on high-humidity summer days in Sydney or when roof temperatures are uniform after recent rainfall. A 2 to 4 hour drying period post-rain improves results. In practice, that means timing matters. If you scan too soon after weather, the image may show thermal patterns that are interesting but not diagnostic.
Thermal imaging is excellent for screening broad areas. It still needs someone who understands what the camera is actually showing.
Moisture meters and secondary verification
Thermal scans identify anomalies. Moisture meters help confirm whether those anomalies are wet. That distinction matters because thermal bridging and insulation voids can mimic moisture signatures.
The same Australian review notes that 30% of initial thermal scan reports require secondary moisture meter verification. Without that follow-up, false positives can inflate remediation costs by AUD 15,000 to 40,000 per incident. On commercial sites, especially strata and industrial buildings, calibrated handheld moisture probes are often what separate a useful scan from an expensive misread.
Use moisture verification when:
- a thermal image shows scattered hotspots
- the repair scope could become extensive
- the building has mixed materials or patch history
- you need stronger evidence for repair approval or insurer review
Drone surveys for large sites
For broad warehouse roofs and industrial facilities, drone-based infrared has changed the first stage of inspection. It reduces the need to put people on active roofs before there's a reason to do so, and it speeds up area coverage.
A 2025 Master Builders Australia survey found 58% of Sydney commercial roofers now use drone-based infrared thermography for initial scans, citing a 70% reduction in false positives compared to visual or hose methods. The same data states that DIY hose testing on a 5,000㎡ warehouse roof can take 6 to 8 hours with 2+ workers, costing AUD $1,200 to $1,800 in labour, while a drone thermal scan covers the same area in 45 minutes at around AUD $450 to $650 with zero climb risk, as summarised in this article on leak repair and detection trade-offs.
For commercial decision-makers, the trade-off is straightforward:
| Method | Best use | Main drawback |
|---|---|---|
| Hose test | Small suspected zone, confirmation testing | Slow, labour-heavy, access risk |
| Drone infrared | Large roofs, early screening, minimal disruption | Needs suitable conditions and follow-up interpretation |
| Moisture meter | Confirming wet areas after scan | Not a broad-area search tool |
| Visual inspection | Obvious defects and maintenance issues | Misses concealed moisture |
If the roof is large, busy, or difficult to access safely, start with the least disruptive method that can narrow the field quickly.
Safety Protocols and When to Call Commercial Roofers
Commercial leak investigation has a clear boundary. Ground-level observation, interior evidence gathering, and basic documentation are one thing. Climbing onto a wet roof, opening suspect areas, or testing around electrical services is another.
That's where many avoidable incidents happen. A warehouse roof might look walkable from below, but Colorbond, aged sheeting, membrane surfaces, brittle skylights, and standing seam systems can all create fall or slip hazards. Add rain, algae, or service clutter and the risk rises fast.

Where preliminary checks should stop
Stop and bring in a qualified commercial roofer when any of these apply:
- The leak is near electrical systems: Light fittings, switchboards, server rooms, plant controls, and cable trays change the risk profile immediately.
- The roof requires work at heights: If access needs ladders, harness systems, edge protection, or controlled roof movement, it has moved beyond a basic site check.
- The building may contain asbestos materials: Disturbing older roofing or associated components without proper controls is not acceptable.
- There are signs of structural weakness: Sagging, corrosion around supports, saturated linings, or unstable roof areas need a professional assessment.
- The source isn't obvious after the first staged review: Repeated guessing usually creates more damage and more cost.
If your site relies on fixed access and fall restraint systems, these roof anchor safety considerations for commercial buildings are worth understanding before anyone steps onto the roof.
Wet commercial roofs don't forgive shortcuts. If a person needs to leave the ground or work near services, the investigation should be planned as a safety task, not treated as a quick look.
Compliance is part of the repair
Leak detection doesn't sit outside compliance. The repair recommendation has to fit the waterproofing system and the applicable standards. In Australia, all external waterproofing work must comply with AS 4654.1:2012 and AS 4654.2:2012, while internal wet areas require AS 3740:2021, as outlined in this overview of waterproofing compliance and defect risk in Australian buildings.
That same review found 20% to 40% of modern multi-unit residential buildings in Australia suffer from some form of waterproofing defect. For strata managers and developers, that matters because the leak itself is only part of the issue. The inspection and repair process also needs to hold up if owners corporations, builders, consultants, or insurers ask how the conclusion was reached.
A safe, standards-aligned inspection is easier to defend than an improvised fix.
Documenting Findings for Repairs and Insurance Claims
Once you've narrowed the source, don't rely on memory. Good documentation shortens the repair process and reduces back-and-forth with contractors, tenants, facilities staff, and insurers.
The best records are simple. They don't need polished reports or technical language. They need to be clear, dated, and tied to a location.
Photograph and date everything
Take photos in pairs. Start with wide shots that place the damage within the room, tenancy, or roof area. Then take close-ups of the stain, drip path, failed flashing, blocked gutter, split membrane, or corroded lap.
Keep the file order logical. Use the date, building area, and a short description in the file name if possible.
A practical photo set includes:
- A room overview: So others can identify the affected location quickly.
- A damage close-up: To show severity and material condition.
- A roof context shot: Showing the nearby penetration, edge, sump, or flashing.
- A weather note: Screenshot or written note of rainfall timing on the day of discovery.
Describe the damage in plain language
Write like a site supervisor, not a lawyer. Short, factual notes work best.
For example:
- Water staining visible to suspended ceiling tile outside tenancy entry
- Active drip observed during rain near supply air grille
- Debris build-up present in box gutter above affected zone
- Sealant split visible at penetration flashing adjacent to plant curb
Avoid vague notes such as "roof leaking badly" or "looks damaged". Those phrases don't help anyone scope the job or assess the claim.
Good records answer four questions. What was seen, where it was seen, when it was seen, and what conditions were present at the time.
Map the interior to the exterior
A simple sketch often saves more time than extra photos. Mark the internal damage point, the nearest wall line or grid, and the corresponding roof zone. If the ceiling stain is in Warehouse Bay 3 near the eastern wall, note that. If the suspected entry point is above an HVAC curb or parapet corner, mark that too.
This mapping matters because water doesn't always drop vertically through the building. A contractor may need to inspect both the visible damage point and the likely travel path. A clear sketch reduces repeat attendance and helps the repair crew bring the right access gear and materials on the first visit.
Before approving works, keep all notes, emails, photos, and call logs in one folder. If tenants reported the issue, save those messages too. They help establish the timeline.
If you need a leak isolated quickly and documented properly, Commercial Roofers handles commercial and industrial roof leak detection across Sydney and NSW with a safety-first approach, clear reporting, and repair recommendations that minimise disruption to tenants, staff, and operations.