
A warehouse manager notices a dark stain below the eaves after a storm. The roof sheets look intact, the gutter isn't blocked, and the leak seems too small to explain the damaged paint on the fascia. The problem may be at the edge, where water is tracking back instead of breaking cleanly into the gutter.
That narrow strip of formed metal is drip edge flashing. On a commercial roof, it isn't a decorative accessory added at the end of the job. It forms part of the roof's water-management system, and its projection, fall, laps, clearances, fasteners and material compatibility can determine whether the edge stays dry or becomes a concealed corrosion and leakage point.
For owners, developers, strata managers and specifiers across Sydney and NSW, the edge detail becomes especially important on warehouses, factories, retail sites and other buildings with long roof runs or exposed elevations. This guide starts with the simple idea behind drip edge flashing, then works through profiles, compatible materials, Australian dimensions, installation coordination, maintenance and practical selection.
Table of Contents
- Introduction to Drip Edge Flashing on Commercial Roofs
- What Drip Edge Flashing Is and How It Protects Your Building
- Materials Profiles and Compatibility With Commercial Roofing Systems
- Australian Standards Compliance and Key Dimensions to Get Right
- Installation Overview and Best Practices for Lasting Performance
- Maintenance Troubleshooting and When to Replace Drip Edge Flashing
- How to Choose the Right Drip Edge Flashing and Plan Your Budget
Introduction to Drip Edge Flashing on Commercial Roofs
A roof-edge leak often starts somewhere other than the roof covering. Water runs down the sheet, reaches the eave and should fall into the gutter. Instead, it follows the underside of the flashing, wets the fascia or enters the wall junction, and leaves a stain that appears well away from the original failure.
On a small building, that may be treated as a maintenance nuisance. On a commercial property, the consequences can spread through insulation, eaves, wall cladding and internal finishes. A minor gap repeated along a long roof edge can expose many junctions to wind-driven rain, particularly where the building sits in an open industrial area or near the coast.
Drip edge flashing creates a controlled end point for water. It gives rain a defined path from the roof surface to the gutter or away from the façade, rather than allowing water to cling to the metal and travel backwards. Australian roofing guidance treats this detail as measurable, with requirements and recommendations covering edge projection, fall, overlaps and clearances (Australian flashing guidance).
Who needs to understand the detail
You don't need to be a roofer to make a good decision. You do need enough information to ask whether the proposed detail suits the roof system, existing fascia, gutter arrangement, exposure and surrounding materials.
A warehouse owner might be reviewing a roof replacement quote. A builder may be coordinating sarking, gutters and wall cladding. A strata manager might be investigating staining beneath a parapet or deciding whether a local repair is enough. Each situation needs the same basic questions answered:
- Where should the water detach?
- What prevents it from tracking behind the fascia?
- How are joints overlapped and fixed?
- Will the materials remain compatible as the roof moves and weathers?
- Does the detail meet the applicable Australian requirements?
The right answer isn't always a simple folded strip. A new metal roof may need a purpose-formed edge trim, while a retrofit may require an extended overflashing to cover a legacy fascia or misaligned gutter. Parapets, box gutters and lightweight cladding introduce their own geometry.
By the end, you'll be able to brief a contractor, compare quotations on a like-for-like basis and recognise when an edge problem needs a broader roof and façade assessment.
What Drip Edge Flashing Is and How It Protects Your Building
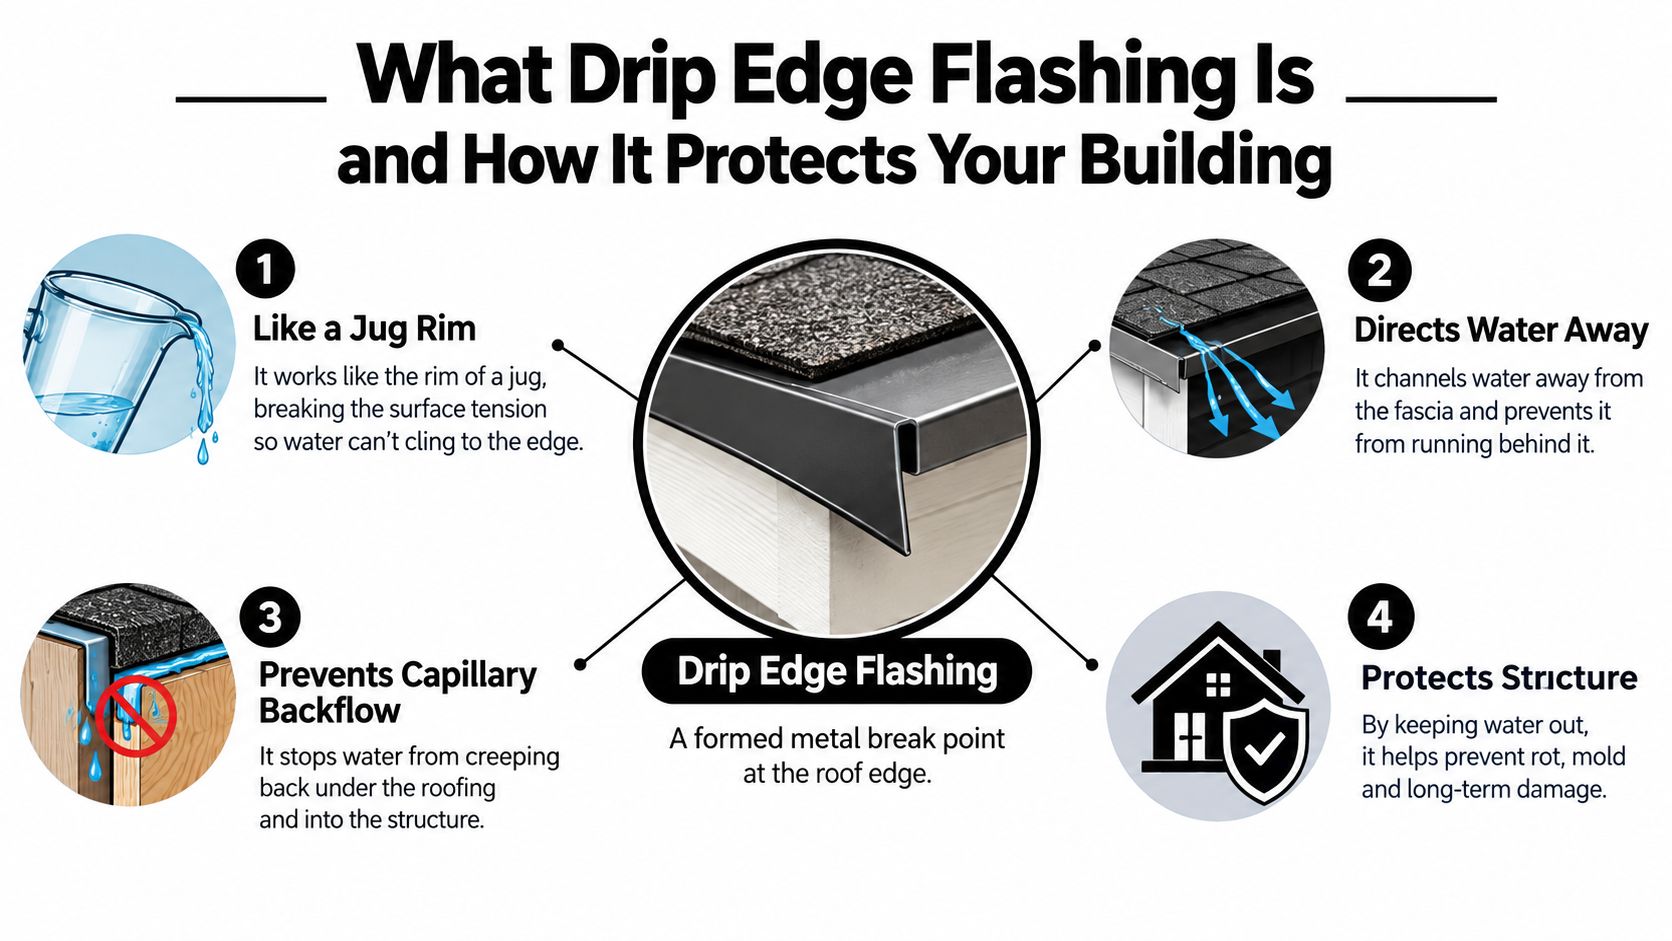
Think about pouring water from a jug. If the rim is clean and shaped properly, water leaves the jug in a predictable stream. If the rim is damaged or the water is allowed to cling to the underside, it runs down the outside instead.
A roof edge needs the same clean break. Drip edge flashing is a formed metal component that creates that break point, directing water towards the gutter and away from the fascia, eaves and wall interface.
Follow the water path
The detail works through several connected actions:
- The upper flange receives runoff. It sits beneath or alongside the roof covering and carries water towards the edge.
- The formed break changes the water's direction. A hem, kick or sharp edge encourages the stream to detach instead of following the metal underneath.
- The lower section protects the fascia. It extends beyond vulnerable materials and helps keep the discharge aligned with the gutter.
- The clearance keeps the drip line open. Water needs space to leave the metal. If the flashing is pressed against another surface, capillary action can draw moisture back.
That final point is easy to overlook. A flashing profile can be present and still perform poorly if its edge is folded flat against the fascia, buried in sealant or blocked by an adjacent surface. Australian guidance discusses edge breaks, projections and clearances because the geometry controls whether water sheds or returns.
Practical rule: Don't ask only whether flashing has been installed. Ask where the water is meant to detach and whether that point remains clear after gutters, cladding and sealants are completed.
Don't confuse roof-edge and wall flashings
A drip edge belongs at the roof perimeter and manages discharge into the gutter or away from the façade. Z-flashing generally manages water over a wall opening, cladding joint or horizontal transition. Wall and window flashings have different roles again, often directing moisture to the exterior face of a wall.
The distinction matters on mixed commercial assemblies. A warehouse may combine a metal roof, masonry wall, lightweight cladding, windows and parapets. Calling every folded metal component “flashing” can hide the fact that each junction needs a specific drainage path. For a useful overview of the different applications, see this guide to commercial roof flashing types.
The roof edge also needs to work with the gutter, sarking and fascia as one assembly. A correctly shaped trim can't compensate for a gutter set too far away, a blocked outlet or a wall flashing that discharges behind the cladding. The purpose is continuous water management, not just covering a joint.
A short visual explanation can help non-technical stakeholders understand the difference between a visible trim and a functional drainage edge.
Materials Profiles and Compatibility With Commercial Roofing Systems
Material selection starts with the roof assembly, not the colour chart. The flashing must tolerate the same weather, movement and exposure as the roof, while remaining compatible with gutters, fasteners, fascia, wall cladding and sealants.
Coated steel, including Colorbond products, is commonly considered where the roof and trims already use a coated steel system. It offers a consistent appearance and a rigid edge, but exposed cut edges, incompatible fasteners or trapped moisture can still create corrosion points. Aluminium is light and useful where weight, forming or corrosion resistance is important, although the installer must account for its different movement and contact behaviour.
Zinc and copper suit particular architectural or heritage applications. They can provide a deliberate finish and may be specified alongside architectural cladding, but they shouldn't be mixed casually with other metals. Contact between dissimilar materials, runoff from one metal onto another and unsuitable fasteners can shorten the life of the edge detail.
Profiles serve different problems
A simple L-shaped or hemmed edge may suit a new roof where the fascia and gutter are correctly aligned. A hemmed profile gives water a sharper release point and can add stiffness to the exposed edge. An extended overflashing becomes more useful during a retrofit, where the existing fascia, sarking or gutter position leaves a wider or irregular gap.
The choice changes again at parapets, box gutters and lightweight wall systems. These locations may need a broader folded assembly that covers the junction, maintains the required fall and connects with other flashings without creating a back path.
For background on selecting compatible roof flashing for metal roofs, focus on how the flashing profile integrates with the particular sheet and edge condition rather than treating it as a universal trim.
Drip edge material and profile compatibility matrix
| Material or Profile | Best Fit System | Key Consideration |
|---|---|---|
| Coated steel, including Colorbond | Compatible metal roofing, fascia and gutter systems | Match coatings, fasteners and cut-edge treatment to limit corrosion |
| Aluminium | Lightweight roofing and selected coastal or architectural applications | Check movement, thickness, fastener compatibility and contact with other metals |
| Zinc | Architectural cladding and designed façade systems | Use a compatible drainage and fixing strategy, especially at mixed-metal junctions |
| Copper | Heritage or intentionally specified premium architectural assemblies | Keep the full runoff path and adjacent metals compatible |
| L-shaped profile | Straightforward new roof edges with sound fascia alignment | May provide less coverage where the gutter or fascia sits out of position |
| Hemmed profile | Exposed roof edges requiring a defined release point | Preserve the hem and clearance during installation |
| Extended overflashing | Warehouses, reroofs and retrofit edges with legacy geometry | Useful for covering wider transitions, but must still connect to the water path |
| Formal parapet or box-gutter flashing | Parapets, internal gutters and complex commercial junctions | Requires coordinated falls, laps, outlets and adjacent wall details |
The cheapest profile isn't necessarily the lowest-risk choice. A small saving on metal can be outweighed by cutting, reworking or dismantling a gutter and fascia interface that was never properly covered.
Australian Standards Compliance and Key Dimensions to Get Right
A warehouse edge can look tidy from the ground and still send water behind the fascia. Australian practice treats drip edge flashing as a prescriptive, measurable detail. The National Construction Code sets requirements for flashing at relevant roof, wall and opening junctions, while installation guidance defines the dimensions that keep water moving and limit weather exposure.
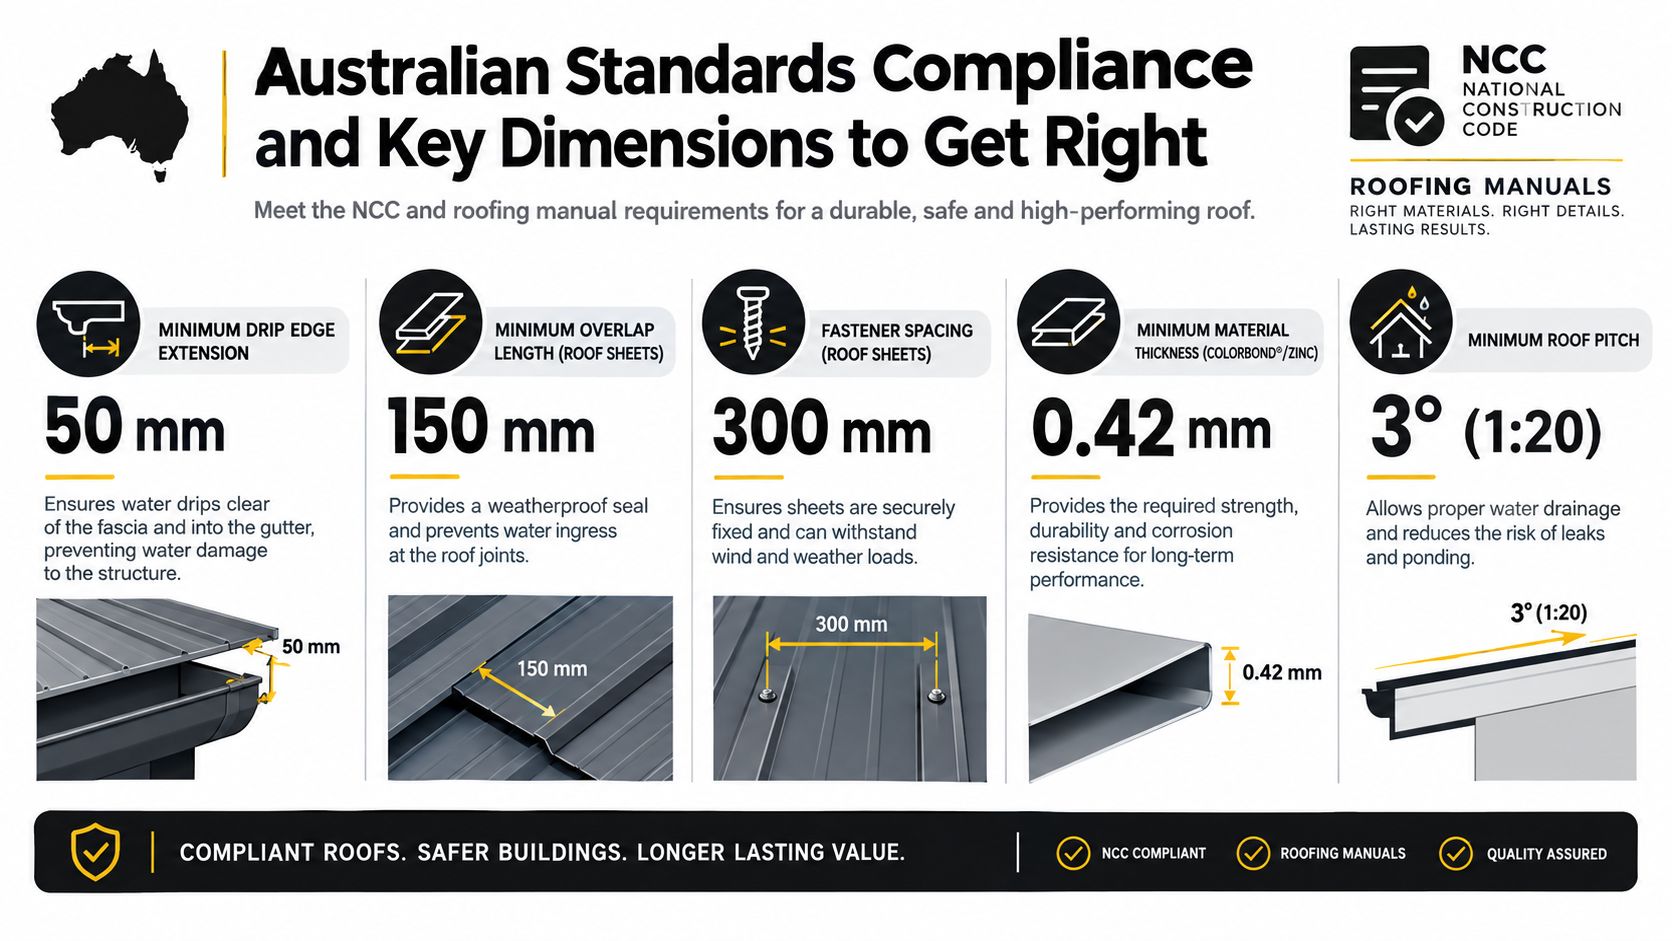
Each measurement controls a different part of the drainage path. Projection places the discharge beyond the edge. Fall discourages ponding. Lap direction follows the roof's flow. Fastener spacing controls movement and wind resistance. Clearance keeps the drip line open and reduces prolonged contact with adjacent materials.
Dimensions that influence performance
Australian metal-roofing guidance specifies a minimum 10 mm drip edge and a typical 1.5° minimum fall to help prevent ponding. It also cites 75 mm laps for flashing joints in the direction of flow (Australian flashing guide). On a long commercial run, losing a small amount of projection or fall can leave moisture at cut edges or direct it towards the eaves rather than away from the building.
Other guidance specifies a minimum free drip edge of 5 to 10 mm. The Australian Steel Institute recommends at least 3 mm clearance between exposed cladding edges and adjacent surfaces, helping maintain the drip line and reduce corrosion risk (Queensland standards and tolerances guidance). At parapets, the same drainage principle appears as a minimum 3° fall for parapet cappings, with the drip edge extending far enough to clear the fascia material.
The NCC roof-cladding provisions require flashing and capping joints to overlap by not less than 25 mm, use fasteners at intervals of not more than 40 mm, and follow the direction of roof fall (NCC roof-cladding provisions). For masonry and cavity-wall work, NSW guidance states that damp-proof-course flashings should extend at least 20 mm wider than the masonry thickness.
Minimum compliance versus exposure planning
Code minima provide a baseline, not a complete edge design. Coastal sites, exposed elevations, unusual gutter positions and retrofit work can add wind-driven rain, salt exposure or trapped moisture at cuts and concealed laps.
At a parapet, box gutter or lightweight wall junction, the profile may need a broader folded assembly spanning the junction, maintaining the required fall and connecting with adjacent flashings without creating a back path. Fascia position and cladding geometry determine whether a standard edge profile can discharge cleanly or whether an extended detail is needed.
For a commercial specification, request the proposed profile, material, lap arrangement, fixing pattern and interface detail. Check that the drawing or quotation shows the connection to the gutter, sarking, fascia, parapet or wall cladding. A compliant dimension in isolation cannot repair a disconnected drainage path.
For context, review this guide to Australian roofing standards and ask the roofer to confirm which edition and provisions apply to the project.
Installation Overview and Best Practices for Lasting Performance
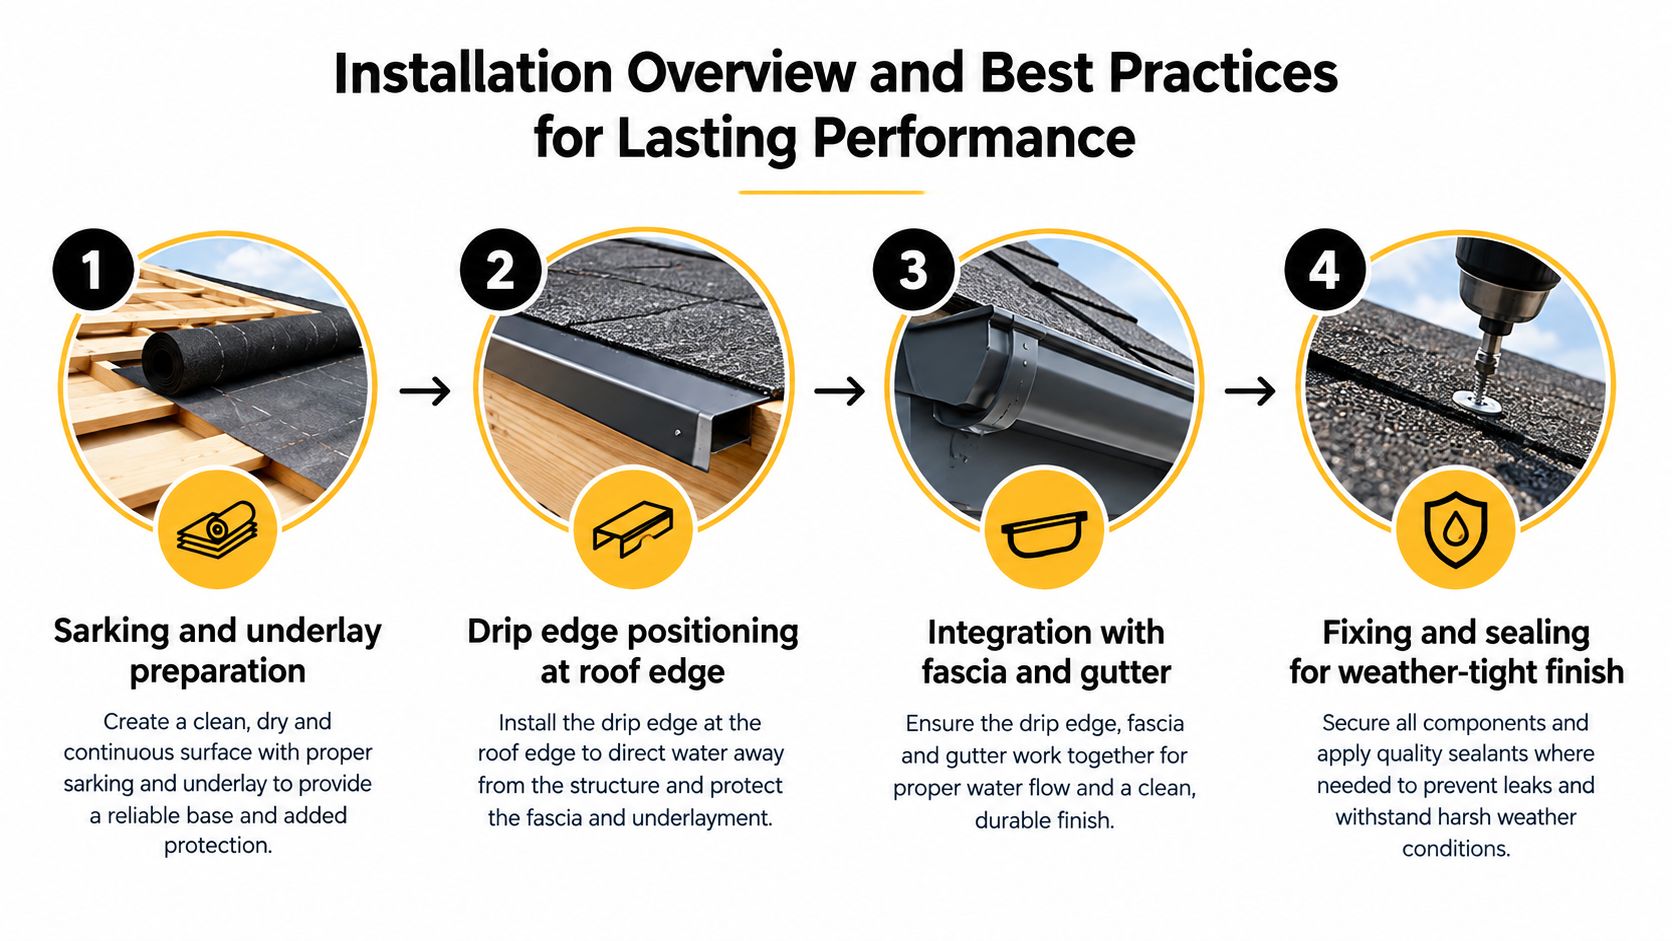
Installation succeeds when each layer hands water to the next one without interruption. On a commercial roof, the sequence needs to be coordinated with the roof sheets, sarking or underlay, fascia, gutter and wall cladding. The flashing isn't a final strip added after everyone else has finished.
Keep the drainage sequence continuous
At the roof edge, the installer first confirms the substrate, roof line and intended gutter position. Sarking or underlay must meet the flashing in a way that sends incidental moisture outward. If the layers terminate in the wrong order, water can enter behind the fascia even when the visible metal looks neat.
The flashing then needs to sit at the designed projection and fall. Its exposed edge should include the specified break or hem, with enough clearance for water to detach. A sealant bead may support a joint, but sealant shouldn't replace the physical lap, fall or drainage opening.
Joints follow the direction of roof fall. The upper piece should shed onto the lower piece, not force water into a reverse lap. Fasteners need to secure the flashing without distorting the channel or closing the drip line.
Water should always be able to move outward by gravity. If a detail depends on a bead of sealant remaining perfect to maintain that path, it deserves another review.
Coordinate difficult edges before work starts
Parapets and box gutters need a coordinated detail because several planes meet at once. The capping must shed towards the intended outlet, while the edge or apron must clear the fascia and connect with adjacent membrane, roof and wall flashings. A retrofit can be more difficult than new work because the existing fascia may be uneven, the sarking may be trapped and the gutter may sit too close to the wall.
Ask the contractor to confirm the following before installation:
- Sarking interface: Identify where underlay or membrane drains and how the flashing receives it.
- Gutter alignment: Check that water lands inside the gutter without striking the front lip or bypassing the outlet.
- Lap direction: Confirm that each joint follows the roof fall.
- Edge release: Keep the hem, projection and clearance open after cladding and sealants are installed.
- Trade coordination: Make sure gutter installers, façade contractors and roof plumbers work from the same edge detail.
Work at large industrial roofs also requires controlled access, exclusion zones and safe sequencing. A visually tidy edge isn't evidence of safe or compliant installation. Use the project documentation and inspection records to verify what has been concealed.
For an overview of coordinated roof flashing installation, look for details that show the relationship between flashing, roofing layers and guttering rather than isolated product photos.
Maintenance Troubleshooting and When to Replace Drip Edge Flashing
Most edge failures leave clues before they become internal leaks. A dark streak below the eave, recurring overflow at one gutter section or rust around a cut edge can indicate that water isn't leaving the roof as designed.
Start inspections from safe accessible areas. Ground-level views, gutter inspections and internal eave checks can identify warning signs, but a commercial roof should be assessed by a competent professional where access, height or fragile materials create risk.

Match the symptom to the likely cause
- Fascia staining or peeling coating: Water may be tracking behind the edge because the projection, hem or gutter alignment is wrong.
- Rust at cut edges: Exposed substrate, trapped moisture, incompatible metals or damaged coating may be allowing corrosion to start.
- Lifted or open laps: Wind movement, inadequate fastening or a joint lapped against the fall can create a path for driven rain.
- Water behind the gutter: The flashing may be too short, distorted or installed behind the wrong layer.
- Overflow at one roof section: The gutter may be blocked, but the edge geometry or local fall may also be directing water outside the gutter.
- Wet eaves or wall junctions: Moisture may be entering at a connected wall, parapet or penetration flashing rather than at the visible drip line.
A single symptom doesn't prove a single cause. Water can travel along metal and membranes before it appears, so repairs based only on the stain location often miss the entry point.
Repair, reseal or replace
Cleaning should remove leaves, dirt and retained debris without scratching coated finishes. Resealing may support a sound lap or corner, but it shouldn't conceal an open joint, active corrosion or a missing projection. Inspectors should also check whether sealant has blocked the free edge and stopped water from detaching.
Replacement becomes the sensible option when corrosion has perforated the metal, deformation has closed the drip line, laps have separated, or the edge no longer reaches the gutter. A partial repair can work where the surrounding detail remains sound, but widespread failure usually calls for perimeter replacement and inspection of the fascia, sarking and adjacent cladding.
Coastal and industrial buildings deserve a planned inspection regime because salt, airborne contaminants, exhaust deposits and wind-driven rain can accelerate deterioration. Set inspection timing around the site's exposure, roof access arrangements and previous failure history. After severe weather or gutter work, check the edge again, since impact and movement can alter the discharge path.
How to Choose the Right Drip Edge Flashing and Plan Your Budget
Choose the edge detail by answering the site questions in order. Start with exposure, then identify the roof and wall systems, then select the profile and material that preserve a continuous drainage path.
A practical selection checklist
- Exposure: Consider coastal air, open wind exposure, driven rain, industrial contaminants and the building's orientation.
- Roof system: Confirm whether the roof uses metal sheets, tiles, membranes, parapet cappings or a mixed assembly.
- Existing geometry: Measure the fascia position, gutter setback, sarking termination and any legacy cladding that the new flashing must cover.
- Profile: Decide whether a hemmed drip edge is sufficient or whether an extended overflashing or formal parapet detail is needed.
- Compatibility: Match coatings, fasteners, sealants and adjacent metals. Don't allow runoff or direct contact to create an avoidable corrosion path.
- Compliance records: Request drawings or written details showing projection, fall, laps, clearances and fixing arrangements.
- Warranty scope: Check whether the roof and flashing warranties cover the complete edge assembly or only individual products.
- Access and coordination: Allow for safe access, gutter removal, façade interfaces, penetrations and work by other trades.
Budget comparisons are only useful when quotations describe the same scope. One contractor may include new flashing, gutter adjustment and fascia repairs, while another may price a narrow patch over the visible stain. Ask each bidder to identify the material, profile, lengths, corners, laps, fixings, access requirements and reinstatement work.
Material choice, profile complexity, roof height, restricted access, parapets, box gutters and retrofit conditions all affect the final price. A specialist assessment is justified where the roof has legacy geometry, asbestos-containing materials, fragile cladding, heritage requirements or repeated unexplained leakage.
The right drip edge flashing is a small component with a large responsibility. It must release water cleanly, protect vulnerable edges, remain compatible with the roof assembly and satisfy measurable Australian requirements.
Commercial Roofers offers inspections, roof flashing installation, gutter and box gutter work, commercial roof replacement and detailed reporting for warehouses, factories, strata properties and other NSW sites. If your fascia is staining or you're planning a reroof or retrofit, visit Commercial Roofers to arrange an assessment of the edge detail and receive a clear scope of work.