
Standing seam roofing holds raised-seam metal panels to the structure with concealed clips, so no screws pierce the sheet. The panels lock together along their edges and can shift slightly as temperatures rise and fall. That movement is why the job needs far more planning than fixing standard profiled sheeting. A mistake early on usually shows up later.
Table of Contents
- What the Job Involves from Start to Finish
- Key Stages to Watch
- Key Stages of Standing Seam Roof Installation
- Checking the Existing Structure
- Getting the Substrate Flat and Clean
- Planning Around Occupied Buildings
- Setting Out Clip Spacing
- Fixing Clips to Purlins or Battens
- Common Clip and Fixing Approaches for Commercial Roofs
- Forming Panel Seams Correctly
- Avoiding Seaming Mistakes
- Placing Fixed and Sliding Clips
- Flashing the Edges and Interfaces
- Setting Up Safety Before Work Starts
- Meeting Australian Compliance Requirements
- Keeping Records That Prove Compliance
- Logging Concealed Fixings as You Go
- Inspecting the Finished Roof
- Handing Over the Paperwork
- How Long Does a Standing Seam Installation Take?
- How Does It Compare with Profiled Sheeting?
- Which Documents Should You Request Before Work Begins?
- What a Well-Run Project Looks Like
What the Job Involves from Start to Finish
The infographic below shows the six stages of a typical commercial project, from the first site assessment through to final inspection.
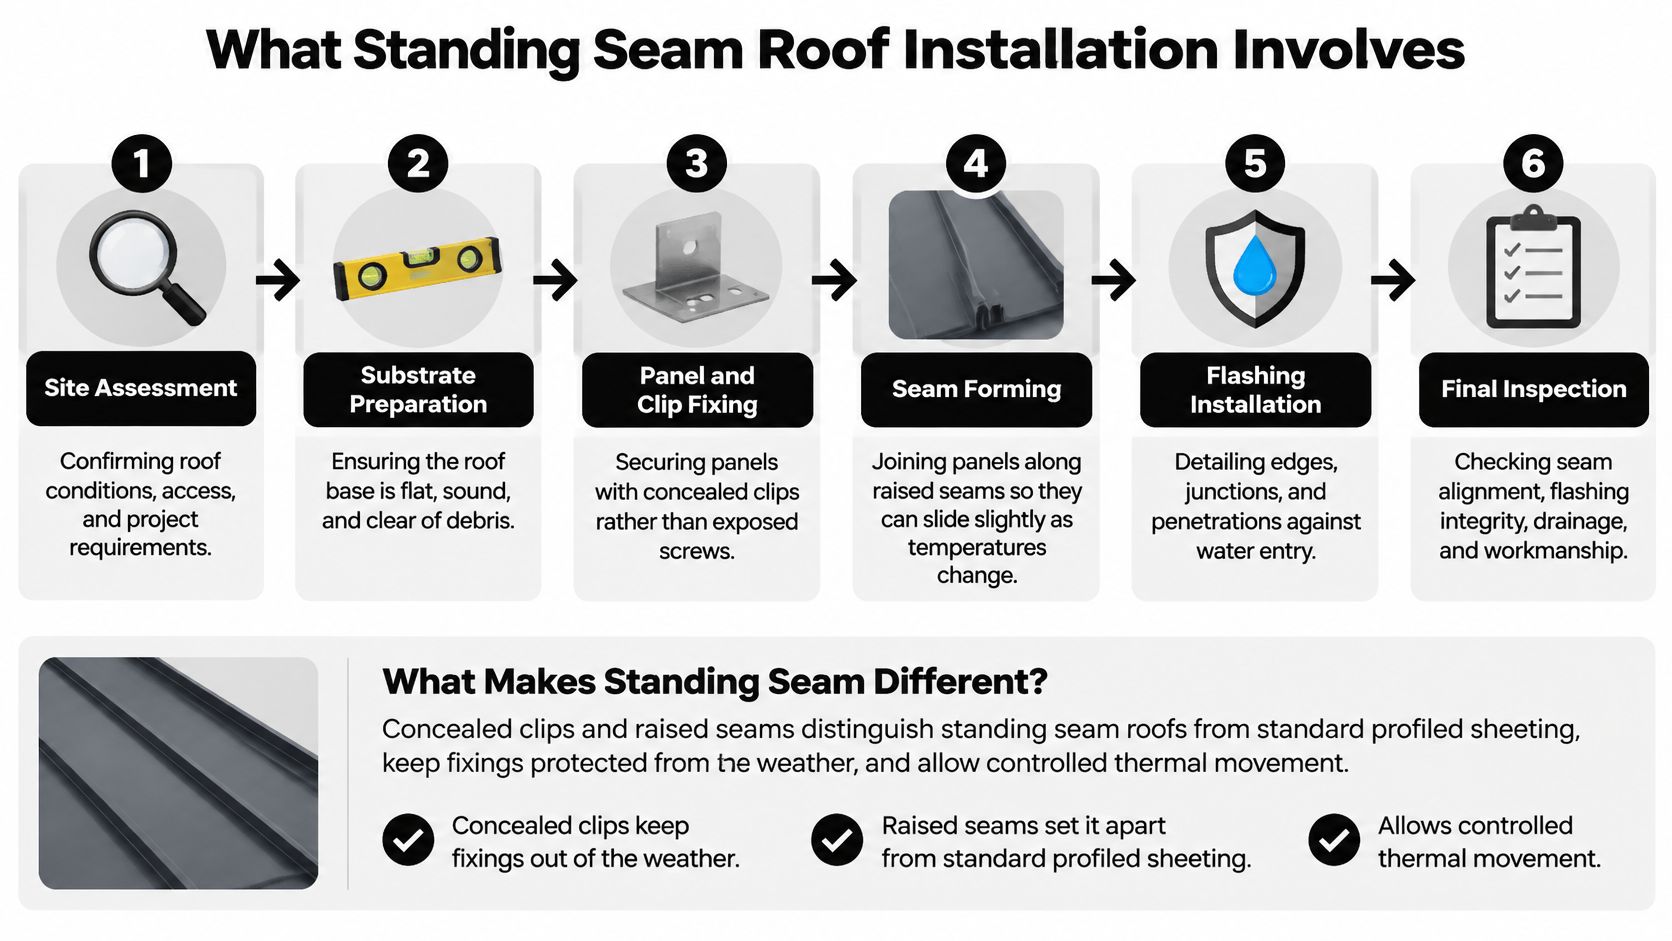
Concealed clips and raised seams are what set this system apart. Each later stage depends on the one before it, so a shortcut early on often turns into a leak or a noisy panel a year down the track.
Commercial roofs come in many forms and price brackets, so it pays to understand your options before settling on standing seam. You can compare the figures in this guide to commercial membrane roof costs.
Key Stages to Watch
Here is what each stage needs to achieve:
- Site assessment confirms the roof's condition, access arrangements and project requirements.
- Substrate preparation makes sure the base is flat, sound and clear of debris.
- Clip fixing and seaming locks the panels in place while still allowing controlled movement.
- Flashing and final inspection protect the edges and confirm the roof drains properly.
The clips do the holding, but they only perform well if the substrate beneath them is flat.
Key Stages of Standing Seam Roof Installation
Most crews learn the same lessons on every job. The table below summarises each stage, what it is meant to achieve and the mistake that tends to cause the most trouble.
| Installation Stage | Main Purpose | Common Problem to Avoid |
|---|---|---|
| Site Assessment | Confirm roof condition, access and requirements | Missing a support mismatch until handover |
| Substrate Preparation | Create a flat, sound and clean base | High spots that distort the profile |
| Panel and Clip Fixing | Secure panels with concealed clips | Inconsistent clip spacing |
| Seam Forming | Join panels along raised seams | Over-tightening that ripples the profile |
| Flashing Installation | Seal edges, junctions and penetrations | Rigid sealants that crack with movement |
| Final Inspection | Check seams, drainage and workmanship | Skipping gutter and outlet checks |
Most of these problems come down to rushing a stage that looked simple. Take the extra time on clip spacing and substrate levels, because fixing them after the panels are on is far more expensive.
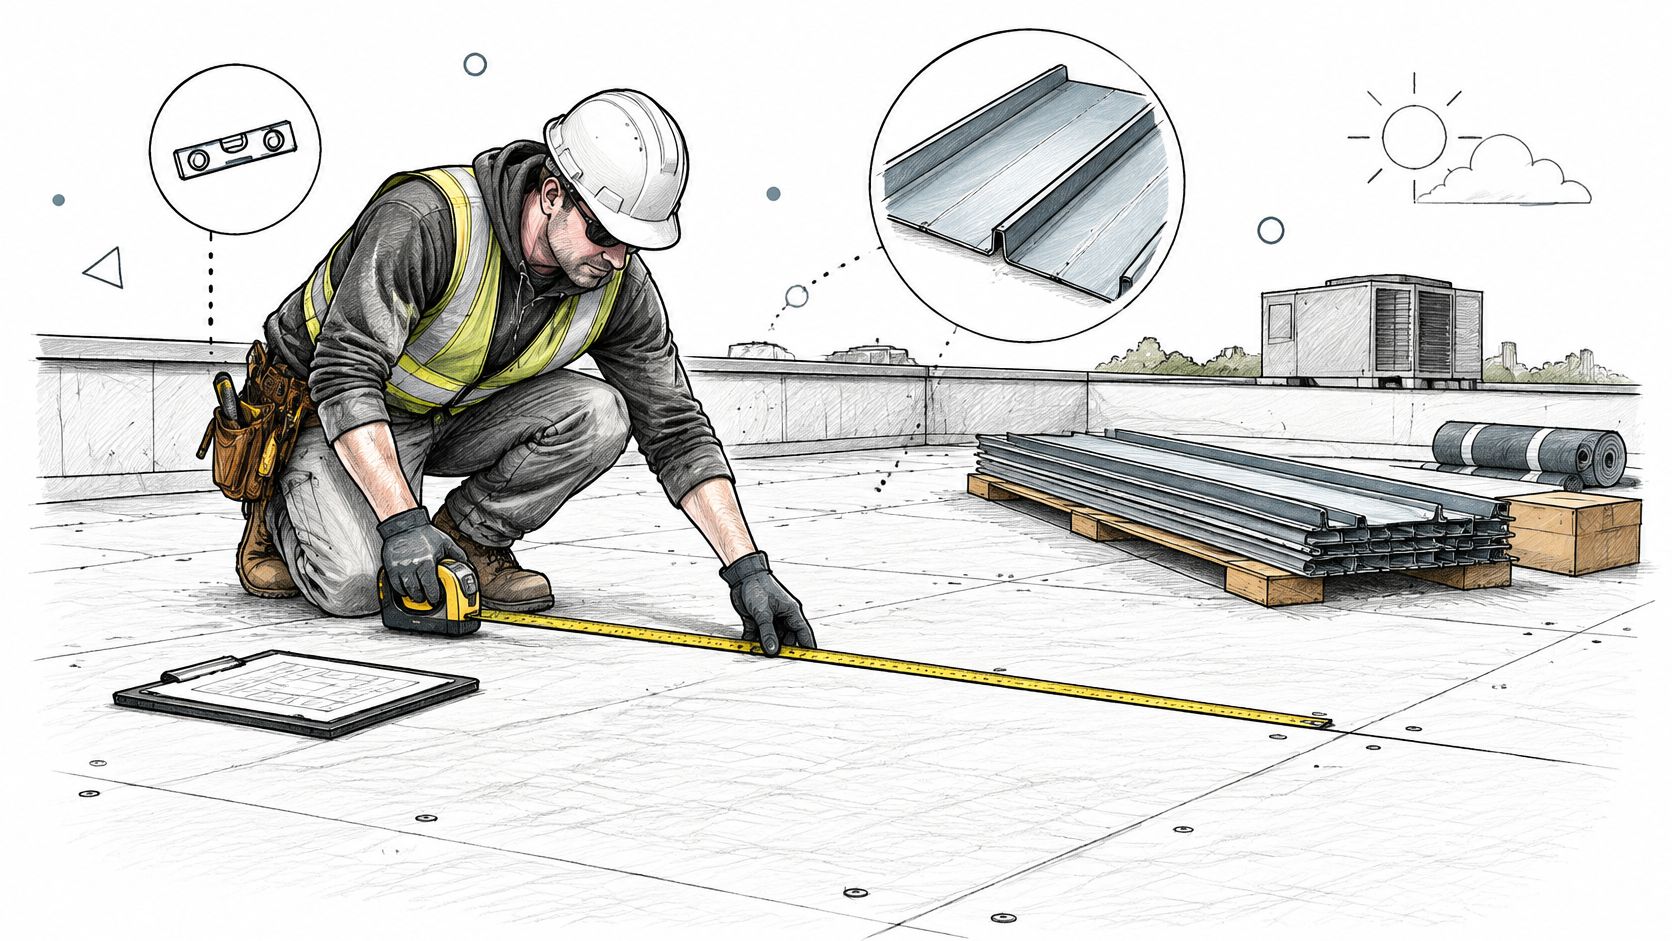
Most of the problems you'll chase on a standing seam job were settled before the first panel went up. That's why the sensible place to start is a proper look at what's already there.
Checking the Existing Structure
Get up close to the purlins or battens, and pay attention to any sheeting that's staying put. Gutters, penetrations and parapets matter too, because each one changes how the new system has to be fixed.
Compare roof pitch, drainage paths and support spacing against the design documents. Finding a mismatch on day one is an annoyance. Finding it at handover is a dispute.
Getting the Substrate Flat and Clean
Clips belong on a substrate that's flat, sound and free of debris, full stop. Even a small high spot will show up later as a ripple in the finished profile.
- Level check: Run a straightedge across the deck to catch high spots before any clips go down.
- Debris sweep: Clear grit, leaves and offcuts, since they can puncture or abrade the membrane.
- Dry check: Make sure the substrate is dry before the separation mat goes on.
A high spot caught with a straightedge takes minutes to grind back. Find that same spot after the seams are closed and you could be looking at days of rework.
Planning Around Occupied Buildings
On an occupied site, the program can be just as demanding as the roof itself. Sort out material deliveries, crane or hoist access and staging areas early, before the trades all start competing for the same bay.
Tenants in a retail centre or patients in a healthcare facility should feel as little of the work as possible. This is also the stage where you lock down project details with the client.
Get the scope in writing. It saves arguments later about what the finished roof was supposed to look like. Show the client sample colours, profile and seam type before any panels are ordered.
If you want the wider picture, our guide to metal roofing installation covers the full process.
Prepare the substrate properly and the panels mostly look after themselves. Cut that corner and you'll pay for it later.
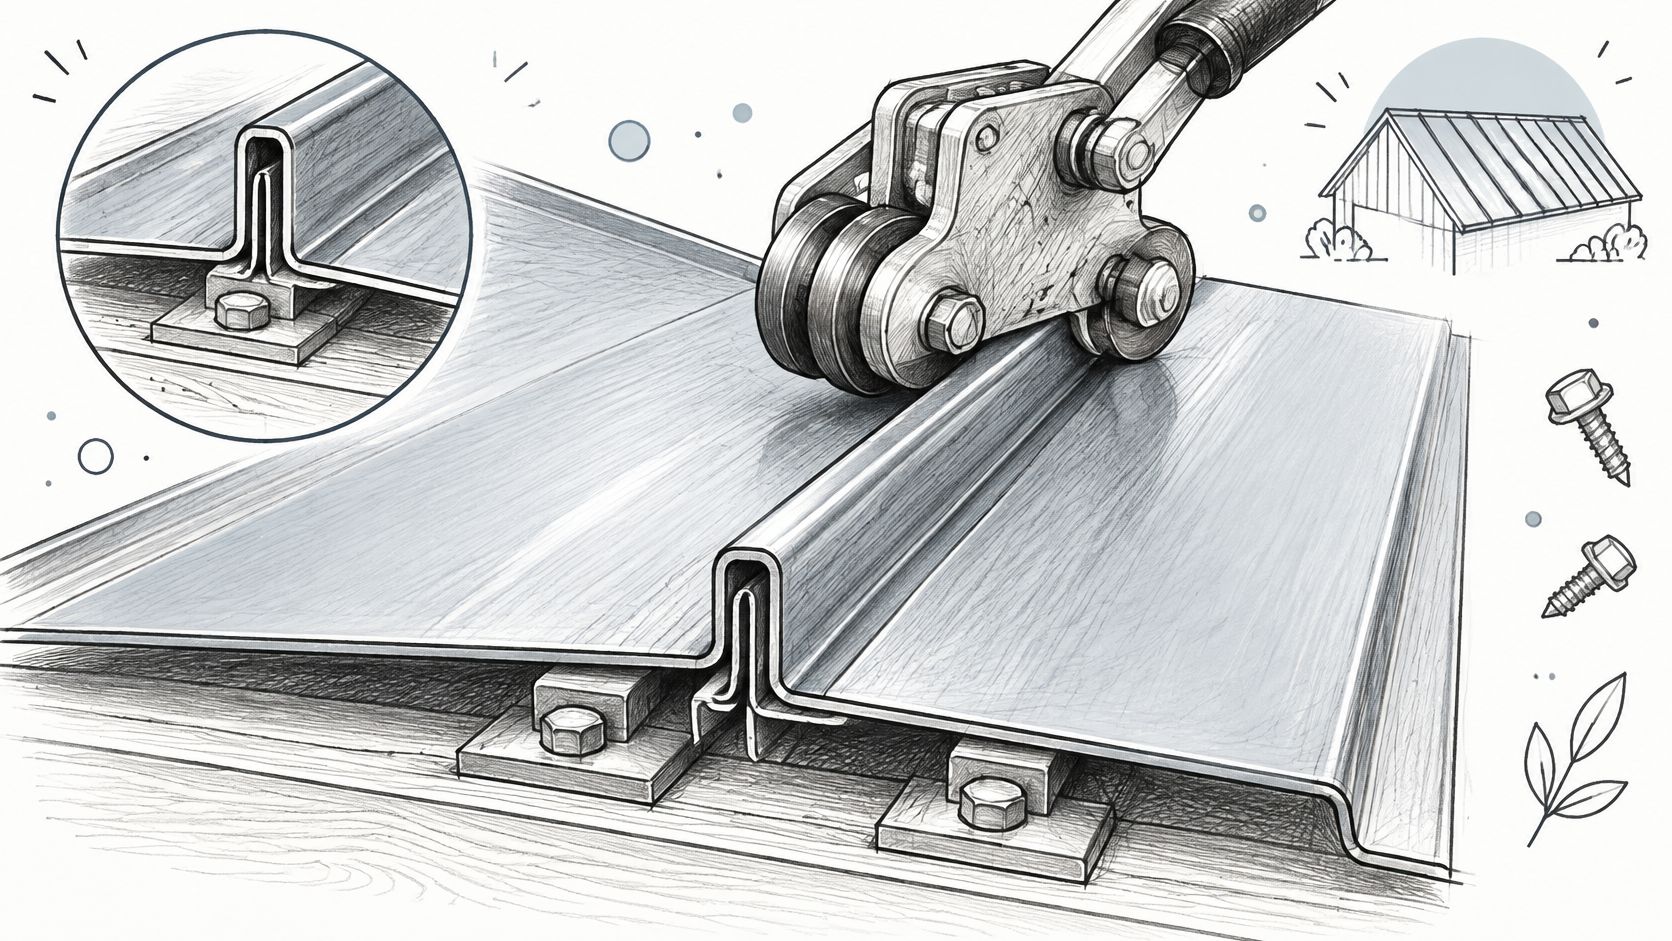
On a standing seam roof, the clips do the heavy lifting. You never see them once the roof is finished, but they are what keep every panel anchored through wind and movement.
Get the clips wrong and nothing else sits right. Panels wander, seams pinch, and the whole run starts to look tired.
Setting Out Clip Spacing
Consistency is everything here. Measure carefully off your starting line and hold that spacing across the full roof plane.
Even a few millimetres of drift matters. One crooked clip pushes the next panel out, and the error just compounds from there.
Fixing Clips to Purlins or Battens
What you are fixing into changes how you fix. Always confirm the support type on the drawings before you drive the first fastener.
- Purlins: Fix straight through into the steel or timber member. Check each fastener has bitten properly — no half-seated screws.
- Battens: Double-check batten size and centres against the design. Undersized battens will not carry clip loads for long.
Common Clip and Fixing Approaches for Commercial Roofs
Different buildings need different fixing strategies. This quick comparison covers what you will see most often on commercial work.
| Fixing Approach | Where It Typically Suits | Key Check Before Fixing |
|---|---|---|
| Fixed clips | Short panels under 2 m | Confirm the clip holds the panel without sliding |
| Sliding clips | Long panels, usually over 3 m | Check the base allows free expansion |
| Purlin-fixed clips | Steel-framed warehouses and factories | Full fastener engagement into the member |
| Batten-fixed clips | Roofs on timber or batten supports | Batten size and spacing against design |
Match the approach to the panel length and structure, not just what is in the ute. A long warehouse run with fixed clips will fight thermal movement all summer.
Clip pull-out capacity has to be checked against the design wind actions. A clip that feels solid on a calm day can still let go in a proper storm.
Forming Panel Seams Correctly
With clips set, engage each panel and close the seam fully before moving on. Half-finished seams are difficult to come back to cleanly.
Pitch decides the profile. Low-pitch roofs generally call for a double lock seam, while a single lock works on pitches of 25 degrees and above.
Avoiding Seaming Mistakes
A few common habits cause most of the damage on site:
- Over-tightening: Too much pressure distorts the profile and leaves ripples you cannot hide.
- Dirty panels: Grit caught in the joint will scratch the coating as you close it.
- Walking on seams: Fresh seams dent easily. Stick to marked walkways and keep boots off the ribs.
Commercial Roofers includes a workmanship warranty on every new roofing project, so keep a record of each clip check and seam inspection.
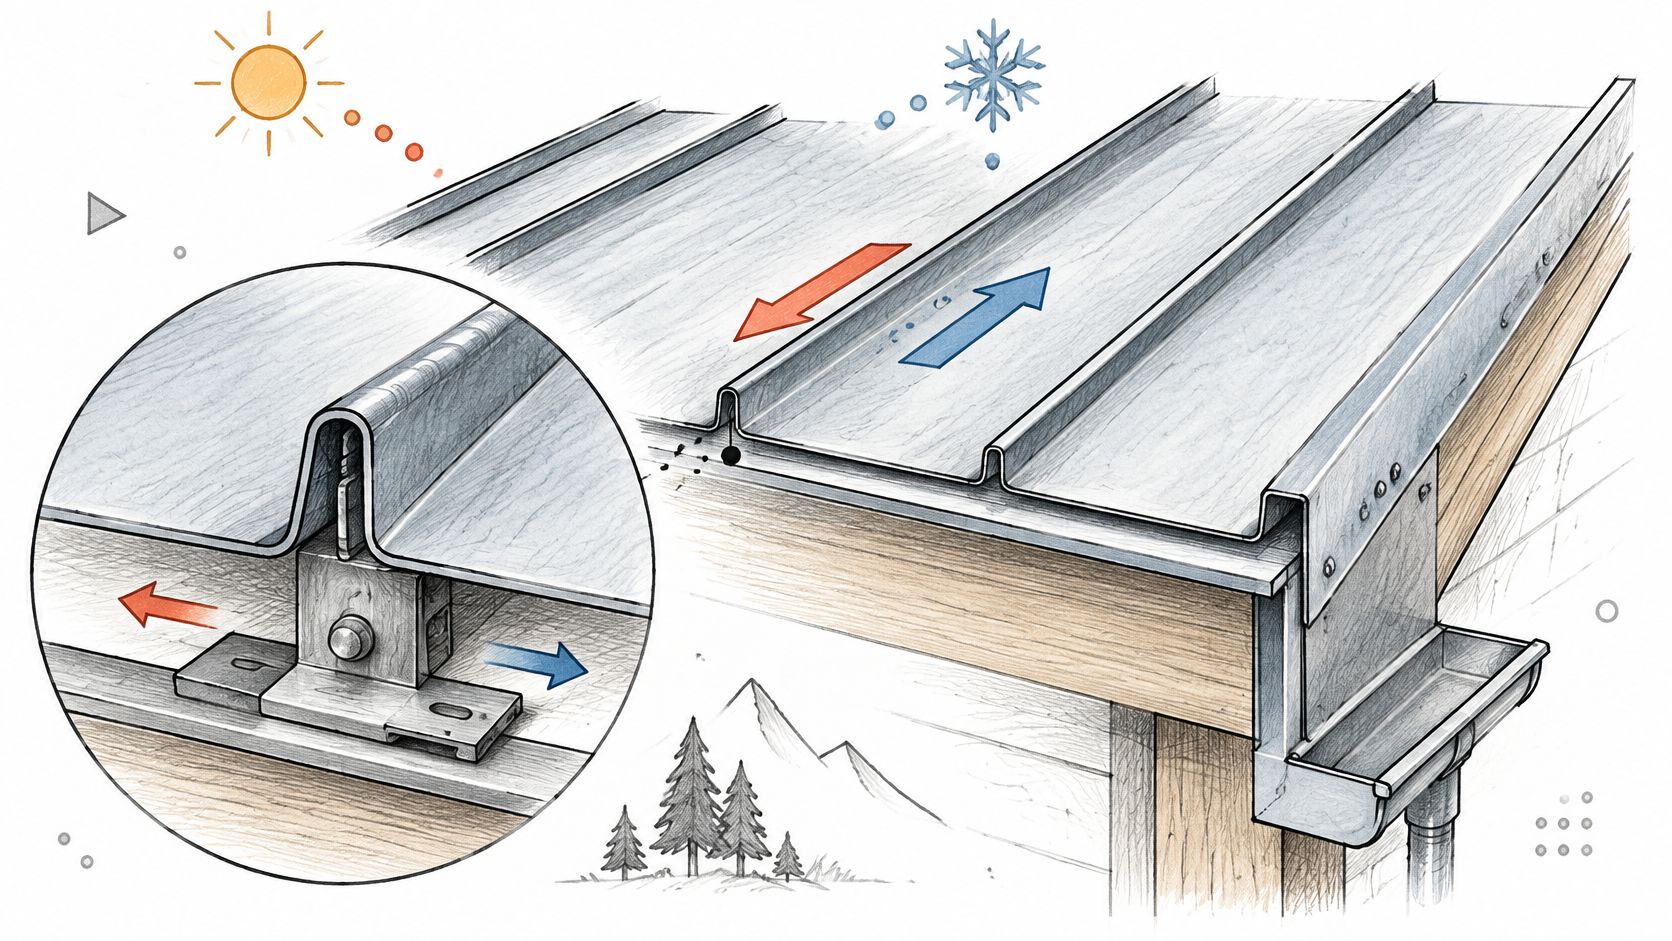
Metal expands and contracts with temperature, and on a large commercial roof that movement can be obvious within a single day.
Ignore it and the panels take the hit. They buckle, distort, or slowly work their fixings loose.
Getting the clip layout right is where the fix starts. Once the field is sorted, the edges and interfaces need the same attention.
Placing Fixed and Sliding Clips
Fixed clips hold each panel in place. Sliding clips allow the upper part of the panel to travel along its length.
Panel length changes the calculation. A steel panel grows about 1.2 mm per metre over a 100°C swing, so a 10 m run moves roughly 12 mm. Aluminium moves about 2.4 mm per metre, which is twice as much.
Thermal movement never goes away. Your clip layout decides whether it is absorbed smoothly or pushed into the seams.
I like to picture a long steel ruler left out in the sun. It grows, and it needs room to do so.
Flashing the Edges and Interfaces
Ridge, barge, eave, and wall junctions deserve the same care as the main panels. Plant penetrations, skylights, and ventilation openings do too.
In my experience, most leaks trace back to a flashing detail rather than the panel itself. Treat each interface as its own job, not an afterthought.
- Ridge and barge: Check that the trim sits flat without forcing the panel ends.
- Eaves: Keep the drip edge clear of the gutter line.
- Penetrations: Seal each one with a proper flashing kit, not sealant alone.
Sealants need to stay flexible enough to move with the roof. Choose products rated for metal movement, and keep rigid fillers away from joints that will flex.
For more detail on each junction, read our guide to roof flashing types.
A cracked bead is usually the first sign that a detail was rushed. Check it before the crew packs up for the day, because fresh sealant costs far less than repairing a ceiling stain.
Commercial roofs are a different beast from house jobs. Crews are working at height across large floor areas, often right next to occupied tenancies and live plant. One dropped bolt can do real damage.
That's why the planning needs to happen first. Safety controls should be in place well before anyone steps onto the roof.
Setting Up Safety Before Work Starts
Get these sorted before the first crew member goes up:
- Fall and edge protection installed and checked every morning, not just on day one.
- Exclusion zones marked on the ground below work areas.
- Weather monitoring with a clear stop-work rule for wind and rain.
- A materials plan for lifting and staging, so nothing ends up dropped onto occupied areas.
Edge protection is the non-negotiable part. Treat it like a guardrail on a highway, not an optional extra you add if there's time.
A safety plan sitting in a folder is no use to anyone. Walk the crew through it before anyone climbs up.
Meeting Australian Compliance Requirements
Compliance works the same way. If you leave it until handover, you'll be scrambling to fix things that could have been sorted at the start.
Before you order any material, confirm which Australian requirements apply to the metal roof installation. Check corrosion protection, roof pitch, support spans and drainage design against the approved system. It's a lot easier to catch a mismatch on paper than after the panels are fixed.
Keeping Records That Prove Compliance
Good paperwork is what shows the roof was built to the approved system. Keep these documents together, both on site and in the project file:
- The specification and approved drawings.
- Product records, including batch numbers for panels and clips.
- Installation checks, such as clip spacing and seam inspections, signed off as the work progresses.
At Commercial Roofers, our in-house crews handle both safety and compliance under one management line. Nothing gets handed off to a subcontractor and lost in the gap between them.
For the full list of requirements, see our guide to roofing standards in Australia.
Bottom line: a safe site and a clean paper trail protect the crew, the building's occupants and the client. Good records also make insurance questions a lot easier to answer.
Walk the roof with the client before the final seam goes on. Anything they flag at that stage can still be fixed while the work is open, which is far cheaper than chasing it later.
Logging Concealed Fixings as You Go
Take a photo of every concealed fixing before it disappears under the panels. It feels tedious at the time, but those photos are often the first thing you reach for when a warranty claim lands two or three years down the track.
Pair the photos with a running log:
- Clip counts for each panel run, so you know exactly what went in
- Product batch numbers for panels and clips, in case you need matching replacements years later
- Crew check dates showing who signed off each seam and fixing
Inspecting the Finished Roof
Once the roof is complete, go back over seam alignment, flashing integrity, drainage flow and debris removal. Don't rush this part. Small problems tend to hide in the details.
Gutters and outlets are the spot most people miss. If you can, run water through them and watch where it pools. Ponding at a joint or a sluggish outlet is far easier to fix now than after the first heavy storm.
A short water test on a gutter can save a ceiling stain months later.
Handing Over the Paperwork
A written final inspection report gives owners and insurers a clear record of what was built and when it was checked. Treat it as part of the job, not an afterthought.
Every standing seam roof installation from Commercial Roofers comes with a workmanship warranty. The final report, product records and maintenance notes all belong on file, because they're what support that warranty and any future maintenance program.
Store everything in one folder on site and keep another copy in the project file. That way, the owner can find it quickly when they need it.
Good records turn the next callback into a quick phone call instead of a site dispute.
How Long Does a Standing Seam Installation Take?
It mostly comes down to three things: how big the roof is, how easily crews can get on and off site, and what the weather is doing. A compact warehouse roof might wrap up in a few weeks. A large multi-building complex can stretch into months.
Rain is the factor that catches most people out. Panels can't be fixed or seamed while wet, so projects often lose days nobody planned for. Build a buffer into your program from the start rather than squeezing it in later.
Site access is the other common slowdown. On a busy site, cranes, delivery windows and staging areas can hold up the whole crew, so sort those out before the first panel arrives.
How Does It Compare with Profiled Sheeting?
Profiled sheeting is screwed straight through the sheet, which means every fixing sits out in the weather. Standing seam works differently. The clips are concealed, and the panels can slide as temperatures rise and fall.
Concealed clips mean fewer penetrations and more room for thermal movement.
Maintenance tends to follow a similar pattern. With fewer exposed screws, there are fewer spots to loosen or start weeping over time. Seams, gutters and flashing still need regular checks, though, and they shouldn't be overlooked just because the roof looks cleaner.
Which Documents Should You Request Before Work Begins?
Get these in hand before the first panel is ordered:
- The approved specification and design drawings
- Product records, including panel and clip batch numbers
- Proof of licence and public liability insurance
- A written scope, program and warranty terms
What a Well-Run Project Looks Like
In practice, a good project starts with a clear scope and a site walk before any seaming begins. Ask for photos of the concealed fixings as the work goes on, because they're the only real record of what's behind the finished surface. Daily safety checks and a written final inspection report round things out.
Commercial Roofers has more than 20 years of experience and runs in-house crews, so the same team stays accountable from start to finish. Every new roofing project also comes with a workmanship warranty. Regular updates and minimal disruption to tenants are part of the job, not an extra.
Planning a standing seam project? Commercial Roofers can inspect your roof, explain your options and provide a clear quote. Request a quote from Commercial Roofers today.