
You've got a warehouse roof that needs replacing, tenants asking about disruption and quotes that don't seem to cover the same work. One contractor has allowed for insulation, another mentions sarking, and neither has explained what happens if the purlins are corroded once the sheets come off.
A sound metal roofing installation starts by resolving those questions, not by ordering sheets. Wind design, moisture control and material compatibility belong in the specification before procurement. The practical task is to turn that specification into an orderly job, with clear inspection points and no concealed work signed off on trust.
Table of Contents
- Installation Phases and Timelines at a Glance
- How to Assess the Site Before Any Sheet Goes Up
- Choosing a Profile and Preparing the Substrate
- Working Safely on the Roof During Strip and Fixing
- How to Fix Sheets and Flash Penetrations Correctly
- Designing Condensation Control and Corrosion Protection
- Cost Drivers, Warranties and the Quote Checklist
Installation Phases and Timelines at a Glance
The working order is site assessment, materials confirmation, strip and substrate repair, underlay and condensation barrier, sheet laying and fixing, flashings and drainage, then testing and handover. Some activities overlap, but the crew shouldn't pass a hold point until the responsible person accepts the work.
Allow time for investigation and procurement rather than treating everything before installation as administration. An incomplete survey can leave the contractor waiting for a structural decision after the building is already open. Custom profiles and unresolved flashing dimensions can also interrupt an otherwise straightforward programme.
The sequence below shows where each approval belongs.
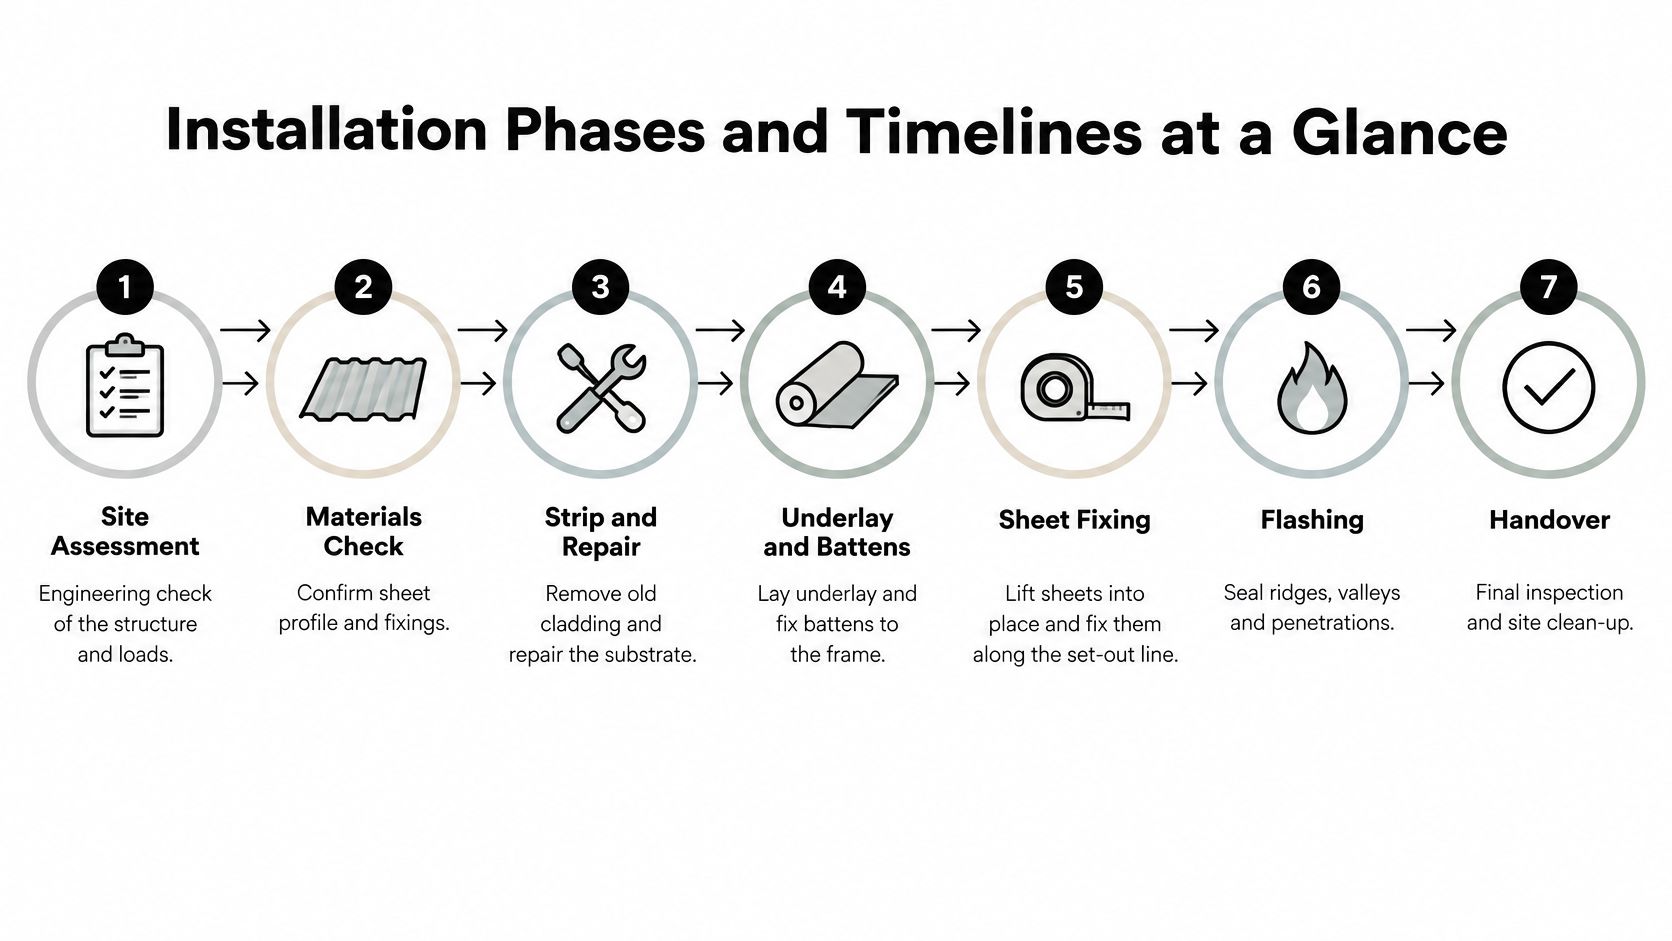
Installation phases, indicative durations and hold points
| Phase | Main Work | Typical Duration | Hold Point |
|---|---|---|---|
| Site assessment | Wind region, structure and condition survey | Depends on access and engineering review | Written design basis signed off |
| Materials confirmation | Profile, thickness, fixings and flashings locked | Supplier-confirmed procurement period | Written specification approved |
| Strip and substrate repair | Remove old sheets, repair purlins and battens | Depends on concealed condition | Structure inspected and accepted |
| Underlay and condensation barrier | Lay membrane, set drape and ventilation | Depends on assembly and staging | Barrier continuous, photos taken |
| Sheet laying and fixing | Lay, lap and fix sheets to schedule | Depends on profile, access and weather | Fixing checked bay by bay |
| Flashings, ridges and box gutters | Complete penetrations, edges and falls | Depends on detailing complexity | Falls and outlets checked and tested |
| Testing and handover | Check seating, coatings, debris and documentation | Allow for inspection and rectification | Signed handover pack |
These are programme dependencies, not promised durations. Ask the installer to turn them into project-specific dates after the survey, supplier confirmation and access planning.
What stretches the programme
Weather exposure, crane access and operating restrictions all affect how much roof can safely be opened and completed. A straightforward shed and a distribution facility with active loading docks follow the same sequence, but need different staging.
Programme check: The survey and written specification should be complete before the materials order is released.
A credible schedule also includes temporary weather protection and a response to unexpected defects. Without those allowances, the completion date is an aspiration rather than a workable plan.
How to Assess the Site Before Any Sheet Goes Up
A replacement roof can look straightforward until the wind exposure, altered framing or adjoining materials change the design. Confirm those conditions before ordering sheets. The decisions made at survey stage affect the connections and roof assembly, not just the profile.
Work through the survey in order
Confirm the design conditions. Have the designer establish the site's wind region, design wind actions and applicable requirements for the commercial building. Record the design basis and applicable standards in the project documents. The NCC sheet-roofing provisions covering wind resistance can serve as a reference, but the designer must determine the compliance pathway for the actual project.
Flag exposure. Note coastal conditions, exposed ridges and nearby industrial processes. Give the designer and supplier the site information they need to assess environmental exposure and material suitability.
Measure the roof geometry. Record pitch, bay lengths, overhangs, parapets, changes in level and penetrations. Verify existing conditions on site rather than relying only on drawings.
Inspect the supporting structure. Check purlin size, spacing, alignment, corrosion and alterations. Record notches, damaged battens and differences between the structure on site and the original design.
Assess the existing covering before disturbing it. Mark corrosion and enlarged fixing holes. If asbestos is suspected, arrange competent identification and a removal plan before strip-off.
Map materials and drainage paths. Identify adjoining roofs, flashings, gutters and equipment that could contact the new system or discharge water onto it. These checks help identify compatibility and drainage issues before installation.
Obtain written approval. The designer should accept the technical specification, and the owner should approve the scope and operational arrangements before work proceeds.
Investigate alterations, not just visible damage
Consider a factory with a later mezzanine addition. If its supports or other alterations affect roof framing, the engineer needs to assess the arrangement before replacement sheeting is specified. That is a project-specific check, not evidence that every mezzanine has overloaded the purlins.
Standards editions also belong in the design record. The ABCB's standards update provides background on the transition between editions of AS 1562.1. The project documents should state which NCC and standards editions apply. For NSW work, confirm adoption and transitional arrangements with the project certifier rather than assuming the newest published document governs the job.
Settle wind design, material compatibility and the treatment of water paths before the first sheet is ordered. Changes made after installation can mean rework, delays and added cost.
Choosing a Profile and Preparing the Substrate
Choose the profile against tested span capacity, roof pitch, appearance, maintenance access and fixing method. Don't choose it from a colour sample and expect the installer to resolve the engineering afterwards.
The following comparison is a procurement guide. Actual span capability, fixing requirements and cost must come from the selected product and project quotation.
Common commercial profiles and where they fit
| Profile | Typical Commercial Use | Fixing Method | Main Trade-off |
|---|---|---|---|
| Corrugated Colorbond | Sheds, warehouses and budget-led projects | Exposed crest fixings where specified | Accessible fasteners, with inspection requirements |
| Trapezoidal Colorbond | Factories and warehouses where tested spans suit the framing | Exposed screws to the tested schedule | Check fixing quantity and labour against the selected product |
| Interlocking snap-lock panel | Clean-look roofs needing concealed fixing | Concealed clips with interlocking panels | Clip layout and movement detailing need careful coordination |
| Standing seam | Architectural commercial roofs | Concealed clips and the specified seaming system | Obtain specialist installation and fabrication pricing |
Colorbond identifies a coated steel product, not a universal span rating. Different profiles need their own technical checks. Likewise, a concealed-fix appearance doesn't remove the need to inspect clips and their supporting connections before they disappear.
Prepare the surface before covering it
Strip the old roof in controlled sections that match the weather-protection plan. Keep removed fasteners, broken sheet fragments and demolition debris away from the prepared framing.
Check that purlin tops are aligned within the selected system's tolerances. Don't pull a sheet hard onto distorted supports and accept the resulting twist as normal. Refer damaged or altered structural members to the engineer, then complete the approved repairs before proceeding.
Remove drill swarf and cutting filings as work progresses. Check the prepared surface for anything that could damage the membrane, and confirm the barrier can be installed continuously around changes in level and supports.
A new sheet can conceal an old defect. It cannot correct it.
Treat accessories as part of the roof
The NCC 2025 sheet-roofing corrosion and compatibility provisions address corrosion protection through compatibility requirements. Subject to the applicable adoption arrangements, use that system-level approach when checking sheets, fasteners, flashings, gutters and adjacent materials.
Pay particular attention to copper runoff, dissimilar-metal contact and replacement components connected to an existing roof. Ask the supplier to confirm compatibility in writing where the interface is uncertain.
A cheaper substitute screw or flashing isn't an equivalent just because it fits. Require approval against the specification before substitution, including any implications for the manufacturer's warranty.
Working Safely on the Roof During Strip and Fixing
Set up the access and fall-protection arrangements before anyone starts stripping sheets. The site-specific safety plan should identify the principal contractor, responsible supervisors and controls for people working below.
Resolve access and lifting hazards
- Protect edges and openings. Select suitable edge protection or designed restraint and fall-arrest arrangements, including verified anchor points where required.
- Assess fragile areas. Identify skylights and deteriorated sheets. Don't treat a walking board or a visible purlin line as permission to cross an unassessed roof.
- Plan sheet lifts. Agree crane or hoist positions, exclusion zones and traffic management around loading docks and pedestrian routes.
- Control suspect materials. Arrange asbestos assessment and appropriately licensed removal where required. Stop if unexpected suspect material appears.
- Secure loose material. Restrain stored sheets and offcuts, and prevent debris from falling into occupied areas.
Separate construction from operations
Agree barriers, delivery routes, noise-sensitive periods and shutdown windows with the building operator. People inside shouldn't have to guess whether overhead work makes an area unsafe.
Confirm insurance, emergency arrangements and the safety documentation before mobilisation. If access conditions change, revise the work method rather than asking the crew to improvise around an active loading dock or unprotected opening.
How to Fix Sheets and Flash Penetrations Correctly
A sheet can look straight from the ground and still be poorly fixed. On warehouse and strata roofs, the usual failures begin with an unconfirmed fixing schedule, misplaced fasteners or a penetration detail that interrupts drainage. The manufacturer's tested fixing schedule and project design govern the installation. The table below is a non-binding benchmark for discussion, not a specification for a commercial roof. Confirm the required fixing with the designer and roofing manufacturer for the actual profile, supports and wind design.
Fixing schedule by profile
| Profile | End Spans | Internal Spans | Perimeter and Corners |
|---|---|---|---|
| Corrugated | Every second rib | Every third rib | Confirm closer fixing requirements with designer and manufacturer |
| Trapezoidal | Every rib | Every rib | Confirm closer fixing requirements with designer and manufacturer |
| Concealed-clip profiles | Manufacturer clip schedule | Manufacturer clip schedule | Confirm project-specific clip layout |
These frequencies are only a starting point. The NCC sheet-roofing fixing provisions apply within their stated scope, so do not treat them as approval for a commercial assembly. Check the project drawings and product instructions before ordering sheets or fasteners.
Alignment and handling need checking before the first run is committed.
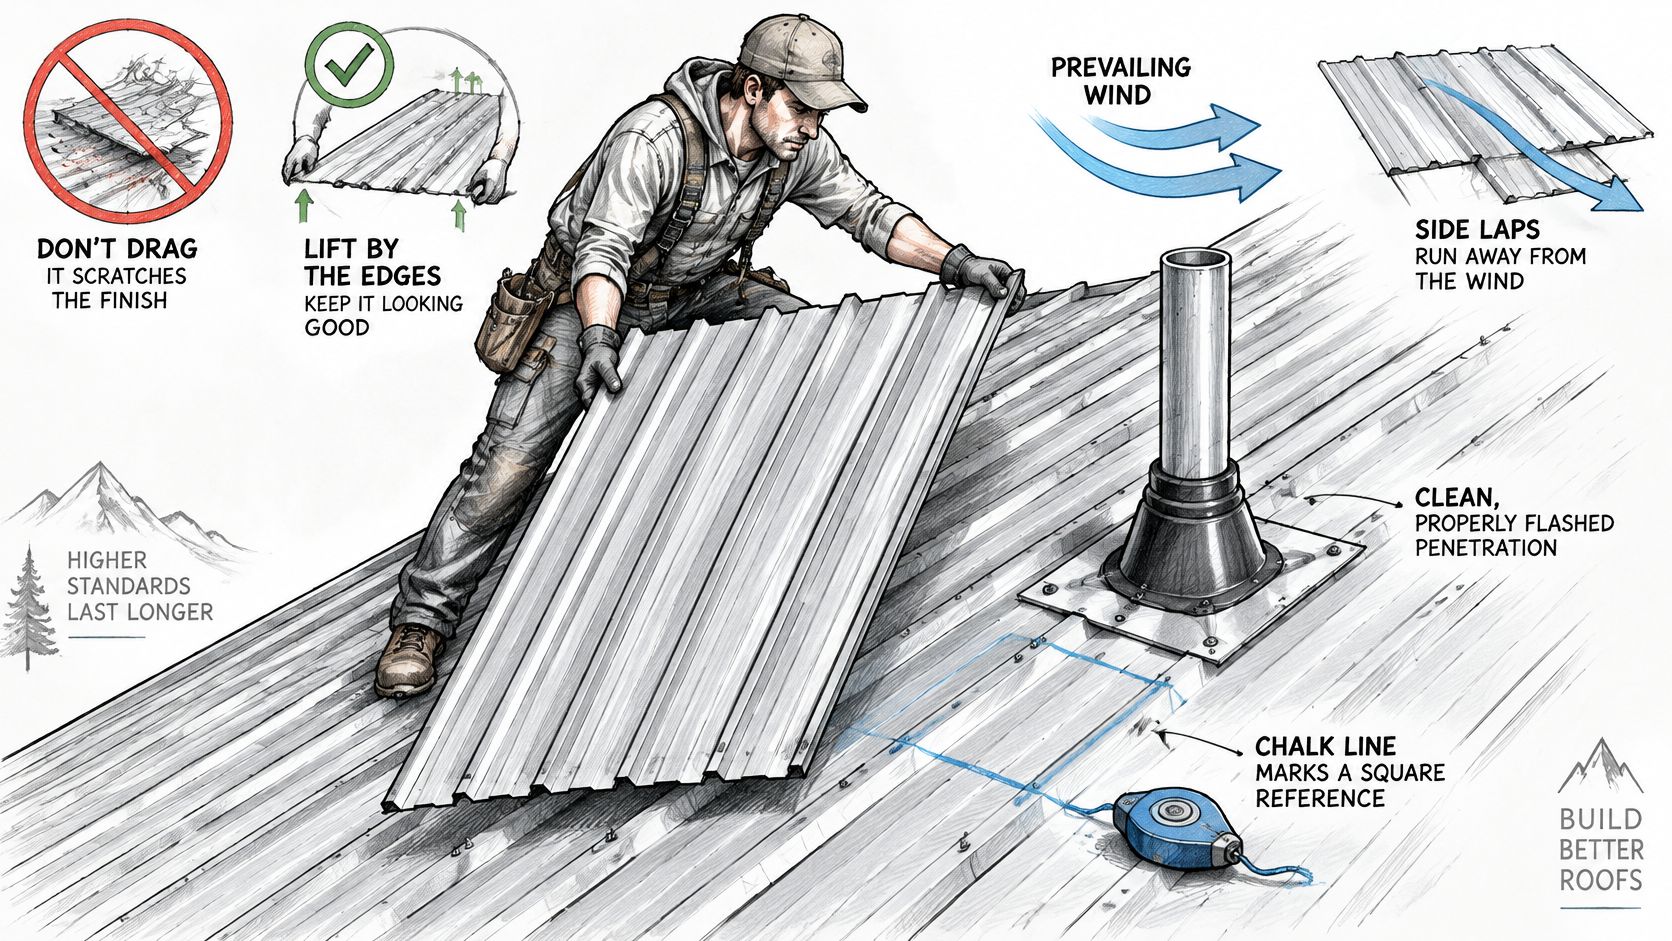
Follow a controlled fixing sequence
Establish a square set-out line. Check the first sheet against the roof geometry and drainage direction. Follow the profile's prescribed lap orientation rather than trying to correct alignment at the far edge.
Lift sheets into position. Avoid dragging them across finished coatings. Inspect for damage while it is accessible and use the specified treatment.
Fix at the position specified for the profile. For pierced corrugated or trapezoidal sheets, use the crest-fixing detail only where the manufacturer specifies crest fixing. Place each fastener through the designated crest, not the valley. If the product calls for valley fixing, follow that product-specific detail. Concealed-fix systems require their own clip and connection details.
Check screw seating. Overdriving can distort the washer; underdriving can leave inadequate compression and allow movement. Set the driver on the actual assembly, then inspect fastener seating as work progresses. The guide to roofing screws for metal roofs can help frame questions about selection, but confirm approval for the specific roof.
Confirm the laps. Check side-lap engagement and the manufacturer's end-lap and support requirements. A lap that looks closed from below may still be incorrectly engaged.
Detail penetrations for drainage. Set out penetrations to avoid low points and water paths where possible. Use the specified collar and flashing, properly dressed to the roof profile, with compatible sealant where required. Keep the uphill side clear so water can drain around the penetration. Sealant supports the detail, it does not fix trapped water or a poorly fitted flashing.
Complete edges and drainage. Check ridges, barges, box gutters and outlets against the drawings. Carry out controlled water testing where specified, without forcing water into joints in a way that misrepresents normal drainage.
Treat demonstrations as supplementary to the approved installation instructions.
Check perimeter and corner fixing zones
The wind design determines how fixing requirements vary across the roof. Perimeter and corner zones can face different uplift demands from the central field, so the designer's wind basis and fixing schedule should identify their boundaries and required restraint. Mark those zones on the installation drawing and inspect them separately. Do not apply a generic closer-fixing rule without confirming the project design.
If an inspection finds valley fasteners where the approved detail requires crest fixing, the holes themselves are a defect: they can admit water and cannot be made sound by adding screws elsewhere. Stop covering that area, refer the repair to the designer and manufacturer, remove or replace the affected sheet if required, and repair the unused holes using an approved method before reinstating the correct fixing pattern. Rejecting the first incorrect bay is cheaper and more reliable than leaving an unapproved repair across a completed roof.
Designing Condensation Control and Corrosion Protection
A roof can remain watertight from above and still wet the building from below. The Australian Steel Institute's metal roofing and condensation guidance explains that cold, clear, still nights can cool metal below the dew point, particularly where outside air circulates beneath exposed sheets.
Insulation alone isn't a condensation-control design. It can reduce heat transfer without preventing humid air from reaching a cold surface. In an operating warehouse, the designer also needs to understand process moisture, cooling equipment, exhaust systems and internal pressure.
Design for the building's actual use
- List moisture sources. Record process water, kitchens, evaporative cooling, occupied areas and moisture-sensitive stock.
- Coordinate ventilation and exhaust. Design around how the building operates, including enclosed or air-conditioned zones within a larger shed.
- Select membrane performance. Choose vapour control and water-management characteristics for the climate and assembly, not just a familiar product name.
- Preserve the specified gaps. Maintain the required drape or air space and keep insulation clear of ventilation paths.
- Provide a drainage route. Coordinate membrane discharge, penetrations, gutters and outlets so collected moisture has somewhere safe to go.
The Your Home condensation guidance explains the importance of moisture movement, ventilation and vapour permeance. Its residential context doesn't replace commercial design, but the underlying warning is relevant: an impermeable layer in the wrong location can trap moisture.
Design question: Where will condensation go, and how will anyone inspect the parts it could damage?
Keep evidence before closure
Use the guide to installing sarking under a metal roof to prepare installation questions, then require a project-specific membrane detail.
Photograph concealed interfaces, penetrations, cut edges and fastener heads before closure. Record the specified treatment and distinguish surface discolouration from suspected structural corrosion instead of labelling every coating change as the same defect.
Finish with an underside inspection during or after cool conditions. Look for staining at laps and penetrations, damaged barriers and moisture paths that weren't apparent during a dry-weather inspection.
Cost Drivers, Warranties and the Quote Checklist
Compare the scope and risk allocation before comparing the total price. Access arrangements, concealed structural defects and hazardous-material handling can materially change the work required. A quote that excludes those items may be cheaper only until the first hold point.
There's no defensible universal installed rate without knowing the building and assembly. The following table is a qualitative pricing guide, not a measured ranking or a substitute for a survey.
Cost drivers for commercial metal roof installation
| Cost Driver | How It Moves the Price | Typical Effect |
|---|---|---|
| Roof height and access | Hoists, cranes and traffic management | Greater allowance for difficult access |
| Profile and fixing system | Different fabrication, installation and detailing requirements | Architectural systems need separate pricing |
| Existing sheet removal | Hazardous-material assessment, removal and disposal | Additional scope where asbestos is present |
| Substrate repair | Replacement or repair of purlins and battens | Depends on confirmed condition |
| Condensation barrier and ventilation | Membrane, ventilation and exhaust coordination | Additional designed assembly work |
| Penetrations, skylights and box gutters | More junctions and flashing labour | Increases with detail complexity |
| Out-of-hours works | Work staged around live operations | Depends on agreed operating restrictions |
Ask for provisional allowances to be identified clearly, with an agreed approval process for variations. Don't accept “repairs as required” without knowing who authorises the repair and how it will be valued.
Separate the warranties
Request the materials warranty and workmanship warranty separately. The former concerns the supplied products and coatings under their stated terms; the latter should define the contractor's responsibility for installation work.
Ask for the duration, covered components, maintenance obligations, inspection requirements and exclusions in writing. Specifically query condensation, mechanical damage and chemical exposure rather than assuming they're covered. Confirm who coordinates insurer enquiries and documents damage after a storm.
The metal roof replacement cost guide can help organise the commercial questions, but the project quotation still needs to identify its own inclusions.
Send every installer the same checklist
- Design basis. State the wind assessment, applicable documents and person responsible for design.
- Roof system. Name the profile, coating, thickness, accessories and fixing schedule.
- Existing conditions. Price substrate repairs and asbestos handling, or state the exclusions and investigation process.
- Moisture control. Include the specified barrier, ventilation and interface details.
- Hold points. Identify who inspects and who authorises covering the work.
- Handover records. Include concealed-work photographs, inspection results, test records and warranty documents.
- Site responsibility. Identify crew arrangements, safety management and the principal contractor.
- Operational programme. Tie staging, access and shutdowns to the building's actual use.
Compare responses line by line. Book the survey and obtain the written specification before authorising the materials order, especially when the proposed saving depends on leaving something unexamined.
Commercial Roofers offers commercial and industrial metal roofing installation, replacement, inspections and associated guttering across NSW. Visit Commercial Roofers to arrange a site assessment and request a written scope covering the roof system, condensation control, access arrangements and inspection hold points before materials are ordered.