

The replacement sheets are being priced, the warehouse still needs to operate, and the site manager wants a start date. Then someone asks for the roof's wind classification, the condition of the existing purlins and the condensation-control detail. If those answers aren't available, you're not ready to order the roof.
A useful corrugated metal roofing installation guide starts with those gaps, not a screw gun. On a Sydney warehouse re-roof, the job is to deliver a connected structural and weatherproofing system while keeping people, stock and operations protected.
Table of Contents
- Why Commercial Corrugated Roofing Is an Engineered System
- Pre-Mobilisation Checks for Australian Commercial Roofs
- Substrate, Underlay and Insulation Build-Up
- Sheet Layout and Fixing Sequence on Site
- Laps, Flashings and Gutter Integration
- Fastener Selection and Wind-Region Fixing Patterns
- Quality Checks, Common Pitfalls and Handover Records
Why Commercial Corrugated Roofing Is an Engineered System
Consider a hypothetical warehouse re-roof where the crew applies its usual fixing pattern across the entire building. Nobody identifies the roof's corner zones, and nobody checks whether the existing supports suit the replacement profile. When a southerly change arrives, the installation has no demonstrated basis for resisting the site's wind actions.
That's a failure scenario, not a reported case study. It illustrates the question a site manager should ask before accepting any proposal: what connects this roof specification to this particular building?
Start with the load path
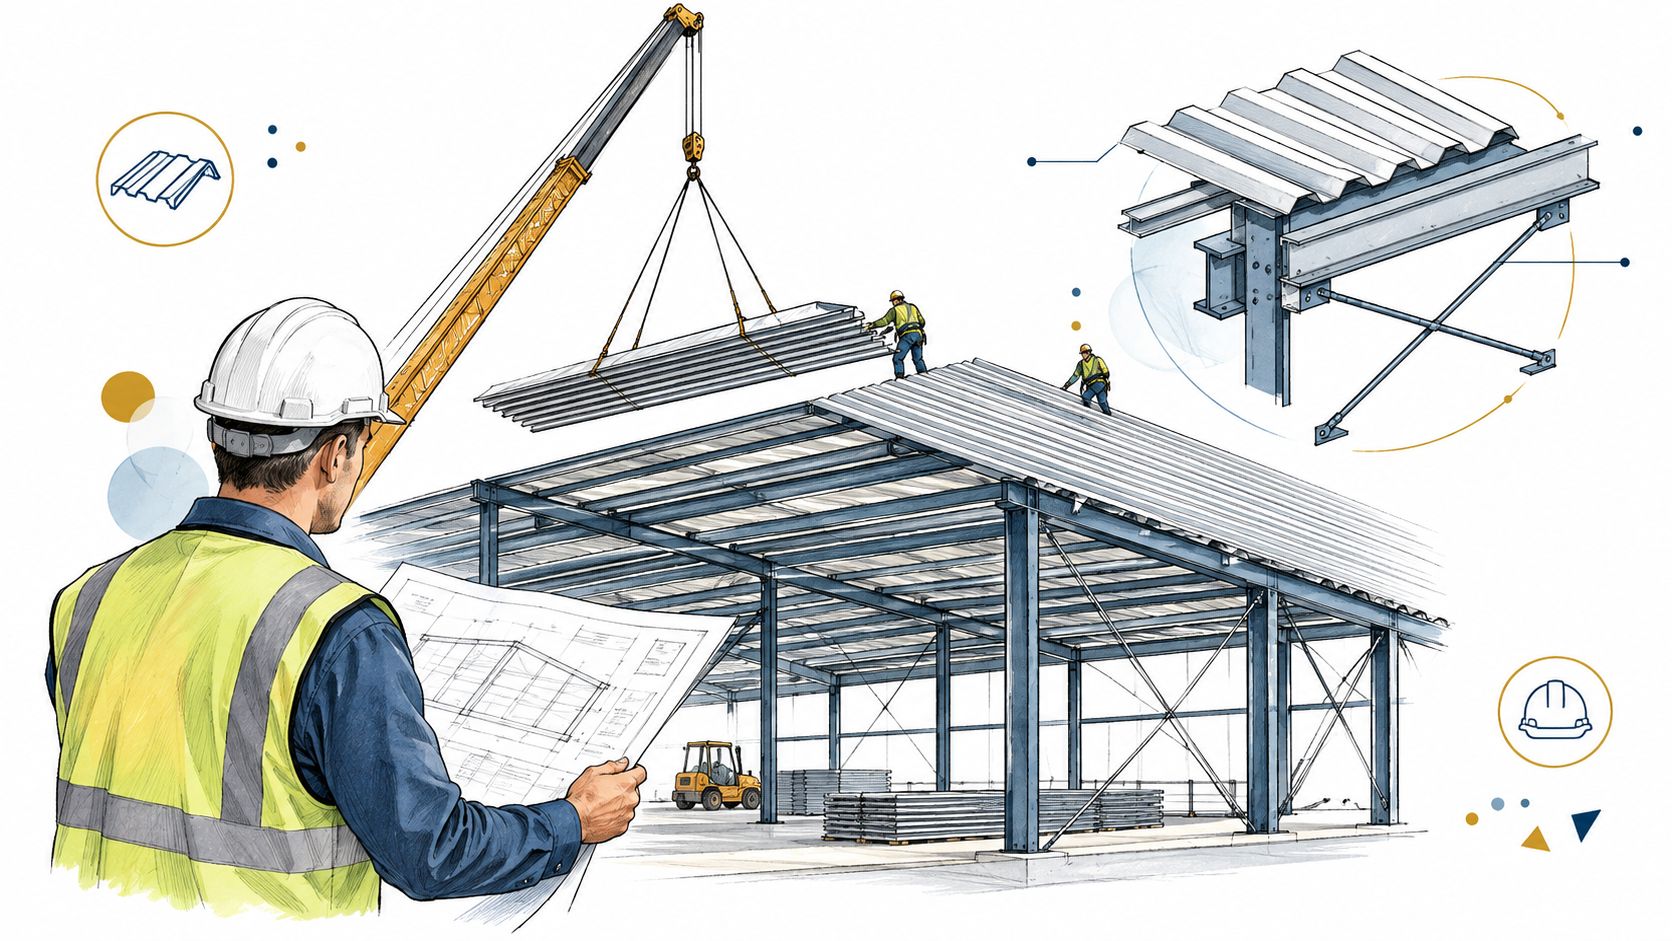
Metal roofing is not cladding attached to whatever framing is already there. The designer needs to consider the sheets, connections and immediate supports together, with the site's wind region, terrain and building importance informing the design.
The NCC sheet-roofing provisions address wind resistance and corrosion protection, and identify cyclonic construction requirements associated with wind Regions B2, C and D. The applicable commercial-building compliance pathway still needs confirmation. Housing provisions are not a blanket specification for an industrial warehouse.
The design team should nominate the applicable NCC edition, wind-action standard and metal-cladding installation standard. Where the building or proposed system falls outside prescriptive limits, obtain project-specific engineering rather than extending a familiar residential detail.
The drawing review belongs ahead of procurement and installation.
Know where generic guidance stops
A manufacturer's technical manual is essential, but the installer still needs to establish that its assumptions match the job. A suitable profile on one building may need different support spacing or connections on another.
The commercial trade-off is straightforward. A cheaper sheet-and-screw package isn't cheaper if the engineer later rejects the support arrangement or requires a different fixing system.
Before approving procurement, ask for:
- A nominated roof system, including profile, coating, supports and compatible connections.
- A roof-zone drawing that installers can follow without interpreting engineering calculations on the roof.
- Resolved junction details, including penetrations, perimeter flashings and drainage interfaces.
- An approval process for changes, so substitutions don't happen through a supplier's delivery docket.
Practical rule: If the crew can't identify the approved detail for the area they're installing, stop and resolve it before covering the supports.
The site manager doesn't need to redesign the roof. They do need enough documentation to distinguish an approved installation from a crew's preferred habit.
Pre-Mobilisation Checks for Australian Commercial Roofs
Treat pre-mobilisation as a release gate. The estimator, engineer, supplier and leading hand should be working from the same roof plan before materials arrive.
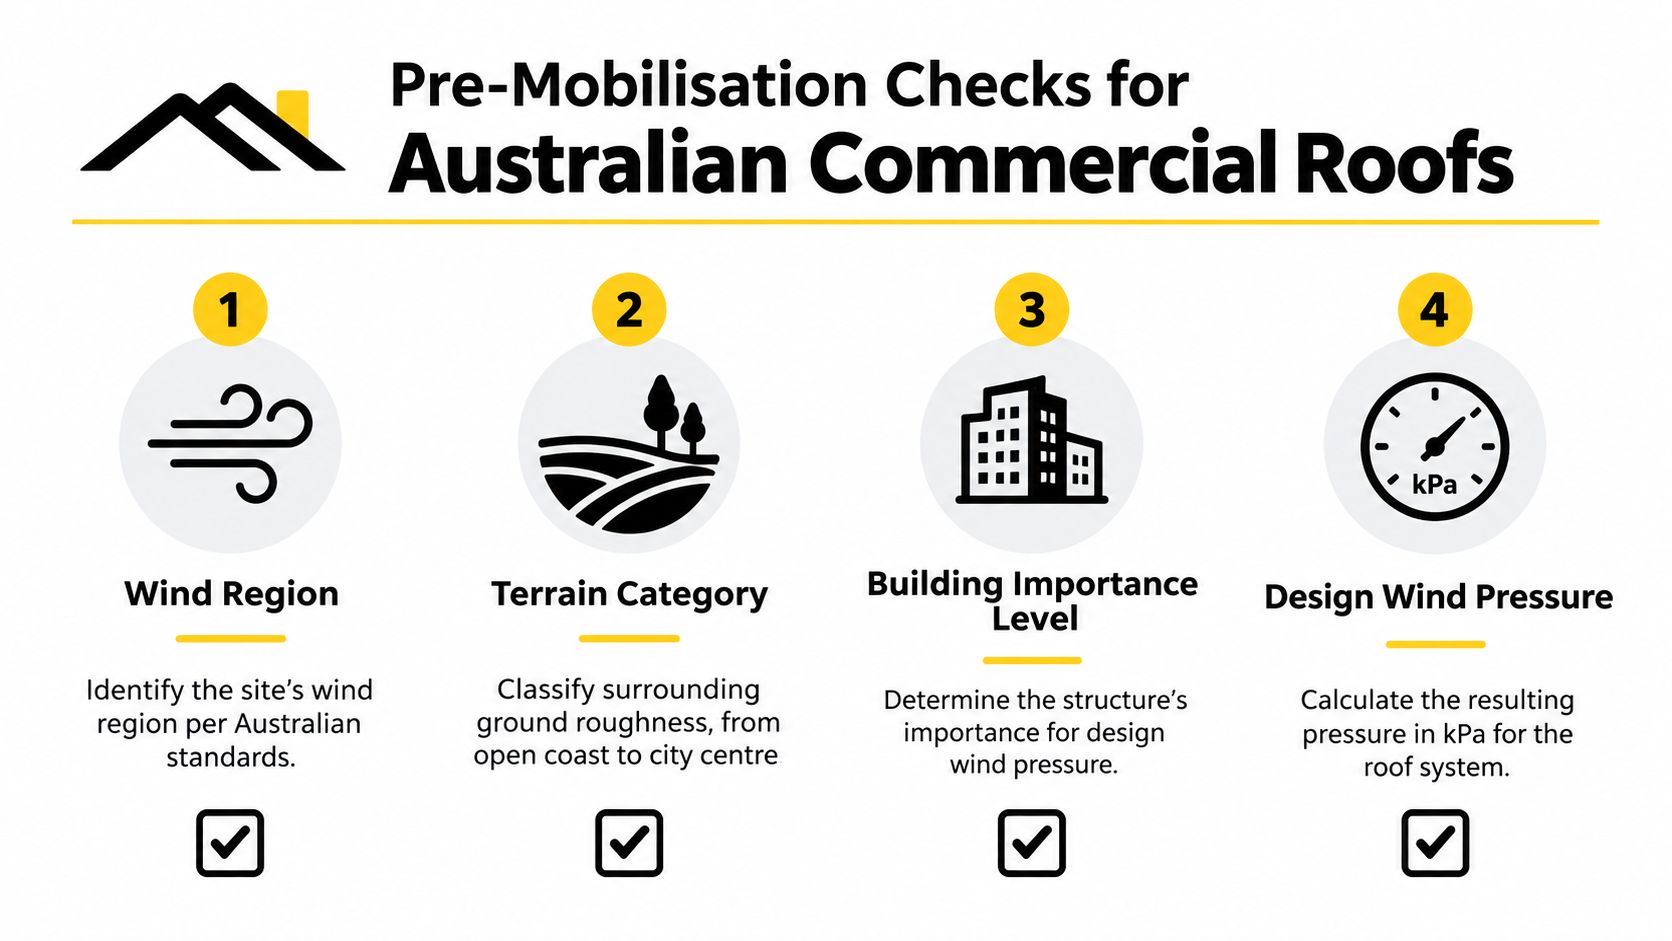
The checklist below is a useful starting point for the design conversation.
Close the design and procurement file
- Confirm the site inputs. Record the wind region, terrain category, building importance and resulting design actions. Don't accept an assumption based solely on the suburb.
- Identify the governing documents. The project specification should nominate AS/NZS 1170.2 for wind actions and the applicable cladding requirements, including AS 1562.1:2018 for metal-sheet design and installation.
- Control the span tables. File the selected manufacturer's tables with the approved profile, material and support assumptions clearly identified. An unmarked catalogue isn't a project-specific approval.
- Resolve substitutions before ordering. Obtain acceptance for changes to sheet profile, coating, fastener or support arrangement. Similar appearance doesn't establish equivalent performance.
- Set up material traceability. Require delivery records that identify sheet batches, coatings and fastener products, then nominate who will retain them.
Ask the supplier to price the approved system, not an incomplete description such as corrugated roofing with standard screws. Otherwise, competing quotations may cover materially different work.
Inspect what the drawings can't confirm
The existing roof needs a documented substrate inspection. Arrange for the responsible person to assess purlin or batten condition, connection condition, alignment and suitability for the proposed system.
Where the inspection raises uncertainty, seek an engineering decision before installation. Don't let a replacement sheet conceal an unresolved support defect.
Use a separate site-readiness checklist:
- Hazard information. Review available asbestos information for an older warehouse and arrange specialist assessment where material identification is uncertain.
- Roof-work controls. Document access, edge protection, exclusion areas, safe work procedures and personnel responsibilities.
- Operational coordination. Agree on delivery routes, lifting areas, internal protection and communication with warehouse staff.
- Claim coordination. Where an insurer is involved, clarify the approved scope, inspection hold points and evidence required before removal starts.
NSW roof-work planning needs to protect workers and others affected by the work. Have the contractor verify the current requirements directly with SafeWork NSW rather than treating a generic safety folder as site approval.
A mobilisation meeting should finish with named owners for unresolved items. If the engineering detail, access arrangements or hazardous-material assessment remains open, the start date remains conditional.
Substrate, Underlay and Insulation Build-Up
A warehouse roof can look watertight from above while moisture develops underneath it. Humid internal air contacting cold metal is a different problem from rain entering through a flashing, and replacing sheets alone doesn't resolve it.
The roof build-up should therefore be drawn as a layered assembly. Identify the supporting structure, underlay, insulation, vapour-control components, ventilation provisions and external cladding, including what happens where those layers meet walls and penetrations.
Choose layers for the building's actual use
A storage shed, conditioned warehouse and commercial laundry shouldn't receive the same condensation detail by default. Ask the operator about moisture-producing processes, temperature control and planned changes of use before finalising the assembly.
The following table is a design-discussion tool, not a specification.
Commercial Roof Build-Up Layers
| Building Use | Vapour Control | Insulation | Ventilation | Condensation Risk |
|---|---|---|---|---|
| General warehouse | Assess internal moisture and climate before selecting a layer | Document the required assembly performance | Confirm how the proposed arrangement handles moisture | Depends on occupation and operating conditions |
| Air-conditioned premises | Resolve vapour direction and continuity with the designer | Coordinate roof insulation with conditioned spaces | Check compatibility with the air-control strategy | Assess temperature differences across the assembly |
| Kitchen or laundry operations | Design for the identified internal moisture load | Keep the specified insulation arrangement continuous | Coordinate process exhaust and roof-space provisions | Give moisture-producing activities explicit attention |
| Existing-roof retrofit | Check how new layers interact with retained construction | Confirm available space and support details | Establish a safe moisture discharge route | Investigate existing staining or wet insulation |
YourHome's insulation guidance states that roof and ceiling insulation can save 45% or more on heating and cooling costs. That's residential guidance, not a promised saving for a warehouse. For commercial work, assess the building's operating conditions and applicable thermal requirements rather than transferring that percentage into a business case.
Resolve continuity before closing the roof
The NSW Government roofing technical guidance addresses sealed vapour-barrier joints, wall junctions and penetrations, with placement on the warm side of insulation. It also specifies a thermal break of at least R0.2 where metal roofing is fixed over metal purlins or battens with a ceiling directly below. That document is a useful technical reference, not a substitute for the warehouse's own design.
Ask the designer to determine whether the assembly needs a vapour-control layer, permeable underlay, ventilated cavity or another coordinated approach. Don't combine products because each is marketed as condensation control.
For installation coordination, use the guide to installing sarking under a metal roof alongside the approved assembly detail.
- Protect drainage routes. Keep insulation and underlay clear of designated water discharge paths.
- Coordinate electrical components. Resolve clearances and interfaces before the roof conceals them.
- Check material compatibility. Confirm coating selection, fasteners and cut-edge treatment against the nominated system requirements.
A dry installation day proves nothing about condensation performance during occupied operation.
Sheet Layout and Fixing Sequence on Site
Good set-out begins with a roof plan that shows sheet direction, support lines, penetrations and zone boundaries. Don't ask the leading hand to discover those decisions while the crane is waiting.
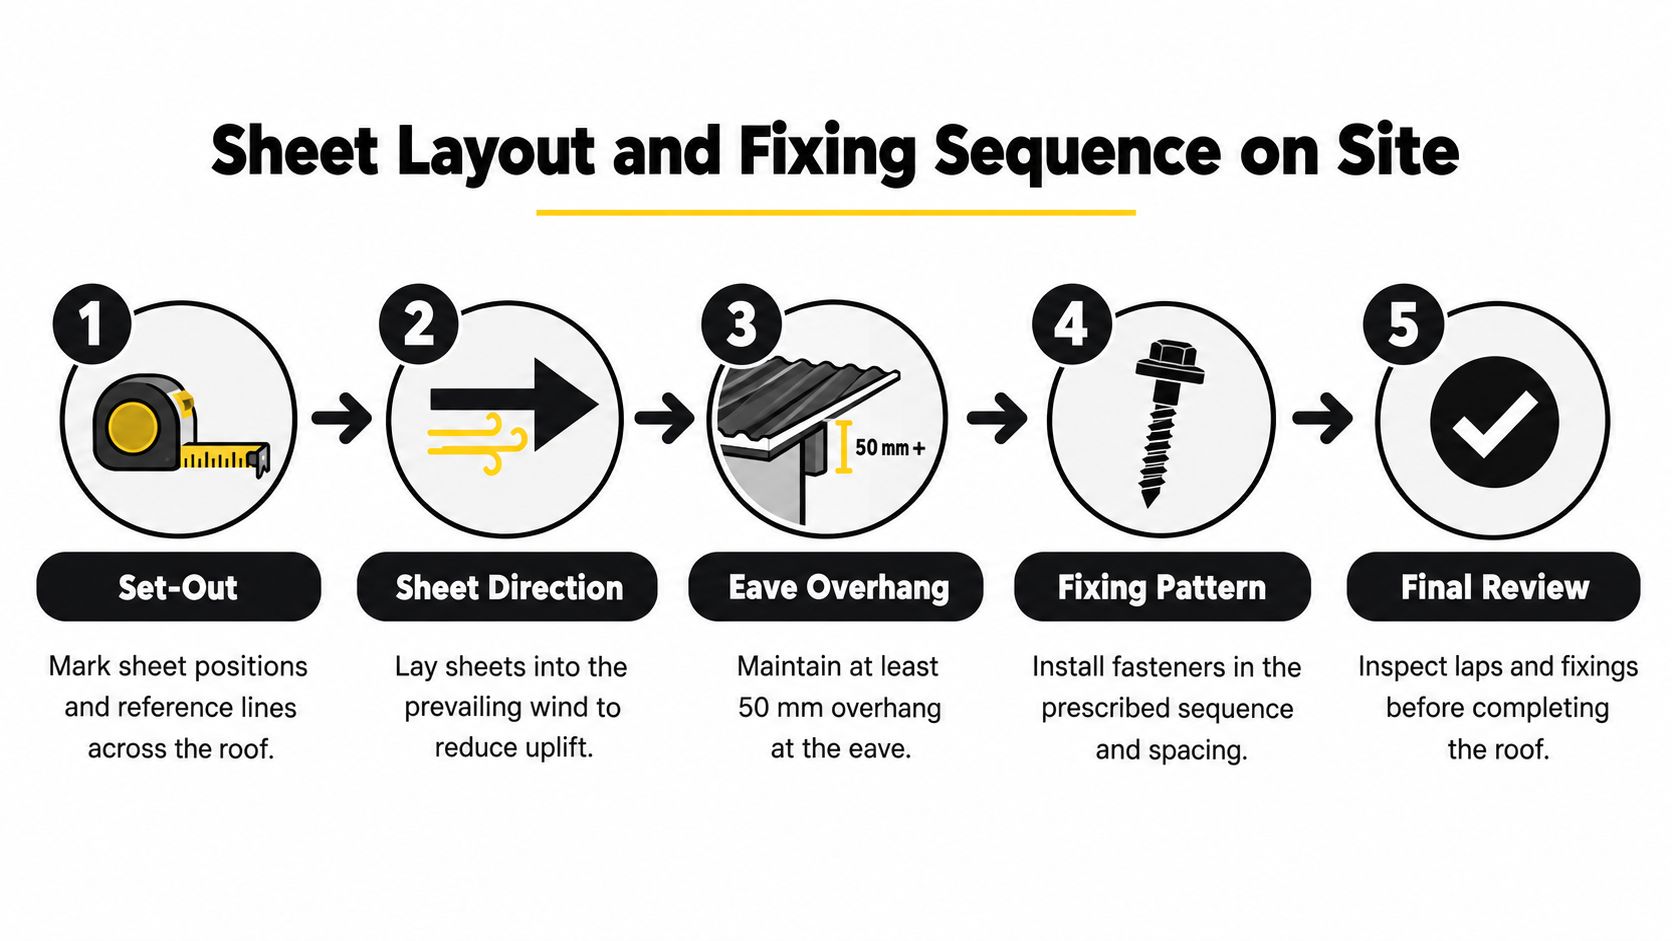
Use the sequence below as a coordination overview. Dimensions and fixing details shown in generic graphics remain subject to the selected system's approved documentation.
Establish the reference lines
Check the roof geometry against the order before lifting sheets. Confirm the eave line, ridge relationship, support positions and the locations of openings that will interrupt sheet runs.
Set reference lines that let the crew check alignment progressively. If the run starts drifting, correct the set-out rather than stretching sheets across their width to force the final edge into position.
Separate the take-off from the engineering decision. An estimator can use a resource such as Exayard roofing estimating software from Exayard when preparing quantities, but the approved roof specification must still determine what gets counted and ordered.
- Match delivery to the work area. Label bundles against the installation plan so crews aren't sorting unidentified sheets on the roof.
- Plan openings before fixing. Confirm HVAC, skylight, flue and other penetration locations with the relevant trades.
- Mark changes in requirements. Make zone boundaries and special details visible on the working drawings.
- Check alignment as work advances. Don't leave cumulative set-out errors for the closing sheets.
Secure complete work areas
Follow the selected system's approved order for laying and fixing sheets. Establish the starting arrangement at the eave and progress without leaving alignment decisions or required connections unresolved.
Temporary positioning isn't the same as completed fixing. The supervisor should know which areas are fully secured, which remain under installation and what must be completed before the crew leaves.
The installation video below can support a crew discussion, but it doesn't replace the project drawings or manufacturer's instructions.
For an operating warehouse, agree on manageable work fronts with the facility manager. Coordinate deliveries, lifting operations and weather decisions with the areas that can be stripped, rebuilt and secured.
A practical daily closeout should identify:
- Completed roof areas, checked against the approved fixing documentation.
- Incomplete interfaces, with an agreed temporary protection arrangement.
- Loose materials and equipment, accounted for before the work area is released.
- Internal exposure, communicated to whoever controls stock and operations.
The trade-off is between opening a large area for apparent speed and retaining control of weather protection. Choose a work front the crew can finish properly, not the largest area available.
Laps, Flashings and Gutter Integration
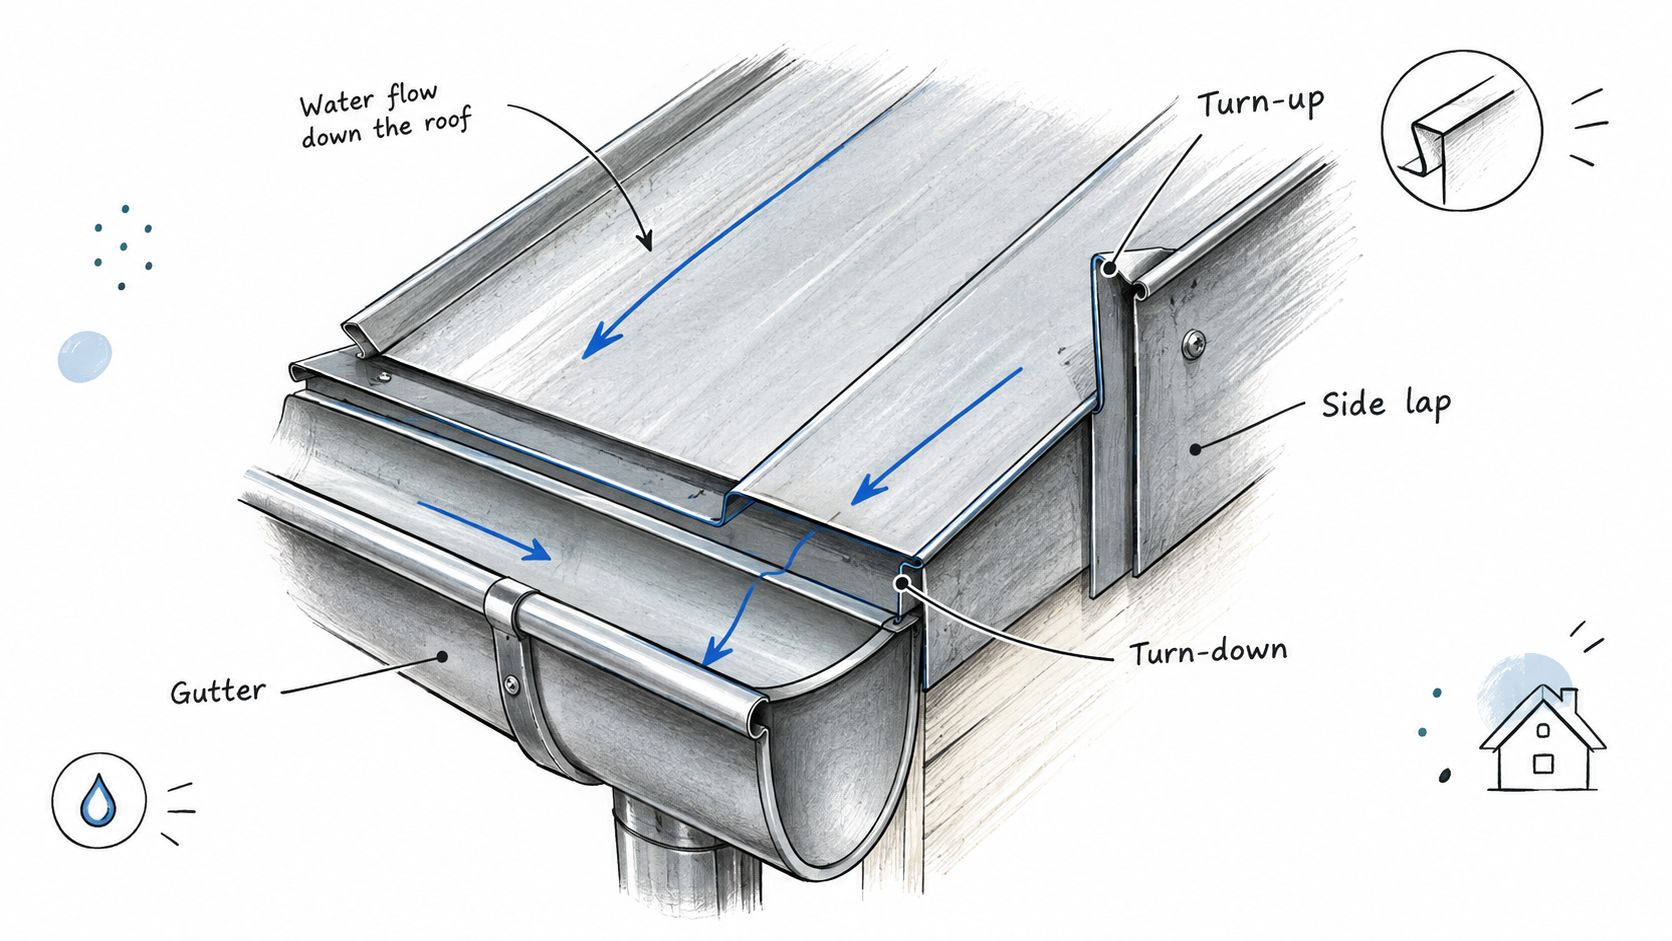
Check junctions as a continuous route from the upper roof to the final discharge point. A neat ridge cap doesn't compensate for an unresolved valley, and a correctly installed sheet doesn't establish that a box gutter can receive and discharge its runoff.
The drainage relationship should be clear before the flashing order is released.
Match laps to the profile and exposure
Establish roof pitch, sheet run, support spacing and prevailing-weather direction together. Orient the approved side lap away from prevailing weather, rather than choosing the starting side solely because access is convenient.
Where the selected profile specifies it, side laps may be approximately 1.5 corrugations, with stitching screws or sealed blind rivets particularly relevant where roofing support spans exceed 900 mm; an eave overhang of at least 50 mm is also system-dependent, not a universal dimension, as reflected in the Stratco corrugated-cladding technical guidance.
Those values shouldn't be transferred to another profile without confirmation. The selected manufacturer's tested limits govern the acceptable combination of pitch, lap, support spacing and fastening.
| Junction | Decision to resolve | Shortcut to reject |
|---|---|---|
| Side lap | Approved overlap, weather orientation and mechanical securing | Applying a familiar overlap to every profile |
| Ridge | Required valley turn-ups and ridge detail | Treating the ridge cap as the entire weatherproofing detail |
| Eave | Turn-down, sheet projection and gutter relationship | Choosing projection without checking the gutter interface |
| Parapet or valley | Flashing geometry and continuous discharge route | Finishing each trade's work without checking the connection |
Use the appropriate turn-up or turn-down tool where the system requires formed sheet ends. Include the specified anti-capillary arrangement rather than assuming lap width alone will control moisture entry.
Compare junction details, not just flashing prices
A flashing quotation needs enough detail to identify what is being supplied. Material alone does not describe how a flashing terminates, accommodates movement or connects to the adjoining roof.
Use the roof flashing installation guide to support coordination, then obtain project-specific details for the actual junctions.
For box gutters, ask the responsible designer to identify the applicable drainage requirements and resolve sumps, outlets, overflows and adjoining roof interfaces. Don't nominate gutter dimensions or claim NSW compliance from a generic roofing detail.
Penetrations deserve the same discipline:
- HVAC curbs. Confirm the surrounding flashing arrangement before the unit obstructs access.
- Flues and skylights. Coordinate the opening, support and weatherproofing detail with the supplier.
- Solar mounting points. Obtain an accepted roof interface rather than allowing a later installer to improvise it.
Site check: Follow the proposed water route on the drawing, then walk the same route on the roof.
At handover, inspect the discharge path as well as the visible flashing finish. A junction isn't complete merely because its exposed edges look tidy.
Fastener Selection and Wind-Region Fixing Patterns
A generic screw pattern is a pricing assumption, not evidence of compliance. The installer needs a schedule tied to the selected sheet, supporting material and engineered roof zones.
The same applies to the screw itself. Confirm AS 3566-compliant corrosion-resistant fasteners with sealing washers against the approved product documentation, including suitability for the substrate and exposure. Don't substitute a different screw because its head looks the same.
Read the schedule by roof zone
The engineer's schedule should tell the crew where requirements change and how those changes relate to the roof plan. The following grid sets out the decisions to request, not a fixing specification.
| Roof condition | Required decision | Evidence to retain |
|---|---|---|
| Central roof area | Approved sheet-to-support fixing arrangement | Accepted schedule and marked roof plan |
| Perimeter | Whether increased restraint or different detailing is required | Clearly identified zone boundaries |
| Corner | Project-specific connection requirements | Detail available to the installing crew |
| Penetration or interrupted support | Local support and connection arrangement | Approved junction drawing |
| Cyclonic design condition | Validated cladding, connection and support system | Relevant engineering acceptance |
The NCC cyclonic provisions discussed earlier require the roof cladding, connections and immediate supporting members to remain in position through specified pressure sequences, even where damage or permanent distortion occurs. That is a system-performance requirement, not permission to compensate for an unsuitable assembly with extra screws.
Inspect installation quality as well as quantity
Set the driver to achieve the manufacturer's required washer seating. Visually check for uniform compression without sheet deformation, and adjust the installation method if the crew can't achieve consistent results.
Overtightening isn't extra security. It leaves a detail that needs assessment against the approved requirements rather than an assumption that a tighter screw is safer.
The guide to roofing screws for metal roofs is useful for preparing procurement questions, but selection should close against the specified screw and roof-system documentation.
- Loose connection. Investigate the support engagement and condition before tightening.
- Missing fastener. Check the applicable zone schedule, not the pattern in the neighbouring sheet.
- Deformed washer or sheet. Obtain an accepted rectification method.
- Uncertain product. Quarantine the substitution until its suitability is confirmed.
Don't automatically drive a replacement screw into a questionable fixing location and call it repaired. The supervisor needs to establish whether the connection can still deliver the specified restraint and seal.
Photograph representative completed zones while the work is accessible. A photograph doesn't replace inspection, but it helps connect the installation record to the approved schedule.
Quality Checks, Common Pitfalls and Handover Records
Closeout should establish both what was installed and how it was checked. A clean roof photograph alone answers neither question.
Arrange a water-shedding inspection after rainfall or an agreed controlled test. Examine side laps, penetrations, valleys, gutters and transitions, and record the conditions under which the inspection occurred.
Use a closeout sheet with accountable sign-off
| Record | What the facility manager should receive |
|---|---|
| Design | Accepted drawings, roof-zone plan and approved variations |
| Materials | Sheet batches, coating details and fastener identification |
| Inspection | Substrate acceptance, installation checks and photographs |
| Weatherproofing | Junction inspection and water-shedding observations |
| Ownership | Warranty documents, maintenance instructions and contacts |
Check recurring defects against the actual specification: stretched sheets, missed zone changes, incompatible connections, unresolved cut-edge treatment and omitted lap features. Review moisture-control details separately, because a successful rain inspection doesn't verify the internal roof build-up.
Avoid promising that photographs or batch records guarantee a warranty claim. Their purpose is to provide traceable evidence; the actual warranty terms still govern the claim.
Questions that arise after handover
Can staff access the new roof straight away?
Only through the agreed access arrangements and roof-use instructions. Obtain those instructions before handing access back to the operator.
Does moisture underneath mean the roof leaks?
Not necessarily. Arrange an inspection that distinguishes external water entry from condensation rather than authorising sealant work on appearance alone.
Should loose screws be tightened?
Have the roofing contractor assess them against the approved connection detail. The repair needs to address the condition, not just the visible screw head.
When should maintenance start?
At handover, with a documented schedule based on the installed system, site exposure and supplier requirements. Nominate who receives inspection reports and who authorises repairs.
Keep the handover file with the building's maintenance records, not only in the builder's email archive. The next facility manager should be able to identify the roof system and its maintenance obligations without reconstructing the project.
Commercial Roofers offers commercial and industrial roof installation, replacement, inspections and maintenance across Sydney and NSW. Before committing to a warehouse re-roof, visit Commercial Roofers to discuss the existing supports, engineering documentation, condensation strategy and staged installation requirements for your site.