
A warehouse manager usually discovers a sarking problem at the worst possible time. Stock has been moved beneath a metal roof, a storm or cold night passes, and water appears on insulation, electrical equipment or stored cartons even though the roof sheets look intact. That “indoor rain” is often condensation or poorly controlled moisture, not a conventional roof leak.
The practical answer to how to install sarking under a metal roof isn't to staple a reflective sheet tightly beneath the cladding and hope it stays dry. Sarking must collect and drain condensate, work with the insulation layout, and sit within a separately designed ventilation strategy. On a commercial project in NSW, the membrane, battens, roof geometry, gutters and penetrations all have to function as one moisture-management system.
Table of Contents
- Why Sarking Is Critical for Commercial Metal Roofs
- Understanding NCC Requirements and Climate Zones
- Selecting the Right Sarking Membrane
- Installing Sarking Beneath Metal Roof Sheets
- Detailing Flashings, Penetrations and Gutters
- Avoiding Common Ventilation and Condensation Mistakes
Why Sarking Is Critical for Commercial Metal Roofs
A Sydney warehouse can have dry, intact metal sheets above and moisture falling onto stock below. Overnight, the sheet may cool below the surrounding air temperature. The Australian Building Codes Board explains that metal sheeting can radiate heat towards a clear night sky and become several degrees colder than the air around it. Moist air contacting the cold underside then condenses, with droplets reaching ceiling linings, insulation, electrical equipment or stored goods. The ABCB condensation handbook treats sarking primarily as a water-control measure. Its reflective properties are a secondary benefit.
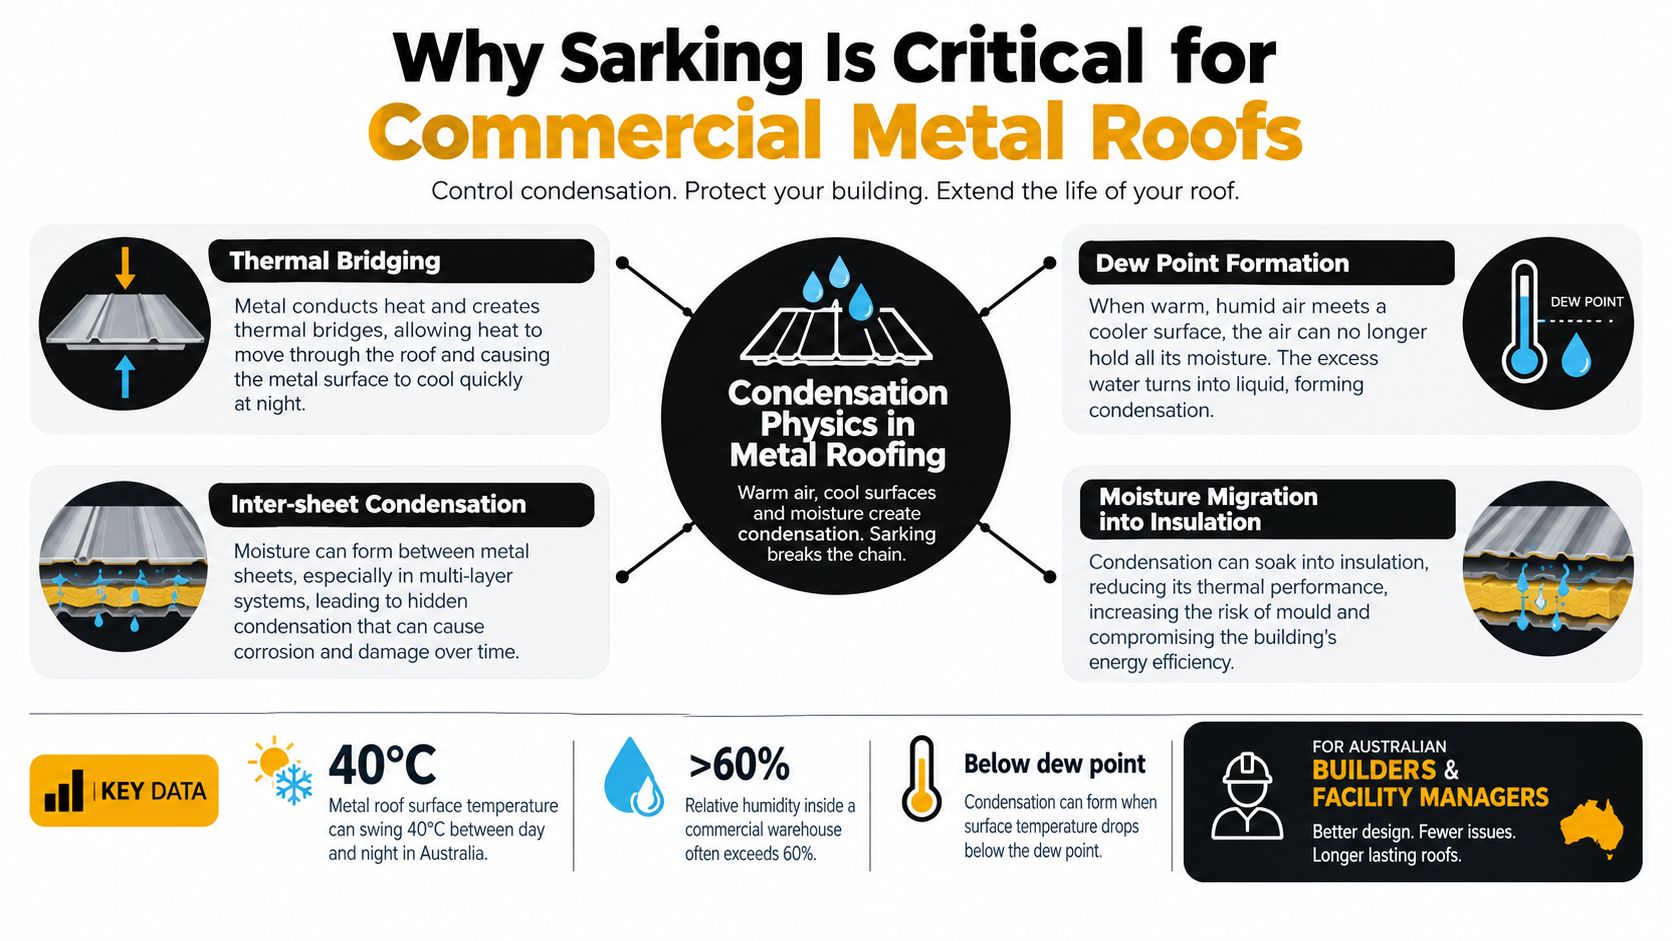
In a logistics facility, warm humid air may sit beneath a rapidly cooling roof. Forklift movements, wash-down work, occupied areas and temperature-controlled zones can all change indoor moisture conditions. Once droplets form, gravity carries them towards the lowest point. A continuous membrane and a planned drainage path help prevent that moisture from wetting bulk insulation, staining ceilings, reaching light fittings or promoting corrosion around roof supports and fixings.
Sarking does more than reflect heat
Labelling sarking as insulation can lead to poor site decisions. Reflective products influence radiant heat transfer, but the membrane's main commercial function beneath metal cladding is to catch condensate and guide it towards the roof edge or gutter. It also offers secondary protection against wind-driven moisture that enters below the sheet profile.
The drainage path depends on workmanship. Interrupted laps, unsealed penetrations or a sag running towards a wall can direct water into the building rather than towards an outlet. A membrane pressed tightly against the metal may transfer heat directly and leave condensate without a dependable route out.
Site rule: Treat sarking as a drainage plane first. Assess its reflective and vapour properties only after the roof assembly and moisture path are understood.
The warehouse consequence
On a residential roof, a damp patch may remain a local repair. In a warehouse, moisture can affect inventory, packaging, electrical systems, plant and production schedules. Investigating the source may require an area to be isolated, stock to be relocated, and finished ceilings or insulation to be opened.
A sound design assigns separate roles to the roof components:
- Water control: The membrane collects condensate and incidental water beneath the metal sheets.
- Thermal control: Insulation and reflective surfaces address heat transfer as specified for the building.
- Air movement: Roof-space ventilation removes moisture and supports drying. Sarking cannot perform that function by itself.
Condensation can still form on the underside of sarking, so a waterproof membrane does not remove the need for ventilation. The membrane gives formed moisture a controlled drainage route, while insulation and ventilation help control the temperature and humidity conditions that produce it. On a commercial NSW project, those components must be coordinated before sheets are fixed, because a well-installed membrane cannot compensate for a roof assembly with no drying path.
Understanding NCC Requirements and Climate Zones
A warehouse roof can meet the sheet manufacturer's requirements and still retain moisture if the membrane, insulation and ventilation do not suit the building location. Before ordering sarking, confirm the project's NCC climate zone, insulation position, roof geometry and ventilation arrangement. NSW sites have different condensation exposures, so membrane selection must follow the complete roof build-up rather than a product label alone.
For relevant roofs in climate zones 6, 7 and 8, the NCC condensation provisions require a roof space at least 20 mm high where it sits above the primary insulation layer or immediately above compliant vapour-permeable sarking. That space must connect to outdoor air through appropriately distributed openings. The requirement is set out in the NCC Housing Provisions condensation-management requirements.
A gap between metal sheeting and sarking does not, by itself, meet the ventilation requirement. The space between roof cladding and sarking or reflective insulation is not the accepted roof-space ventilation method on its own. Airflow must connect with outdoor air and be distributed as required for the particular assembly. On a NSW warehouse, that distinction matters because trapped humidity can wet insulation, affect stored stock and create costly access and remediation work.
Check the roof assembly before installation
Obtain the project specification and resolve these points before the membrane reaches the roof:
- Which NCC climate zone applies to the building location?
- Is the primary insulation above the ceiling, between rafters, or elsewhere?
- Does the selected sarking have vapour properties suited to that insulation arrangement?
- Where will outdoor air enter and leave the roof space?
- Can the membrane carry water from the upper roof to the gutter without interruptions?
- Do fire, acoustic, energy or manufacturer requirements add conditions to the installation?
Sarking does not automatically need high vapour resistance. The suitable vapour properties depend on the roof assembly, climate zone and insulation location. A highly sealed or reflective product can work against the intended drying path if it is selected without checking those factors.
NSW commercial sarking compliance overview
| Factor | Requirement / Consideration |
|---|---|
| Climate zone | Confirm the applicable NCC classification before selecting the membrane or ventilation method. |
| Roof-space height | Verify the 20 mm minimum against the project's insulation position, and document the measurement method in the inspection record. |
| Ventilation | Connect the roof space to outdoor air through the required, evenly distributed openings. |
| Sheet-to-sarking gap | Do not count this gap alone as compliant ventilation. |
| Membrane properties | Match vapour permeance and water-control characteristics to the roof build-up and project specification. |
| Installation quality | Detail laps, penetrations, edges and gutters so the drainage path remains continuous. |
For a broader reference point on roofing standards in Australia, review the relevant requirements alongside the project documents. Retain the product data sheet, installation instructions, approved drawings and inspection records. Those records show whether the installed system matches the design intent and give the site team a clear basis for resolving defects before metal sheets conceal the work.
Selecting the Right Sarking Membrane
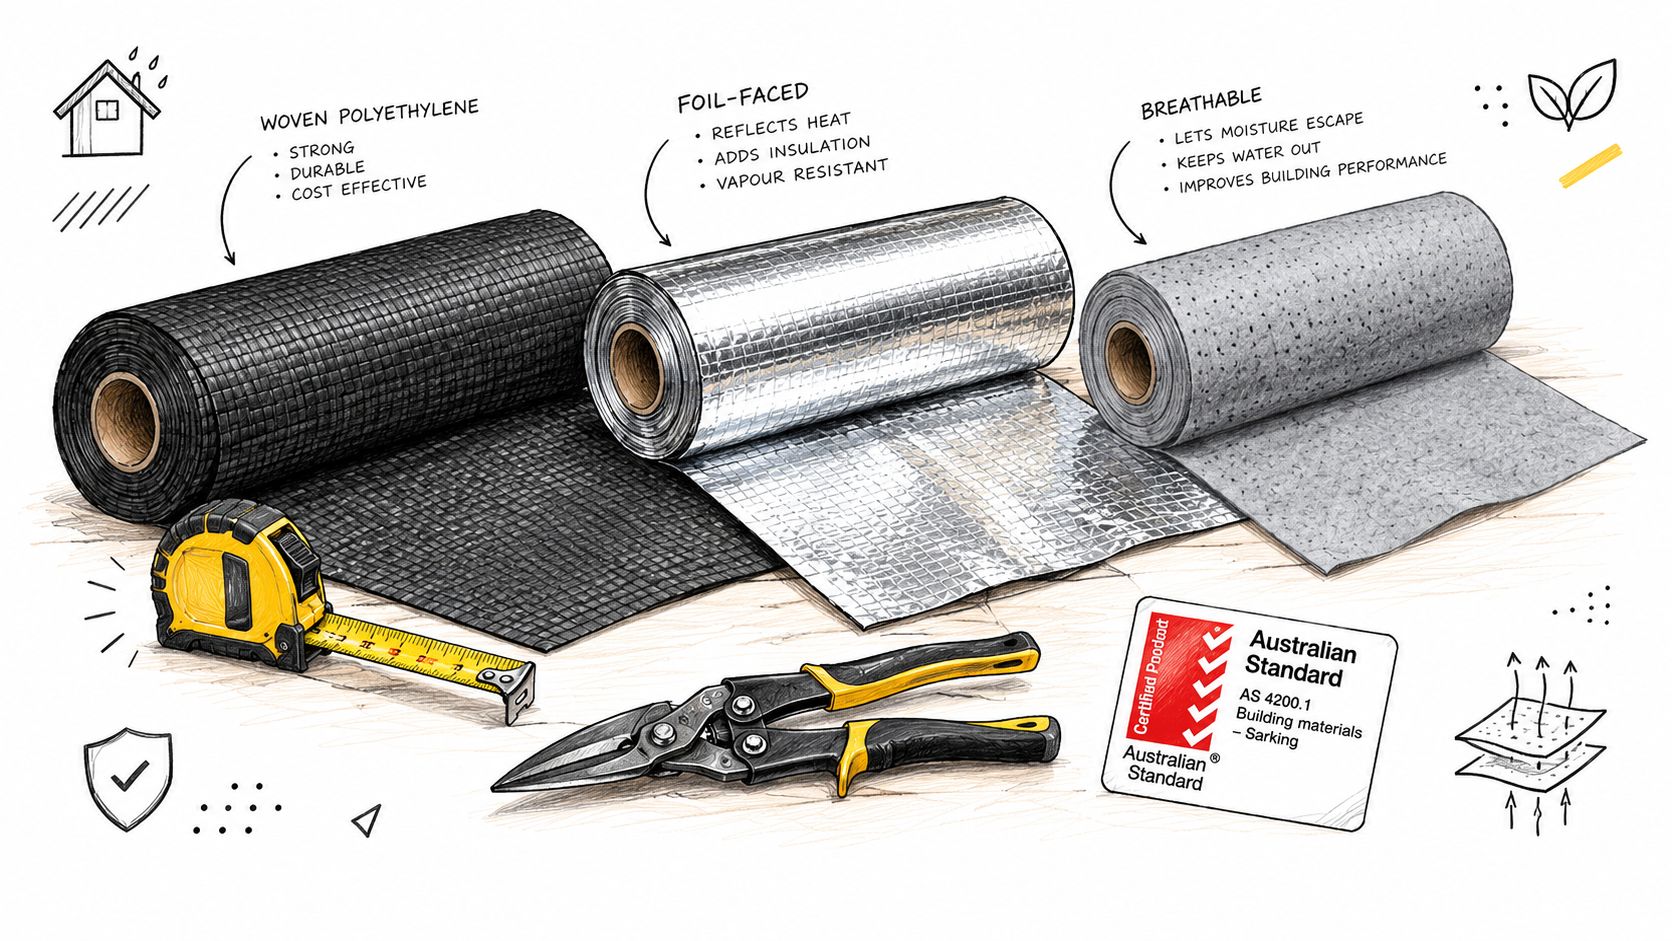
The right membrane is the one that suits the condensation strategy, not the one with the most impressive label or lowest purchase price. Woven polyethylene products may offer dependable water control, while aluminium-faced variants can contribute reflective performance. Neither category should be selected without checking vapour properties, fire requirements, durability, compatibility with the roof system and the manufacturer's installation instructions.
A warehouse with insulation at ceiling level may need a different vapour approach from a roof with insulation at rafter level. A mechanically cooled facility can also behave differently from an open-sided storage building. The roof designer should assess how moisture moves through the whole assembly before the installer commits to a product.
Compare the membrane with the job, not the brochure
Ask the supplier or manufacturer for documentation covering:
- Classification and vapour behaviour: Confirm the membrane is suitable for the climate zone, insulation placement and condensation design.
- Water control: Check whether the product is intended to collect and drain condensate beneath metal cladding.
- Mechanical strength: Confirm it can tolerate handling, fixing and the conditions beneath the selected sheet profile.
- Fire and project requirements: Check the specification for the building's use, construction type and relevant approvals.
- Accessory compatibility: Use approved tapes, sealants, closures and fixing methods rather than mixing untested components.
The membrane also needs a workable drainage geometry. Australian guidance identifies a minimum effective fall of 2° for drainage beneath metal roofing. That is a design and installation issue, not a label claim. A product can be waterproof and still fail if the support arrangement lets water pool, run towards an abutment or sit against insulation.
A common trade-off appears between a tightly tensioned membrane and a supported membrane with a controlled path. Excessive tension can pull water towards fixings or prevent the membrane from forming the intended drainage line. Excessive sag can create pockets and interfere with insulation. The practical target is a continuous, supported fall that drains towards the gutter without allowing the membrane to touch the sheet across the roof.
Practical selection test: If the supplier can't show how the membrane will drain, dry and interface with the insulation, the product hasn't yet been selected for the actual roof.
Installing Sarking Beneath Metal Roof Sheets
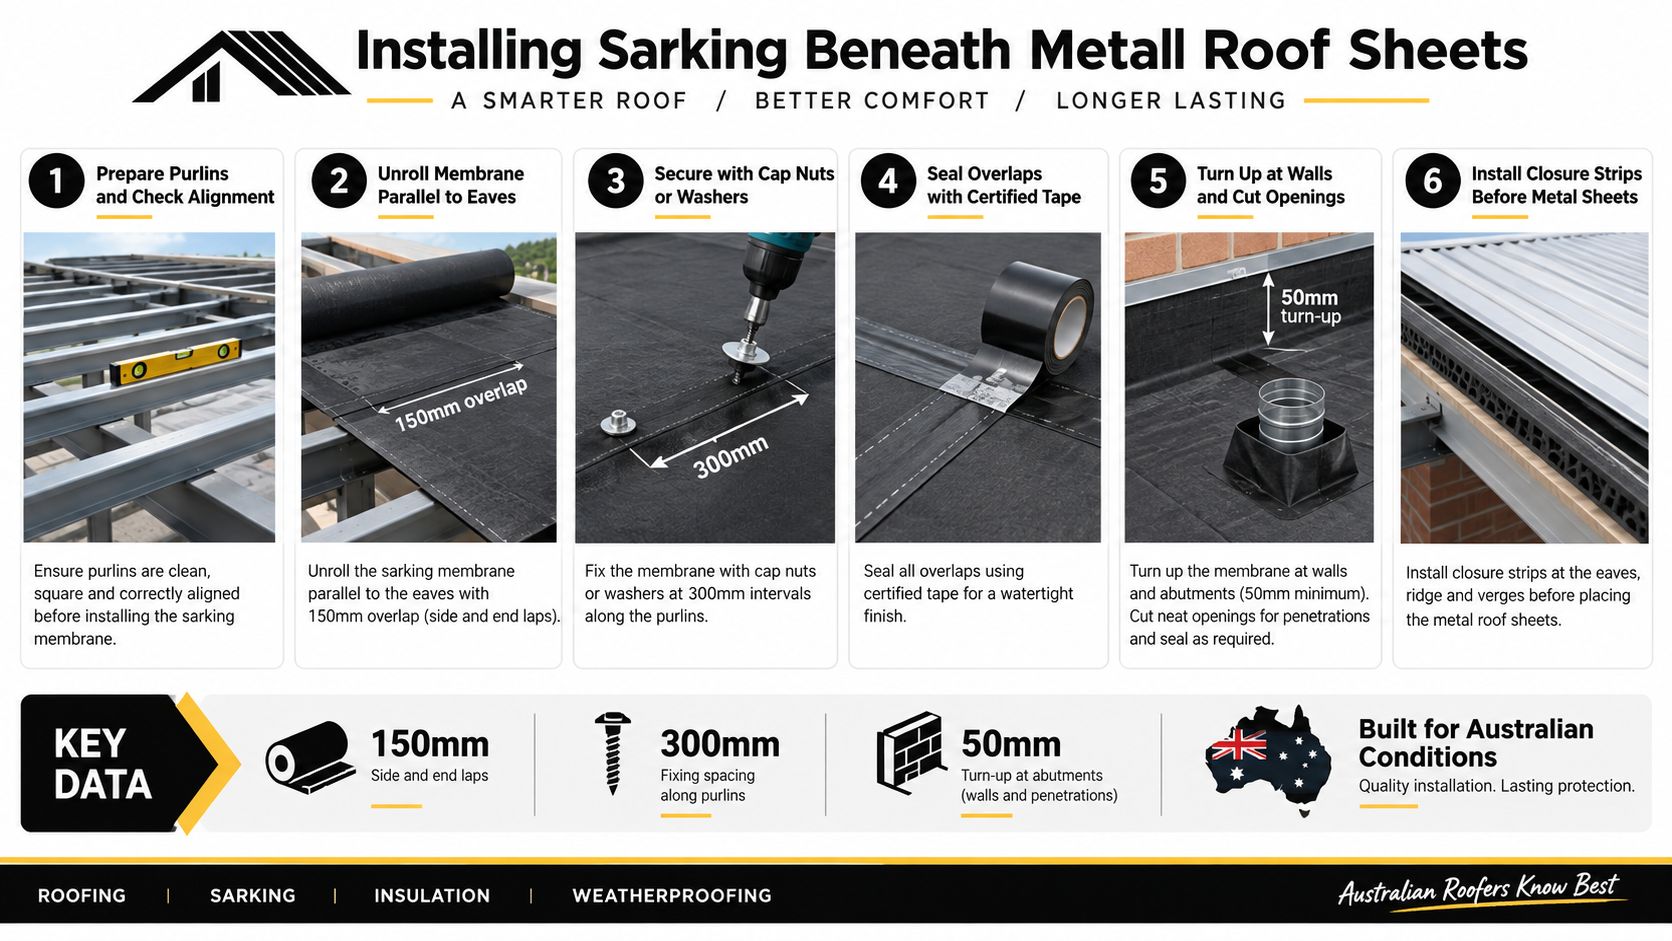
On a NSW warehouse roof, a small defect hidden beneath the first sheet can become wet insulation, damaged stock and a difficult concealed-work repair. Begin with the supporting structure: inspect purlins, rafters, battens and spacer battens for alignment, sharp edges, protruding fasteners and anything that could puncture the membrane. Confirm that the roof geometry can maintain the specified drainage path before the sarking covers defects.
Install the membrane in accordance with AS 4200.2:2017, the membrane manufacturer's instructions and the project specification. Lay it parallel to the eaves so laps drain downslope. Support it beneath battens or spacer battens, while maintaining an effective fall of 2° for drainage. This position also helps keep the membrane separate from the metal cladding, reducing direct heat transfer and giving condensate a controlled path.
Work from the eaves upwards
Set out the first run at the eaves and keep its drainage direction clear. Unroll each higher run so it sheds onto the layer below. A reversed lap can collect wind-driven moisture or condensate at the joint instead of directing it towards the eaves.
Support the membrane consistently enough to prevent uncontrolled ponding. Use the battens or spacer battens specified for the system, and maintain separation from the underside of the metal sheets. State guidance identifies a nominal 25 mm separation as a practical ventilation and drying cavity beneath metal roofing. Treat that dimension as part of the roof assembly, not as a replacement for roof-space ventilation. The project design and manufacturer instructions remain the controlling references.
Form the drainage plane
Check the fall as the membrane crosses the roof. Long commercial spans may include purlin deflection, changes in level and local obstructions, all of which can interrupt drainage. Use a straightedge, level or approved survey method to identify low points before they disappear beneath the sheets.
At each run, verify:
- Direction: Laps face downslope towards the eaves.
- Support: The membrane remains below battens or spacers rather than lying against the metal.
- Continuity: Water can travel across the membrane without reaching a cut edge or blocked fixing zone.
- Edge discharge: The lower termination directs moisture into the gutter or specified drainage component.
- Compatibility: Fixings, tapes and sealants match the membrane classification.
Treat laps and penetrations as part of the system
A lap needs deliberate detailing. Follow the membrane classification and manufacturer's instructions, then inspect each joint for open edges, wrinkles, punctures and contamination. Where sealing is specified, use the certified tape or sealant system and prepare the surfaces correctly.
Plan every penetration before cutting. Mark the opening, make a neat cut without creating an uncontrolled gap, and fit the approved collar, flashing or seal arrangement. A rushed cut around a service pipe can interrupt the drainage route and send condensate into insulation.
Install metal sheets only after the membrane, supports, perimeter details and closures have been inspected. Use profile-specific closure strips where required. Keep them from compressing the membrane against the sheet, because the roof needs a separated path for drainage and drying.
A short visual demonstration can help crews understand the order of operations:
Before the first sheet conceals the work, photograph the eaves, laps, penetrations, valleys and perimeter transitions. These records give the site manager a practical quality-control trail and make concealed-work inspections more useful. They also help confirm that the membrane, insulation, ventilation cavity and metal cladding were installed as one moisture-management system.
Detailing Flashings, Penetrations and Gutters
Most sarking failures occur where the roof changes direction or meets another building element. The broad field of membrane may be correctly installed, yet a gutter, valley, wall abutment, skylight, duct or pipe can interrupt the drainage route. Detail those points as deliberately as the main roof area.
At the gutter, terminate the membrane so condensate enters the drainage system rather than running behind the fascia or back into the roof space. Valleys need enough support and a clear line of discharge. At walls and abutments, turn the membrane up and integrate it with the flashing detail, while avoiding folds that create a reverse fall.
Don't seal the membrane against the sheet
The instinct to make the installation “tighter” often causes the worst result. Pressing sarking directly against metal sheeting increases thermal contact and can trap condensate at the interface. The membrane still needs to control water, but it must also sit within a roof assembly that allows separation, drying and independent ventilation.
Blanket insulation creates another risk. If it reaches a wet membrane at the gutter or valley, it can wick moisture back into the roof space. Keep insulation clear of the discharge point and terminate it in a way that preserves the path into the gutter. Check the product instructions and approved detail rather than cutting the blanket wherever it happens to meet the edge.
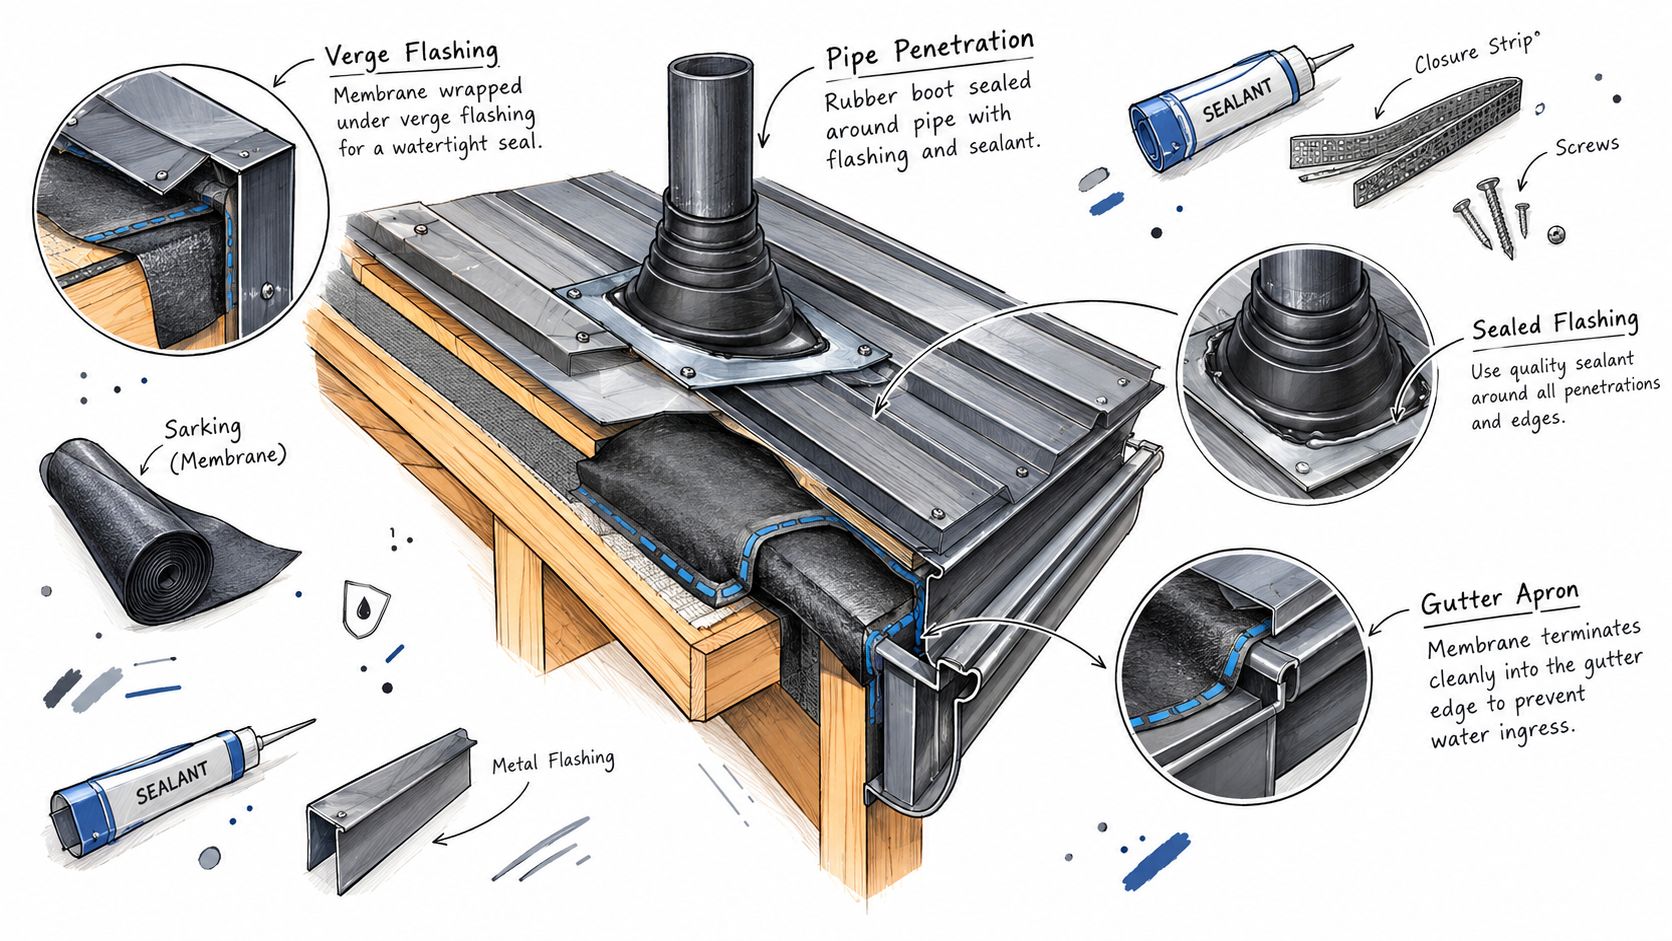
Use a detail register
For a commercial roof, record each non-standard transition before sheeting begins:
- Gutters and box gutters: Confirm the membrane discharges into the designed water path without backflow.
- Valleys: Support the membrane and keep the valley route free from folds, debris and reverse laps.
- Roof penetrations: Use approved collars or flashing interfaces, and seal cuts according to the membrane system.
- Wall abutments: Turn up and connect the membrane to the flashing without blocking drainage.
- Ventilation equipment: Coordinate curbs, ductwork and roof openings with the condensation and fire strategy.
- Light fittings and services: Keep electrical equipment away from likely condensate paths and protect openings during installation.
For background on the metalwork around these vulnerable locations, see this guide to commercial roof flashing types. The flashing detail must work with the membrane, not just cover an opening after the membrane has been cut.
Inspection point: Pouring water onto a completed roof won't prove that concealed condensation will drain correctly. Inspect the membrane's fall, laps, terminations and separation before the sheets hide them.
Avoiding Common Ventilation and Condensation Mistakes
The most damaging shortcut is installing sarking directly against the metal sheeting and calling the remaining space ventilation. That arrangement can increase thermal bridging and trap condensate, while the NCC doesn't accept the sheet-to-sarking gap alone as roof-space ventilation. In relevant climate zones, verify the 20 mm roof-space requirement and confirm that openings connect to outdoor air and are evenly distributed. The NCC condensation provisions should be checked alongside the project-specific design.
A site manager can inspect visible items, including damaged membrane, blocked gutters, exposed laps, poor edge terminations and insulation touching a discharge point. A commercial roofing inspection is still necessary for concealed interfaces, climate-zone compliance, vapour selection, fire requirements and the performance of the complete roof assembly. Guidance on integrating roof insulation with the broader system is available in this resource on tin roof insulation.
Before sign-off, confirm that the membrane follows the approved direction, maintains its drainage path, remains separated from the sheets, and has correctly detailed laps, penetrations, gutters and valleys. Don't accept a neat-looking roof as proof of a compliant one. The critical work is often hidden.
Commercial Roofers offers commercial roof inspections, metal roof replacement, sarking installation, gutter and flashing work, and documented repairs for warehouses and industrial buildings across Greater Sydney and NSW. If your roof assembly needs a compliance check or a properly coordinated moisture-management solution, visit Commercial Roofers to discuss the site, roof condition and required scope.