
Say you manage a Western Sydney warehouse and notice a small ceiling stain a few days after a storm. The roof looks straight from the car park, the floor is dry, and dispatch is already busy. It's tempting to put a bucket nearby and leave the investigation until the next downpour.
That stain may be the last visible sign of a problem that started above the ceiling. Your immediate job is to protect people and stock, preserve useful evidence, and find out whether you're dealing with an isolated defect or a roof that needs planned renewal.
Table of Contents
- Warning Signs of Roof Water Damage and Their Causes
- How to Contain a Roof Leak in the First 24 Hours
- How Water Spreads and What Inspectors Confirm
- Repair and Replacement Options for Each Commercial Roof Type
- Asbestos and Compliance Rules Before Roof Work Starts
- What Drives Repair Costs and How Insurance Claims Work
- Set Up a Maintenance Plan Before the Next Storm
Warning Signs of Roof Water Damage and Their Causes
Water damage in roof assemblies often develops out of sight. Insulation, underlay and ceiling materials can conceal moisture before anyone notices discolouration below. A small mark doesn't establish how much material is wet, and a roof that looks intact from the ground can still leak through a failed washer or flashing joint.
Use the symptoms below to set an inspection priority, not to make a final diagnosis. The urgency recommendations assume there's no immediate threat to people; electrical exposure, ceiling movement or water over stock overrides everything else.
Match the symptom to the likely defect
Roof water damage symptoms, likely causes and urgency
| Symptom | Most likely cause | Urgency |
|---|---|---|
| Ceiling stain that grows after rain | Flashing, sheet lap or fastener leak | Same day |
| Water dripping inside during rain | Open penetration or blocked box gutter overflowing | Same day |
| Damp patch in dry weather under a large metal roof area | Condensation on cold cladding underside | Arrange a prompt inspection |
| Blistering, splitting or ponding on a membrane | Trapped moisture or membrane failure | Inspect before further rain |
| Rust streaks below fasteners or ridges | Fastener corrosion or damaged sheet | Book inspection before corrosion spreads |
| Musty smell or mould in wall cavity | Concealed moisture in insulation or framing | Same day if near stock or electrics |
| Sagging ceiling or wet insulation | Saturated insulation or supporting materials | Immediate |
| Stains near light fittings or switchboards | Water reaching electrical services | Immediate; arrange safe electrical isolation |
| Cracked or slipped tiles after a storm | Wind uplift or impact damage | Inspect before further rain |
Read the pattern, not just the mark
Flashings fail where roofs meet walls, upstands and adjoining surfaces. Loose fasteners and perished sealing washers leave openings around screw holes, while damaged side and end laps allow water between sheets. Smearing sealant over these areas without checking movement, overlap and corrosion rarely produces a dependable repair.
Box gutters need particular attention because overflow can discharge directly into the building. Exhaust fans, skylights and pipe penetrations also need correctly formed flashings, not just a bead of sealant around the opening. On tiled sections, wind or impact can crack tiles or move them out of position.
Rain entry usually follows rainfall and can be traced towards a particular opening. Condensation is more likely when dampness appears during dry weather beneath broad metal roof areas, especially on cold mornings. Neither pattern is conclusive without inspection.
Practical rule: Treat any moisture near electrical equipment, occupied workstations or vulnerable stock as urgent, even when the apparent leak is small.
How to Contain a Roof Leak in the First 24 Hours
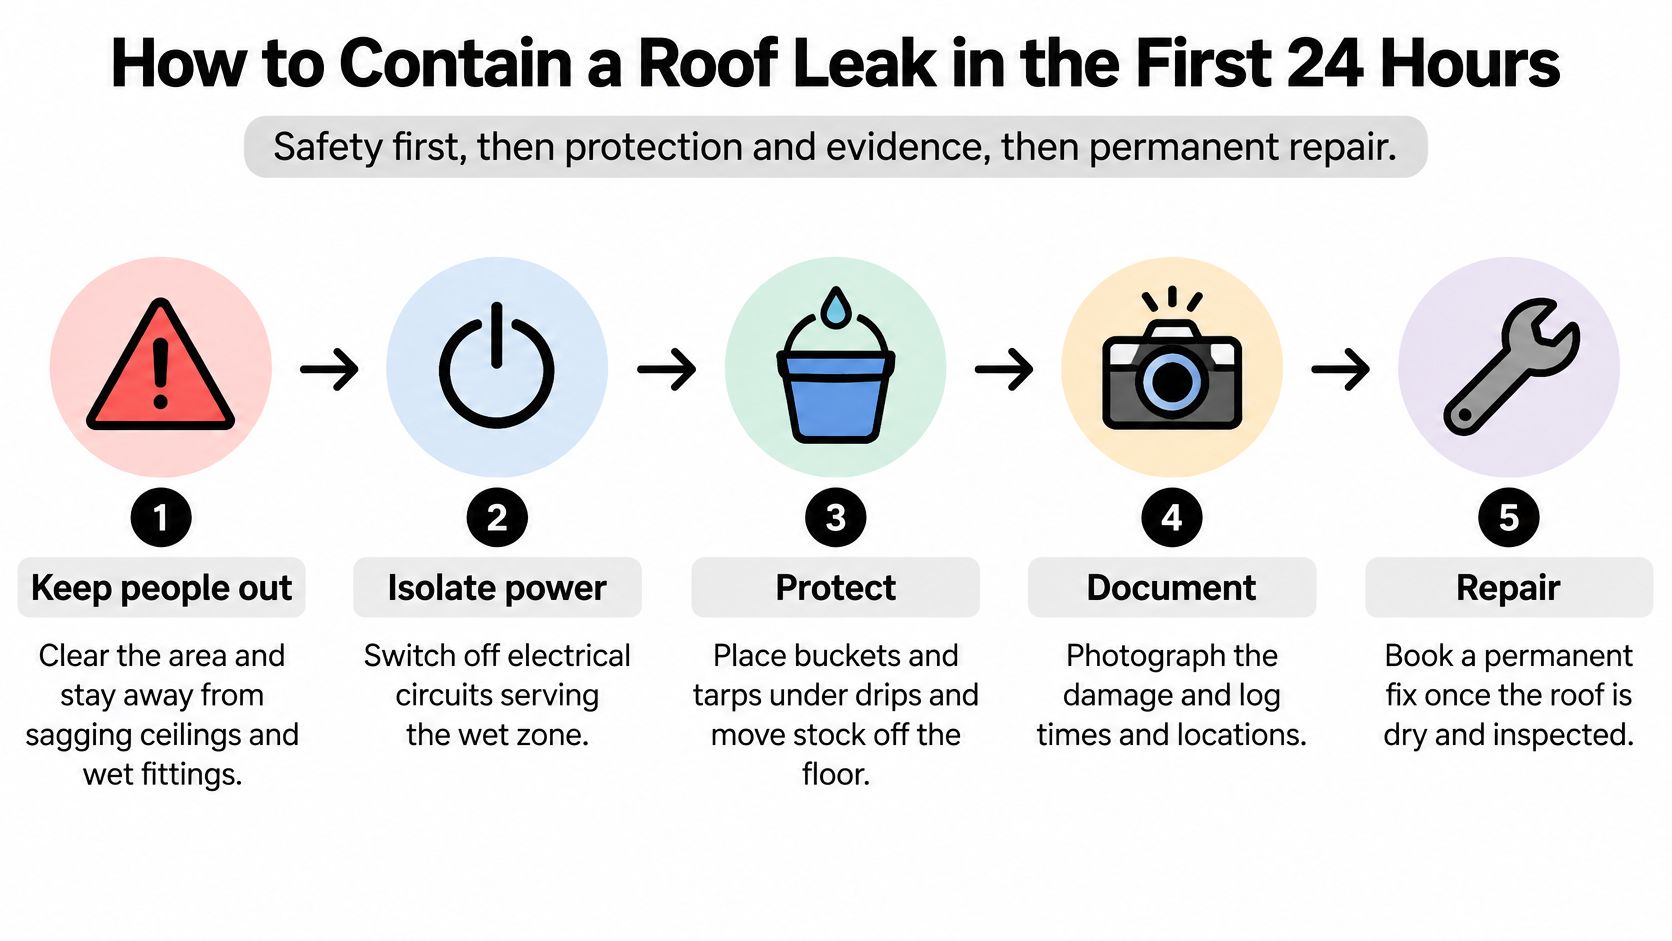
Safety comes first, then protection and evidence, then permanent repair. Don't send a maintenance employee onto a wet roof because they know where the ladder is. Emergency containment needs the same access assessment as planned roofing work.
This sequence keeps the response organised without asking staff to take roofing or electrical risks.
Make safe and limit the loss
Keep people out. Cordon off wet floors and the area beneath sagging ceilings. Move forklift routes and pedestrian access away from the affected bay rather than relying on a warning cone beneath the drip.
Arrange safe electrical isolation. If the switchboard is dry, accessible and safe to operate, have an authorised person isolate the affected circuits. If the board itself is wet, stay clear and call an electrician; don't touch it or approach through standing water.
Photograph before disturbing the scene, where safe. Take wide shots showing the location and close-ups of damage, labels and affected goods. Record dates and times, but don't delay an urgent make-safe action to get a better photograph.
Protect stock and equipment. Relocate goods into a dry bay and cover what can't be moved with polyethylene sheeting, keeping covers clear of electrical equipment and ventilation openings. Raise vulnerable goods clear of floor water and separate damaged stock from saleable stock.
Collect water without approaching unstable ceilings. Use buckets, trays and drop sheets where access is safe. Don't puncture a sagging ceiling yourself: concealed wiring, sudden collapse and contaminated water make controlled drainage a job for the make-safe crew.
Arrange professional temporary cover. A roofer can assess whether tarping, temporary flashing or another containment method suits the opening. Battens, restraints or ballast must suit the roof and wind exposure; don't nail through sheets or improvise with unsecured sandbags.
Notify the insurer and building manager. Log who attended, what they changed and when, including emergency expenditure and interrupted operations. Retain damaged materials where safe until the assessor gives disposal instructions, and document anything that must be removed urgently.
Preserve evidence without delaying safety work
The NSW Government's insurance guidance explains that, where flood cover is absent, a claimant may need to establish that damage came from a covered event such as storm or rainwater rather than excluded flooding. That distinction makes photographs of entry conditions and temporary works valuable, not just photographs of ruined cartons.
Keep the original image files, inspection notes and contractor invoices together. Ask emergency contractors to record what they found before altering it, including blocked outlets, displaced flashings or damaged sheets.
Don't walk on fragile sheets, seal over a ceiling stain, or discard wet materials before receiving disposal advice. Where storage would create a health or safety risk, agree on an alternative evidence record rather than keeping hazardous material inside an operating warehouse.
How Water Spreads and What Inspectors Confirm
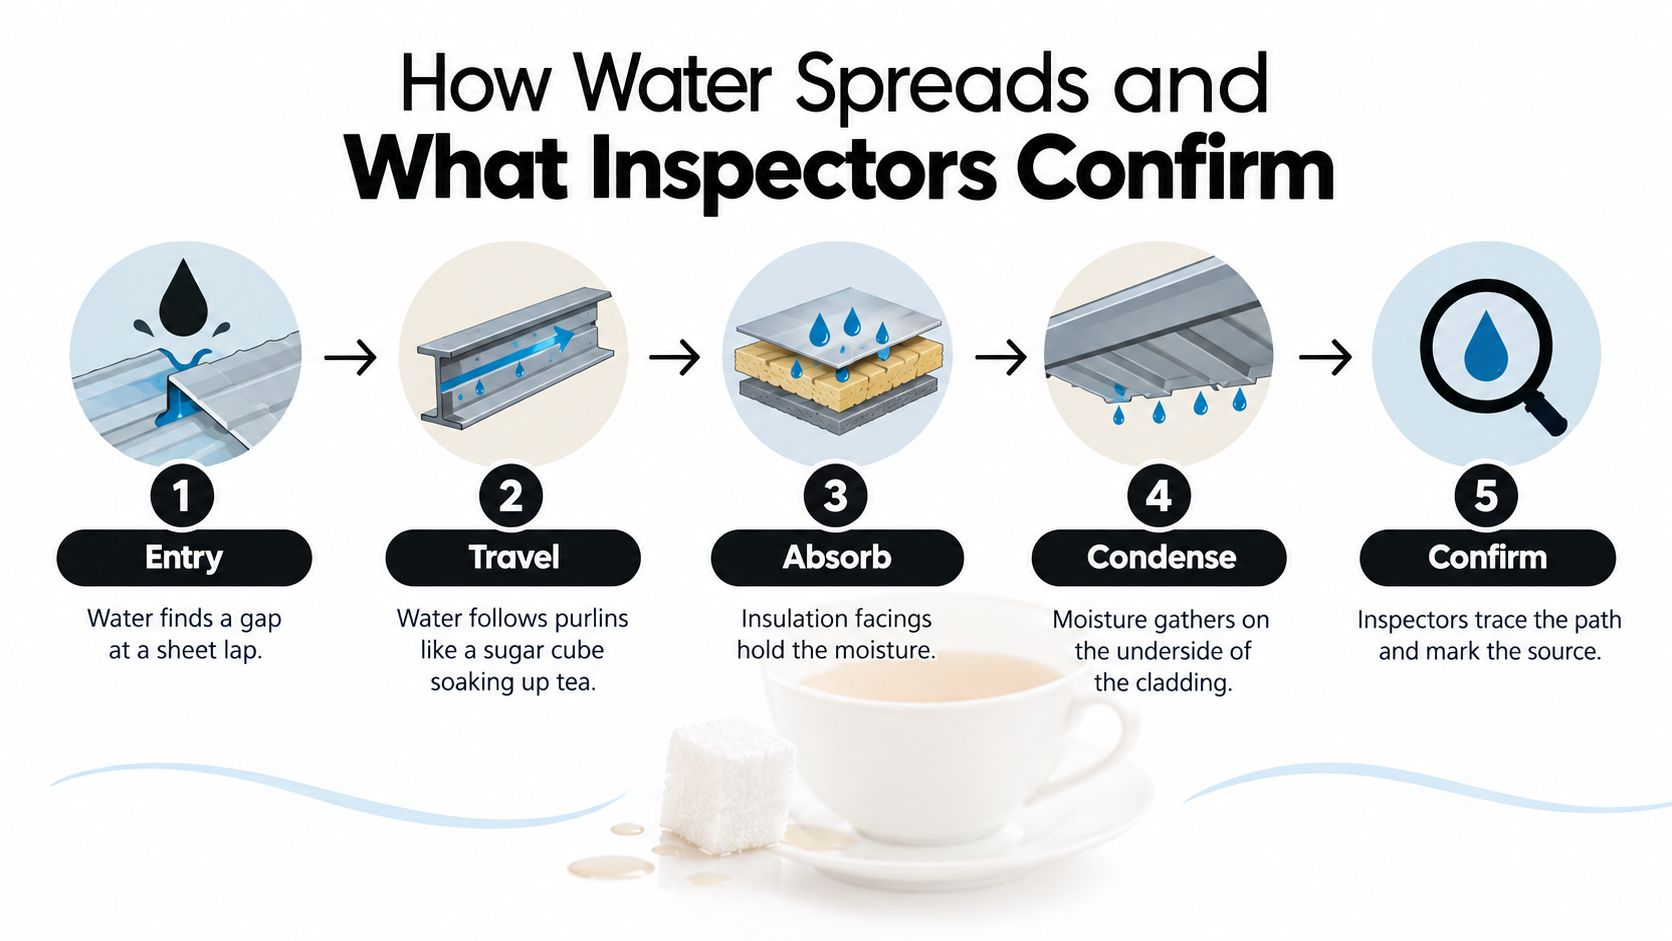
Dip a sugar cube into tea and moisture moves beyond the point of contact. Roof materials can absorb water in a similar way, while gravity and surface tension carry it along sheet undersides, insulation facings and structural members. The stain below may therefore sit well away from the opening above.
The diagram separates these moisture pathways. Condensation is a separate source of water, not an inevitable stage of every rain leak.
Follow the damage through the assembly
Initial wetting may remain confined to a lap, penetration or gutter junction. Water can run beneath cladding without immediately reaching the room below, particularly where underlay temporarily catches and redirects it.
Insulation and underlay wetting broadens the affected area. Absorbent material holds moisture after rainfall stops, while foil facings can redirect water towards joints, tears and low points. An apparently dry ceiling doesn't prove that the layers above it have dried.
Persistent dampness creates conditions for material deterioration. The Australian Government's Your Home condensation guidance identifies mould, mildew and decay as consequences of condensation or infiltrated water. Corrosion also needs assessment where wet insulation remains against metal components.
Ceiling staining and sagging show that moisture has reached internal linings or accumulated above them. Ceiling sheets, fixings and suspension systems need examination rather than a coat of stain blocker. A lining can look serviceable from below while its concealed face is damaged.
Damage to services and contents changes the job from roofing alone to coordinated recovery. Electricians, restoration contractors and stock assessors may need access before the space can reopen.
There's no dependable calendar for this sequence. Water volume, material, temperature and drying conditions matter, and some leaks reach equipment immediately without producing a ceiling stain first.
Inspect safely in dry and wet conditions
Start with a dry-weather inspection using an access and fall-protection plan suited to the building. The inspector should identify fragile surfaces, skylights, roof edges, unsupported areas and suspected asbestos before considering a walk-over. Where access is unsafe, remote photography and internal inspection can guide further investigation without pretending to replace close examination.
The dry inspection establishes condition. Intermittent leaks may also need observation during rainfall from safe internal positions, following the wet path towards its source. A roofer shouldn't climb onto an exposed roof during dangerous weather just to reproduce the leak.
Controlled hose testing can help when natural rainfall doesn't reveal the opening. Test isolated details progressively rather than flooding the entire roof, which can create misleading water paths. Thermal imaging can identify temperature anomalies, but moisture-meter readings and physical checks are needed to interpret them.
For a contested claim, acquisition or repeated unsuccessful repair, an independent roof inspection can help separate diagnosis from the proposed construction scope.
Check the components and keep usable proof
Inspection elements and the evidence to record
| Inspection element | What the inspector checks | Evidence to record |
|---|---|---|
| Roof sheets and tiles | Cracks, slips, corrosion and panel fixity | Dated close-up photos with grid reference |
| Fasteners and screws | Loose, backed-out or rusted screws; missing or damaged washers | Count and location map |
| Flashings and penetrations | Seal condition, laps, upstand height and pipe collars | Photos and sealant condition notes |
| Gutters and box gutters | Blockages, falls, overflow marks and outlet capacity | Before-and-after cleaning photos |
| Membranes | Blisters, splits, ponding and lap integrity | Ponding depth and test results |
| Insulation and ceilings | Moisture content, sagging and staining | Moisture map with readings |
| Roof-space ventilation | Continuous escape path and vapour control | Photos and measured openings |
| Asbestos-containing materials | Suspected asbestos-cement sheeting and its condition | Asbestos register entry and competent sampling results |
Suspected asbestos must remain undisturbed during ordinary roof inspection. A visual assessment can flag a concern, but it can't establish material composition with certainty.
Inspection reporting should also account for the broader building envelope. Owner Inspections' discussion of hidden commercial building defects highlights why waterproofing and concealed defects deserve attention beyond the visible symptom. For an owner, the useful outcome is a mapped defect and an actionable scope, not a general statement that the roof is old.
This video provides an additional visual reference for the investigation process.
Require a report that supports decisions
A useful report distinguishes confirmed entry points from suspected contributing defects. If a contractor can't reproduce a leak, the report should say so and explain the next diagnostic step rather than declaring the problem solved.
Ask for these deliverables:
- A marked roof plan. Match each defect, photograph and internal wet area to a recognisable location.
- A consequence assessment. Identify affected components, immediate safety risks and likely concealed damage needing further access.
- A priority schedule. Separate make-safe work, necessary repairs and optional improvement work.
- A verification plan. Record weather conditions, proposed post-repair observations and the circumstances that trigger another visit.
A repair recommendation should explain both what failed and how the contractor will check that the repair worked.
This reporting discipline protects the roof budget. You can authorise confirmed work now, allow for investigation of concealed areas, and avoid paying for a broad replacement scope built entirely on assumptions.
Repair and Replacement Options for Each Commercial Roof Type
The material determines which details can be repaired and which need replacement. A membrane patch, a new metal flashing and a tile-underlay repair solve different problems, even when the internal stain looks identical.
The repair also needs to accommodate roof movement and drainage. Applying a rigid patch across a moving joint, or coating over corrosion without preparation, can leave the owner paying for removal of the attempted fix before proper work begins.
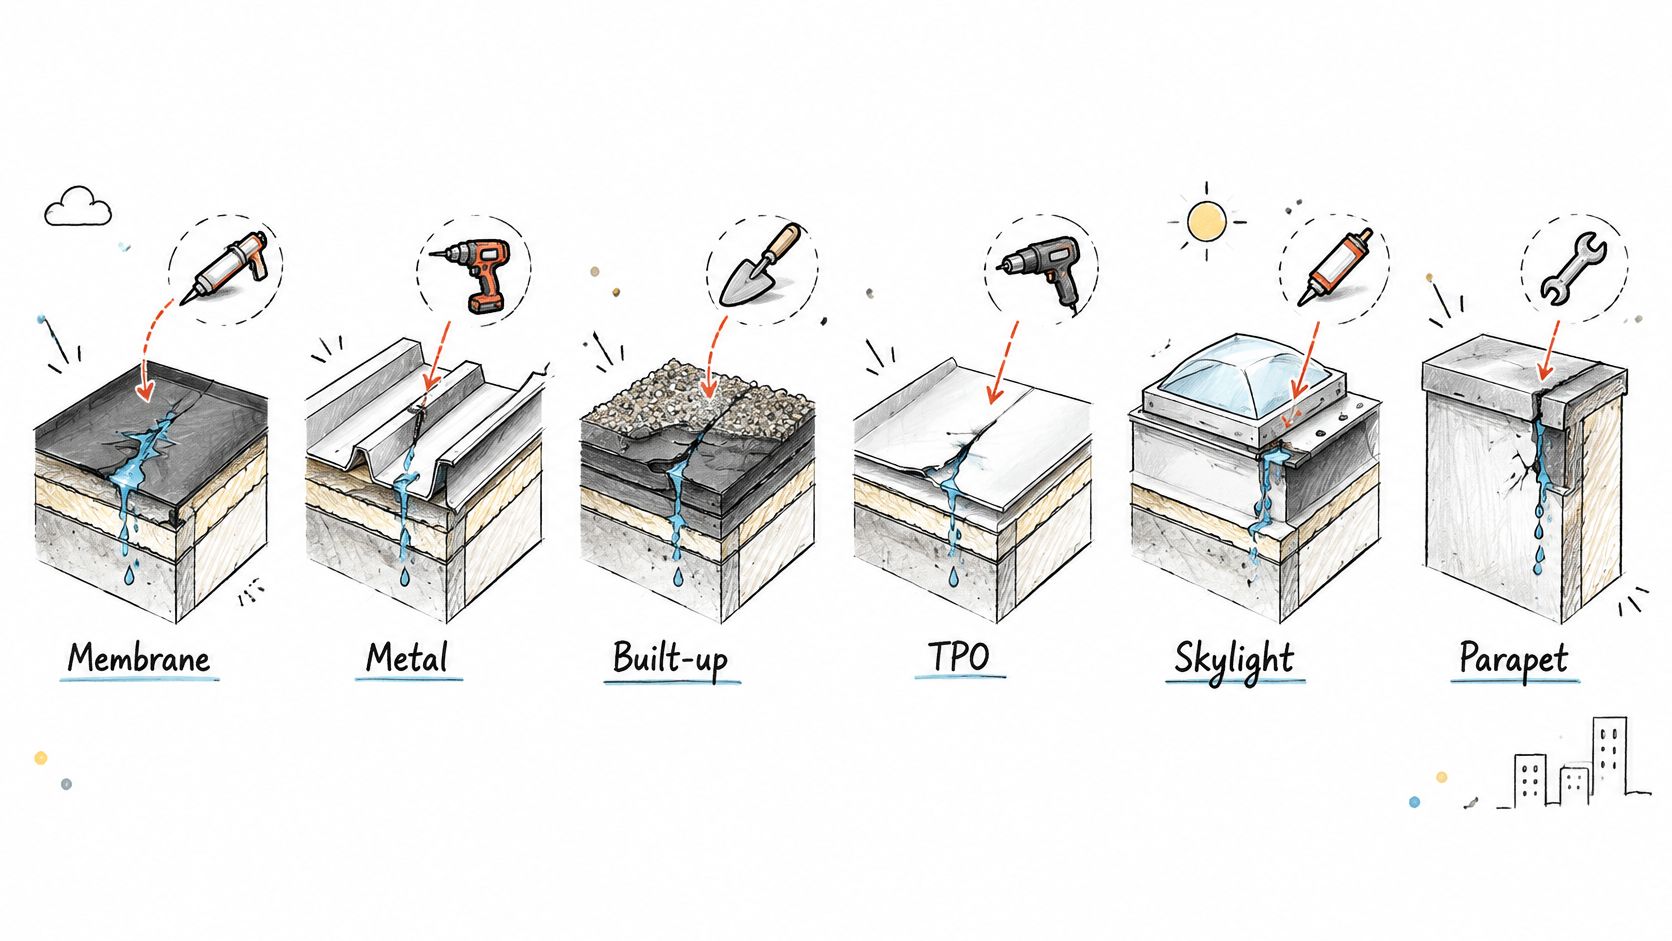
The illustration shows common repair locations across different roofing systems.
Compare the repair pathways
Commercial roof types, leak points and repair pathways
| Roof type | Common leak points | Repair approach | Pros | Cons |
|---|---|---|---|---|
| Metal sheet, including Colorbond-finished profiles, Trimdek and Longline | Fasteners, side laps and ridge or valley flashings | Replace defective fasteners, repair compatible seals or resheet affected sections | Lightweight; straightforward sectional replacement where accessible | Exposed fixings need attention; underside condensation can occur |
| Standing seam or concealed-fix metal | Clips, seam joints and end laps | Repair seams, re-clip or replace targeted panels | Fewer exposed fixing penetrations | Specialist labour; panel access can complicate local repairs |
| Concrete or terracotta tile | Cracked or slipped tiles, damaged ridges and failed underlay | Replace tiles, repair ridge bedding and pointing, repair underlay | Durable; individual tiles can be replaced | Heavy; brittle under foot traffic; underlay access can be extensive |
| Bitumen or modified bitumen | Blisters, splits at laps and perimeter upstands | Compatible patches, specified overlay or coating | Flexible repair options on a suitable substrate | Weathering; careful preparation and hot-work controls where applicable |
| Single-ply membrane, including TPO, PVC and EPDM | Punctures, failed seams, ponding and penetration seals | Material-specific seam repair, patching or designed overlay | Lightweight; suitable for low-slope designs | Puncture sensitivity; incompatible products can undermine repairs |
| Asbestos-cement sheet | Cracks, failed fasteners and broken edges | Assess suitable encapsulation or controlled removal and replacement | Sound material may remain under a management plan | Fragility and asbestos controls restrict repair methods |
Decide how much roof to replace
- Repair local defects when surrounding sheets or membrane remain sound and the drainage arrangement works.
- Replace a defined zone when deterioration affects a group of sheets, a membrane section or an underlay area rather than the whole roof.
- Plan full renewal when failure is widespread, previous patches obstruct reliable detailing, or the deck and supports need extensive work.
Test those choices against the inspection evidence: recurrence after rain, material condition, corrosion around penetrations, drainage performance, insulation moisture and asbestos status. Age alone isn't a sufficient reason to replace a functioning roof, and a new coating won't restore badly corroded metal.
Ask a commercial roofing contractor for side-by-side repair and replacement scopes suited to the existing structure. Metal sheet, standing seam, tile and membrane alternatives need separate consideration of load, slope, drainage and operational access, not just appearance.
A targeted repair avoids unnecessary capital expenditure when the surrounding roof is sound. Planned renewal becomes more attractive when each emergency patch requires another shutdown, stock relocation and access setup.
Asbestos and Compliance Rules Before Roof Work Starts
Asbestos changes the method, access arrangements and disposal scope before anyone removes a fixing. Older warehouses, factories and strata buildings may have asbestos-cement roof sheets, and a leak doesn't justify disturbing unidentified material.
A roofing quote that excludes asbestos without explaining how suspected material will be assessed leaves a major gap. Resolve that uncertainty before booking work, not after a crew arrives with cutting tools.
Establish what can be disturbed
- Check the records. Review the asbestos register, existing surveys and previous removal documentation, where available.
- Treat suspect sheets cautiously. Manage unidentified cement sheeting as potentially asbestos-containing until a competent assessment establishes otherwise.
- Leave sampling to a competent person. Don't drill, grind, break or high-pressure clean sheets to identify them.
- Verify removal permissions. Check the licence requirements for the material, condition and extent of proposed removal with SafeWork NSW. Don't assume ordinary roofing credentials authorise asbestos removal.
- Set the controls before mobilisation. Confirm applicable notification, removal planning, exclusion zones, air monitoring, clearance arrangements and lawful waste disposal requirements.
- Protect the occupied building. Include stock, air intakes, neighbouring tenancies and vehicle movements in the work plan.
Avoid accepting a verbal assurance that encapsulation will make any damaged asbestos roof serviceable. It doesn't restore structural capacity, and unsuitable preparation can create the very disturbance the work is supposed to avoid.
Check the rest of the compliance scope
Roof repairs also require safe access, suitable edge protection and controls for fragile surfaces. A harness isn't a complete plan: the contractor needs suitable anchor arrangements, trained workers and a workable rescue procedure.
Scaffolding or hoardings occupying public land may need council permission. Replacement work also needs assessment against applicable building requirements, including structural loading, roof drainage, insulation, ventilation and vapour management under the National Construction Code.
Before authorising work: Ask who is responsible for approvals, asbestos assessment, clearance documentation and waste records, and have those responsibilities written into the scope.
Confirm current requirements with SafeWork NSW and the relevant approval authority. The exact obligations must be established for the proposed work; a generic roofing checklist isn't a compliance determination.
What Drives Repair Costs and How Insurance Claims Work
A quote reflects the work scope, not roof area alone. Access equipment, internal protection and the need to keep a warehouse operating can matter as much as the replacement material.
A cheap quotation may cover only the external patch while leaving wet insulation, electrical checks and ceiling reinstatement to the owner. Compare the finished outcome and exclusions, not just the total.
Measure the job before comparing prices
Cost drivers for commercial roof water damage repair
| Cost driver | How it changes the price | What to measure before quoting |
|---|---|---|
| Roof area and height | Larger work zones and higher access increase crew time and access costs | Area, height and access points |
| Roof type and profile | Materials need different skills, detailing and equipment | Roof type, profile and sheet length |
| Extent of damage | Local repair requires less work than sectional or full replacement | Moisture map and defect schedule |
| Asbestos | Assessment, controlled removal, monitoring where required and disposal add scope | Register entry and sampling results |
| Structural repairs | Purlin, batten or deck replacement adds labour and materials | Inspector or engineer notes |
| Operational constraints | Staged or after-hours work changes labour and setup requirements | Shutdown windows and stock layout |
| Internal make-good | Insulation, ceilings and electrical work require separate trades | Affected internal finishes and services |
| Insurance documentation | Inspection, assessor attendance and temporary works require coordination | Claim reference and assessor arrangements |
Request an itemised scope, access method, exclusions and a stated warranty period. Where both options are viable, obtain separate prices for targeted repair and replacement, with clear allowances for concealed structural damage.
The cause determines the insurance discussion
Storm damage, gradual deterioration, blocked drainage and floodwater aren't interchangeable claim descriptions. Coverage depends on the actual cause and policy wording, including exclusions, excesses and any distinction between repairing the defective roof and repairing resulting internal damage.
Business-interruption cover also depends on the insured event, limits and selected indemnity period. A roof repair invoice alone won't establish lost turnover or continuing expenses; keep operational and financial records that support those losses.
Use the evidence gathered during containment to support the claim, and coordinate assessor access before non-urgent permanent work removes the original condition. Don't delay essential safety work while waiting for an appointment.
A practical roof leak insurance guide can help organise the questions for your insurer. Keep quotes, invoices, weather records and damaged-stock inventories together, and obtain written direction on disputed work rather than relying on an informal conversation.
Set Up a Maintenance Plan Before the Next Storm
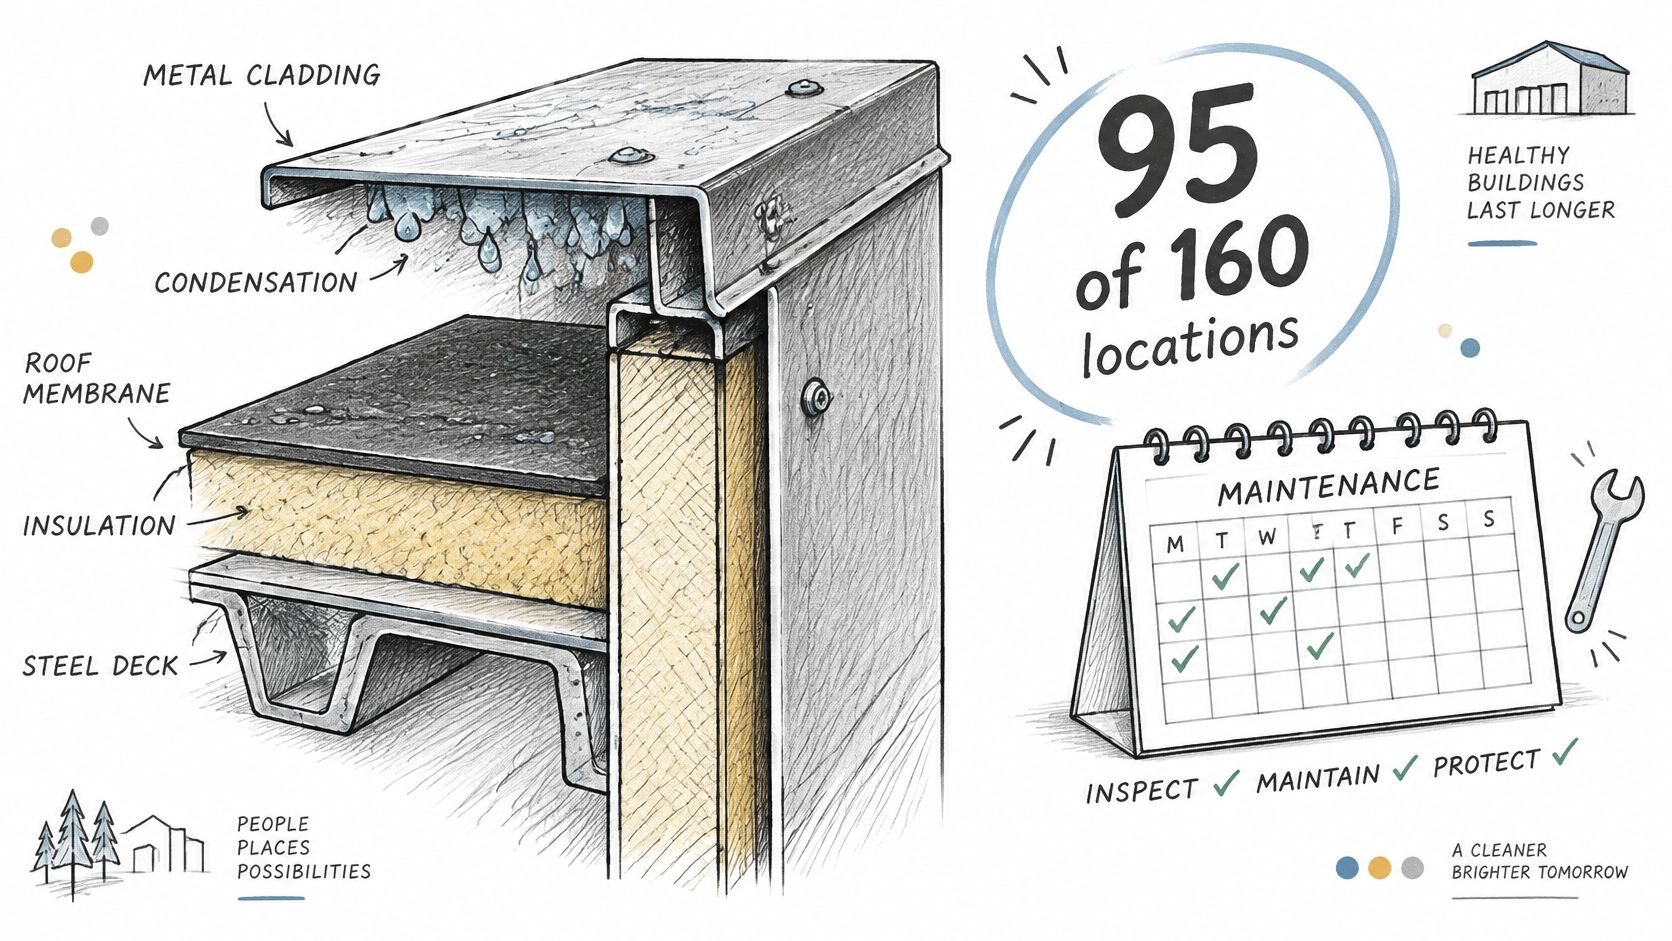
The ABCB's NCC 2025 Condensation in Buildings Handbook reports that analysis of approximately 160 Australian locations identified roof-cladding condensation as likely in 95 locations, even before allowing for additional night-sky cooling. A maintenance plan therefore needs to cover the roof assembly, not just visible openings.
Night-time cooling can leave metal cladding cold enough for humid roof-space air to condense beneath it. The appropriate response depends on climate, occupancy moisture, insulation arrangement and vapour control; adding vents without assessing the assembly isn't automatically the right fix.
This illustration connects those concealed components with practical maintenance checks.
Give each task an owner and a trigger
- Inspect before seasonal heavy rain. Add an inspection after severe wind, hail or impact events, using safe access rather than informal staff walk-overs.
- Set gutter cleaning around exposure. Trees, nearby construction and previous blockage history should determine the cleaning frequency.
- Check fasteners to the system specification. Replace failed components and correct fixing defects; blanket retightening can crush washers or damage holes.
- Review penetration seals by condition. Record cracking, separation and incompatible previous repairs rather than applying fresh sealant indiscriminately.
- Include concealed moisture checks. Assess ventilation continuity, membrane drainage and insulation condition during planned inspections.
- Maintain a roof logbook. Keep dated photographs, readings, repair scopes and verification outcomes against a marked roof plan.
A documented roofing and maintenance plan lets the facility manager hand over responsibilities without losing the building's repair history. Assign someone to close out defects, not merely file inspection reports.
Book an inspection with a defined deliverable
An independent inspector or roofing contractor can establish the maintenance baseline. Commercial Roofers, based in Mount Druitt, uses in-house crews across Greater Sydney for leak repairs, replacement, asbestos removal to applicable Australian standards and inspection reporting, with insurer coordination where needed.
Before booking, verify the contractor's licence, public liability insurance and relevant asbestos authorisations. Request a written scope, stated warranty terms and a report that separates urgent repairs from planned capital work.
Commercial Roofers offers commercial roof inspections, leak repairs and replacement planning for warehouses, factories and strata properties. To arrange an inspection that addresses the water entry, affected materials and practical repair options, visit Commercial Roofers .