
Choosing a new roof is a significant decision. It’s a major investment, and the material you pick is what stands between your home and the elements. A professionally installed metal roof by a reliable company is hard to beat for durability and energy efficiency, but you only get those benefits when you partner with the best. The highest quality materials in the world won't save you from a subpar installation.
Why a Reliable Roofing Company Recommends Metal for Your Home
It's easy to get caught up in how a new roof will look. But the real test of a roofing system is how it performs year after year. For homeowners across Australia, metal roofing has become the go-to choice, and not just because of its sleek, modern appearance. It's all about standing up to our uniquely harsh climate.
This isn't just a trend; the numbers speak for themselves. Metal is, by far, the most common roofing material used in Australian construction. That widespread trust comes from its proven track record in handling everything from scorching sun and torrential downpours to high-wind storms. This is precisely why finding a reliable roofer is so critical—we have the expertise to install it to the standards needed to deliver that tough performance.
Built for Australian Conditions
One of the best things about metal roofing is its sheer versatility. If you live near the coast, specially treated materials like Colorbond are brilliant at resisting corrosion from salt spray, something that can quickly destroy other roofing types. For those in bushfire-prone areas, a properly installed metal roof provides a non-combustible shield, which is a massive advantage for protecting your property.
It's also surprisingly lightweight. This means it puts far less strain on your home's frame compared to heavy concrete or terracotta tiles, a real plus for both new builds and older homes getting a roof overhaul.
A quality metal roof, fitted by a skilled and reliable crew, isn't just another home expense—it's a long-term investment in your home's structural health and your family's peace of mind. A botched job, on the other hand, negates all these advantages and can quickly lead to leaks and expensive repairs.
Unlocking Energy Efficiency and Longevity
One of the most powerful arguments for a metal roofing installation is its incredible energy efficiency. Metal, particularly in lighter colours, acts like a mirror to the sun. It reflects a huge amount of solar heat away from your house instead of soaking it up like a sponge.
This simple reflective property helps keep your attic and the rooms below much cooler during our sweltering summers. Your air conditioner doesn't have to work nearly as hard, which translates directly into lower power bills.
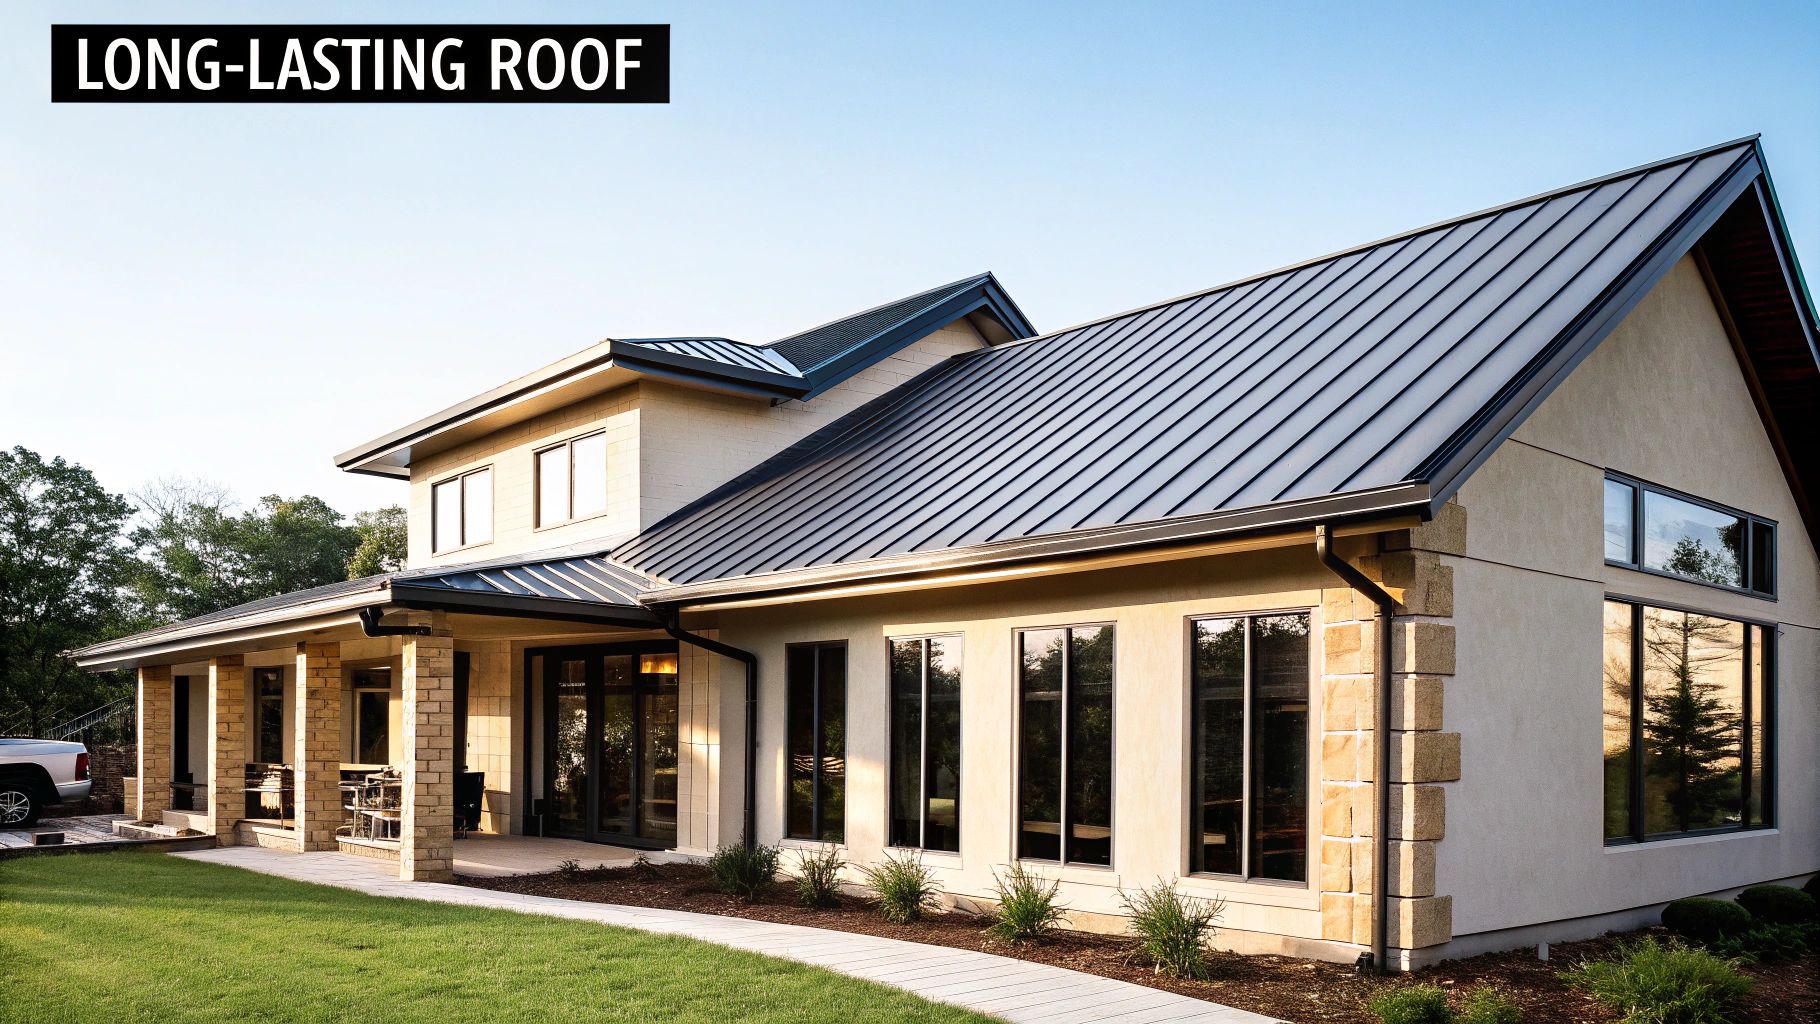
When it comes to longevity, metal roofing is in a league of its own. While you might replace a traditional roof every 15-20 years, a professionally installed metal roof can easily last for 50 years or more with very little upkeep. This impressive lifespan saves you the cost and hassle of multiple re-roofing projects down the track.
Metal Roofing vs Traditional Tiles: A Quick Comparison
To put things in perspective, it's helpful to see a direct comparison. Many homeowners find themselves weighing up the pros and cons of modern metal against more traditional tile options.
| Feature | Metal Roofing | Traditional Tile Roofing |
|---|---|---|
| Lifespan | 50+ years | 20-30 years (requires more maintenance) |
| Weight | Lightweight, less stress on structure | Heavy, may require structural reinforcement |
| Durability | High resistance to impact, wind, fire | Prone to cracking from impact or foot traffic |
| Energy Efficiency | Highly reflective, keeps home cooler | Absorbs and retains heat, increasing cooling costs |
| Maintenance | Minimal; occasional cleaning | Regular checks for cracked or displaced tiles |
Ultimately, this blend of durability, energy savings, and a long, low-maintenance life is what makes metal roofing Australia's favourite. Research from sources like Statista confirms its dominance, showing that metal roofing accounts for around 52.8% of all new roofs installed nationwide, leaving other materials far behind. It’s a choice that simply makes sense for the Australian way of life.
Prepping Your Roof Deck Like a Reliable Roofing Company
Any seasoned roofer will tell you the same thing: a top-tier metal roof is built on a foundation of painstaking preparation. What happens before the first metal sheet is laid is just as critical as the installation itself. Rushing this stage is a surefire way to turn a potential 50-year roof into a 15-year headache.
Think of your roof deck—the timber surface that everything sits on—as the chassis of a car. It doesn't matter how powerful the engine is; if the frame is bent or rusted, the whole vehicle is compromised. It’s the exact same principle for your roof. The deck must be clean, solid, and structurally sound to properly support your new metal system.
Inspecting the Existing Roof Structure
First things first, a thorough inspection is non-negotiable. This means getting up there and carefully examining every square metre of the roof deck, which happens right after the old roofing materials have been completely torn off. This is our only chance to catch any underlying issues, so we're incredibly meticulous here.
So, what are we looking for? The usual suspects are rot, water damage, and general structural weakness.
- Soft Spots: We walk carefully across the entire deck (when it's safe to do so), feeling for any spongy or soft areas underfoot. This is a dead giveaway for rotted plywood or OSB.
- Discolouration: Dark stains, mould, or mildew are clear visual cues. They tell us that water has been getting past the old roof and has started to compromise the timber deck.
- Damaged Boards: We also check for any cracked, split, or delaminating boards. These weak points just won't hold the new fasteners securely.
If we find any compromised sections, they have to be cut out and replaced with new sheeting of the same thickness. This is a non-negotiable repair. It ensures the screws for your new metal roof have solid, fresh timber to bite into, giving you a secure and truly wind-resistant finish.
The Critical Role of Underlayment
Once we've got a solid and clean deck, the next layer of protection is the underlayment. This is a water-resistant (or fully waterproof) barrier that gets installed directly onto the timber deck before any metal panels go down. Honestly, skipping this step is a huge gamble that no reliable roofer would ever take.
While a new metal roof is fantastic at shedding water, the underlayment provides a crucial second line of defence. It protects your home from water that might get pushed in by wild, windy rain, ice dams, or even the condensation that can sometimes form on the underside of metal sheets.
A high-quality synthetic underlayment isn't just a "nice to have"; it's your roof's insurance policy. It protects the timber deck from moisture during the installation and for decades after, safeguarding the structural integrity of your entire home.
For most Australian climates, we find that a high-temperature rated, self-adhering synthetic underlayment is the gold standard. It's incredibly tough, tear-resistant, and creates a superior seal around every single fastener—absolutely vital for a genuinely watertight system.
Prioritising Safety Protocols
Working at heights is inherently dangerous, so safety has to be the absolute top priority from start to finish. A reliable roofing company always operates with a strict safety-first culture, which is as much about protecting our crew as it is about protecting your property.
Here are the absolute must-haves for a safe worksite:
- Secure Ladder Setup: Ladders need to be on firm, level ground and extend at least one metre above the gutter line. We always tie them off at the top to stop any chance of them slipping or shifting.
- Fall Protection: For any roof with a decent pitch or height, proper fall protection is mandatory. This means wearing a safety harness that’s securely attached via a rope and anchor to a solid point on the roof.
- Clean Work Area: Keeping the roof and the ground below clear of debris, tools, and off-cuts is just common sense. Tripping hazards are one of the biggest causes of accidents on roofing projects.
These aren't just suggestions; they're the fundamental practices that define a professional operation. A team that's serious about safety is also a team that pays attention to every other detail—and that’s exactly who you want handling your new roof.
Selecting the Right Tools and Materials
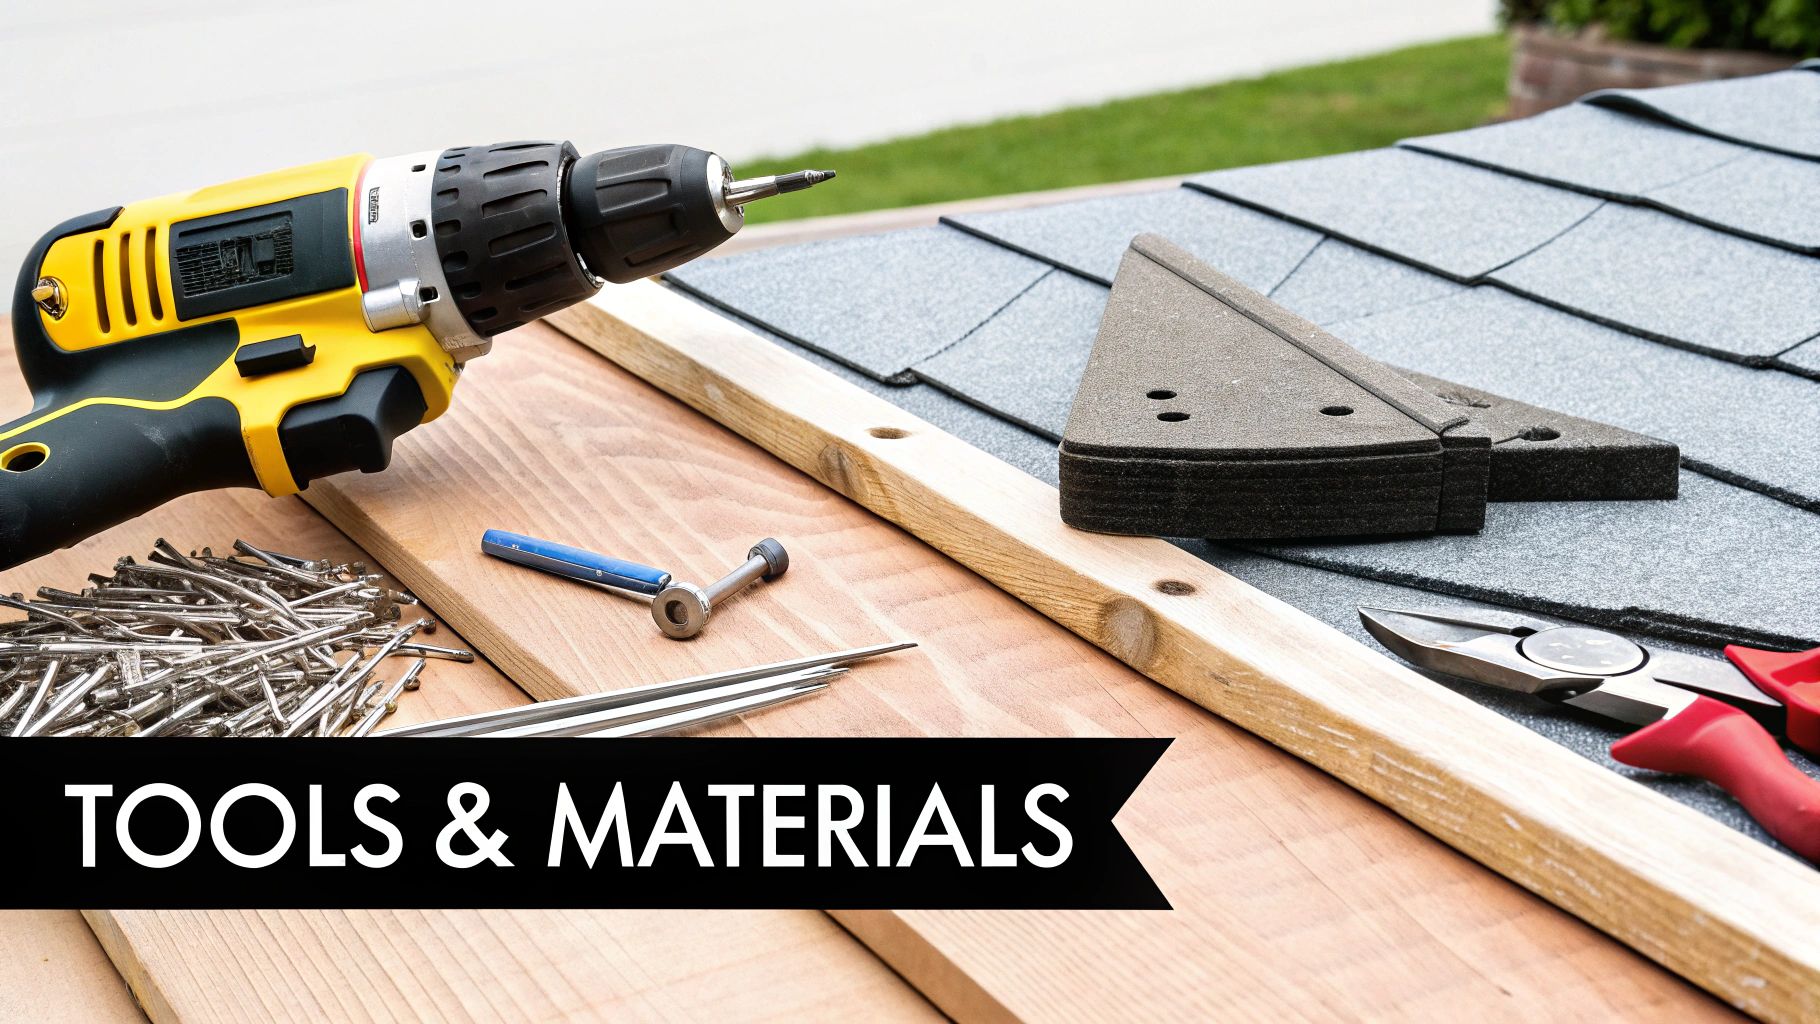
Any successful metal roofing job comes down to more than just experience—it’s about having the right tools and top-quality materials from the very start. We’ve seen firsthand how cutting corners here can compromise the entire project. A truly reliable roofing company never skimps on their gear, because the quality of the equipment directly affects the precision, durability, and lifespan of your new roof.
It’s tempting to think you can get by with standard power tools, but this is a classic mistake. For instance, grabbing a circular saw with a standard abrasive blade will generate a huge amount of heat. This can literally burn off the protective coating on the metal sheets, voiding material warranties and creating hot spots that will inevitably rust. Using the right tool isn’t a luxury; it’s fundamental to getting the job done properly.
The Essential Toolkit for a Reliable Installer
A professional roofer's toolkit looks quite different from a general builder's. Every tool is specialised, designed to handle metal with the finesse it requires. We make sure our teams are kitted out with everything they need to deliver that flawless, long-lasting finish.
Here’s a look at what we consider the absolute non-negotiables for any metal roofing installation:
- Electric Nibblers: This is our go-to for clean, burr-free cuts across panels without generating damaging heat. A nibbler punches out tiny, crescent-shaped bits of metal, which keeps the panel's protective coating intact right to the very edge.
- Power Shears: For long, straight cuts down the length of a panel, nothing beats power shears. Just like nibblers, they slice through the metal without creating heat or sparks, preserving the integrity of the material.
- Screw Gun with Torque Control: A standard drill driver is a recipe for disaster. It’s far too easy to over-tighten screws, crushing the rubber washer and denting the panel. A specialised screw gun with precise torque settings ensures every fastener is perfectly seated for a completely watertight seal.
- Hand Benders and Seamers: These are the tools of the trade for creating those crisp, clean folds needed for flashing, hemming edges, and locking standing seam panels together.
Using the proper equipment from the get-go prevents costly redos and guarantees every part of the roof system performs exactly as it should.
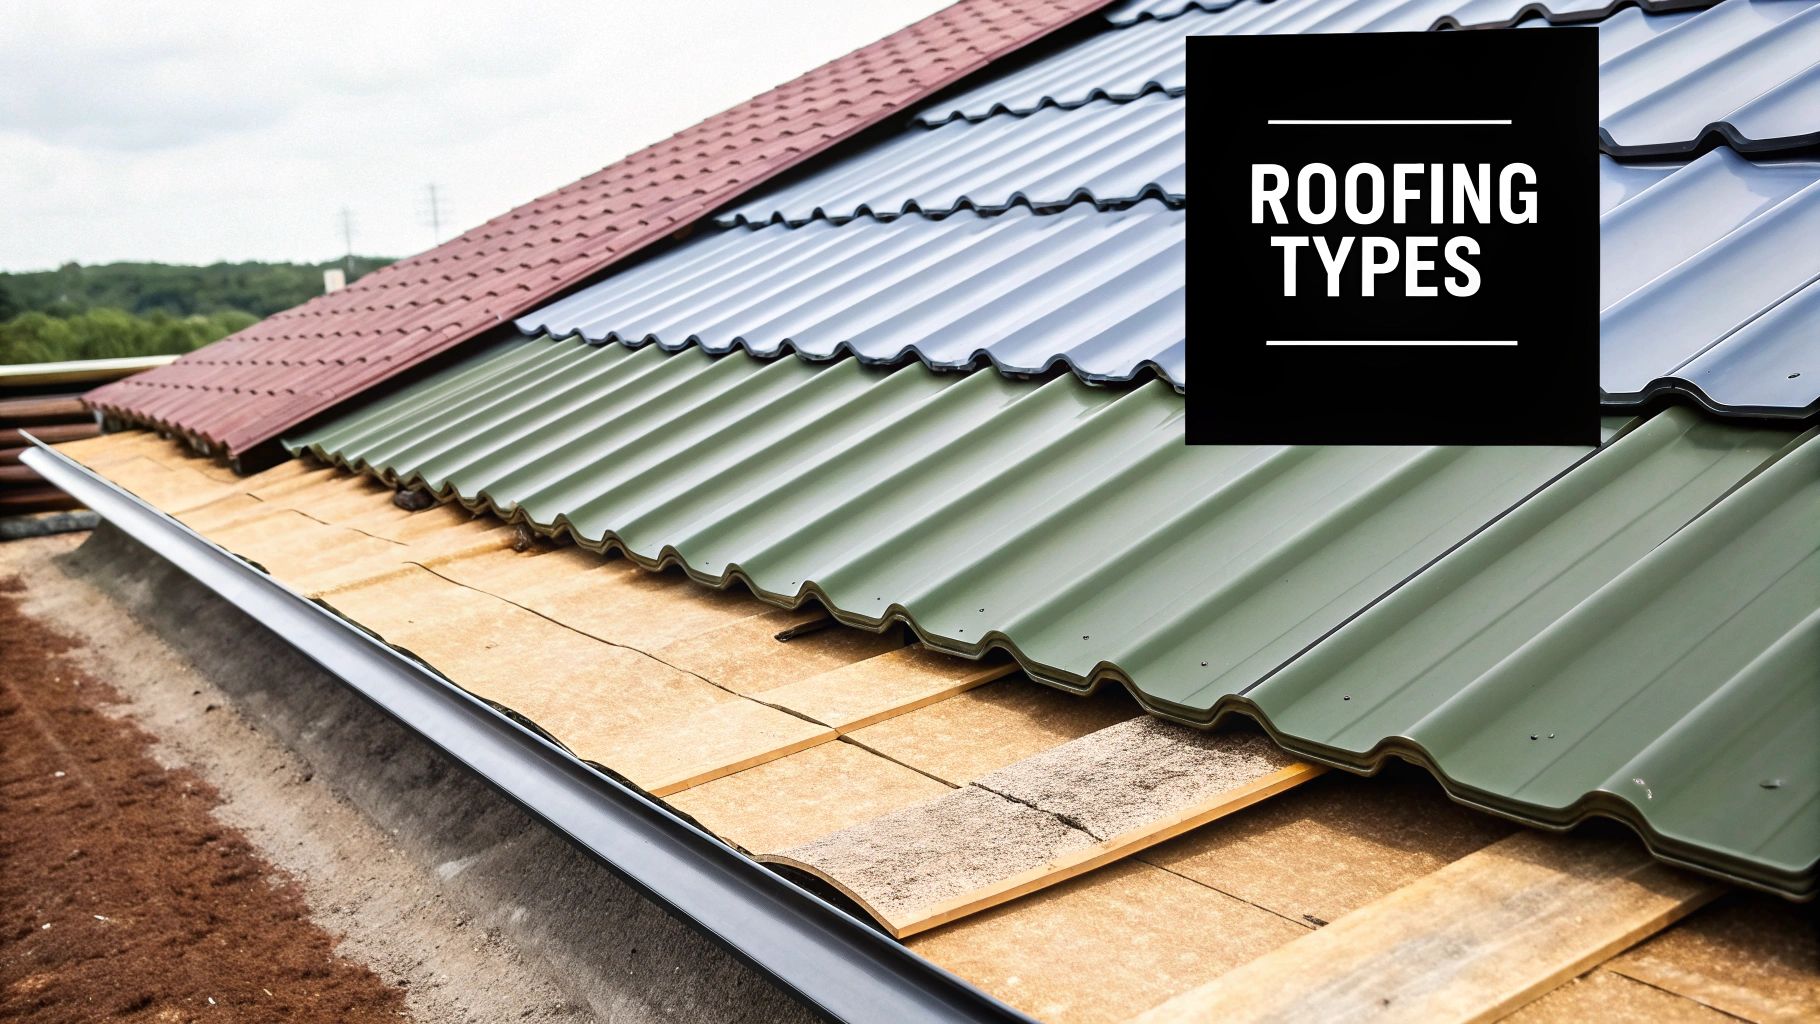
Choosing Your Metal Roofing Material and Profile
The material you select is the heart and soul of your new roof. Here in Australia, two names really stand out for high-quality steel roofing: Colorbond and Zincalume. While both are fantastic, durable options, we always walk our clients through the key differences to find the perfect fit for their home.
Choosing the right material profile is about balancing aesthetics with functionality. A corrugated profile might be perfect for a classic look, while standing seam offers a sleek, modern finish with superior weather resistance due to its concealed fasteners.
Colorbond vs. Zincalume
| Feature | Colorbond | Zincalume |
|---|---|---|
| Composition | A Zincalume steel base with a durable, baked-on paint finish. | A protective alloy of zinc, aluminium, and magnesium over a steel base. |
| Appearance | Available in a wide palette of colours inspired by the Australian landscape. | A classic, unpainted metallic finish. |
| Best For | Homeowners wanting to match their roof to their home's colour scheme. | Projects where a traditional "tin roof" look is desired or for a more industrial aesthetic. |
| Cost | Typically higher due to the advanced paint finish. | Generally more budget-friendly. |
Beyond the material itself, the profile—or shape—of the panels is crucial for both the final look and the roof's performance. The two most popular choices, corrugated and standing seam, each have their own strengths. Corrugated is the classic, with its familiar wavy pattern and inherent strength making it incredibly versatile. Standing seam, on the other hand, provides a clean, modern aesthetic with raised, interlocking seams that hide the fasteners from the weather, offering exceptional protection against leaks.
How a Reliable Roofer Calculates Material Needs Accurately
One of the biggest pitfalls we see is getting the material quantities wrong. Ordering too little brings the whole project to a grinding halt, while ordering too much is just a waste of money. A reliable roofing company will always use a systematic approach to get this right.
To get a solid estimate, you need to measure the length and width of each individual roof plane to work out its square metreage. Crucially, you have to factor in the roof's pitch—a steeper roof has a much larger surface area than a flatter one with the same ground footprint. We always add 10-15% to the total to cover waste from offcuts, overlaps, and any little mistakes. That buffer is essential for a smooth metal roofing installation. Finally, don't forget to measure for all the flashings, ridge caps, and calculate your fasteners—as a rule of thumb, you’ll need about 80-100 screws per 10 square metres.
Laying and Securing Your Metal Panels
Now for the rewarding part. With a perfectly prepared and protected roof deck, we get to see the real transformation begin as we lay down the new metal. This is where your new roof starts to take shape, panel by panel.
It’s a process that calls for a steady hand and a sharp eye. Every single sheet must be flawlessly aligned and secured, because the techniques used here are what separate a leaky, problem-prone roof from a watertight system that will protect your home for decades.
Establishing a Perfectly Straight Baseline
Everything hinges on getting that very first panel dead straight. We can't stress this enough. Think of it as the cornerstone of a building; if it’s even slightly off, every panel that follows will be thrown out of alignment. It creates a domino effect across the whole roof.
This isn't just about looks. Panels that aren't lined up properly lead to gaps and poor overlaps, creating weak points that water will absolutely exploit during the next downpour. A common mistake we see is people just lining up the first panel with the edge of the eave. Big mistake. Roofs, especially on older homes, are almost never perfectly square. Trusting the existing edge is a recipe for a crooked job.
Instead, we always measure and snap a chalk line. We'll measure up from the eave at both ends of the roof, marking a point that allows for the correct overhang—usually between 25-40mm. Then, snap! A bold chalk line between those two points gives us our undeniable guide. This line ensures the first run of panels is perfectly parallel to the ridge, no matter what quirks the old roof framing has.
This single chalk line is probably the most important line we'll draw on the entire job. It dictates the alignment for the whole roof. Taking an extra ten minutes to get this baseline perfect saves hours of headaches and prevents costly mistakes later on.
Installing and Squaring the First Panel
With our baseline set, it’s time to lay the first sheet. We carefully place it on the roof, lining up its bottom edge exactly with our chalk line. But before a single screw goes in, we do one last, crucial check for squareness.
Using a builder's square or the classic 3-4-5 triangle method, we make sure the panel is perfectly perpendicular to the eave line. This confirms the vertical ribs are running straight up the roof toward the peak. Only when we’re 100% certain it's square do we drive the first few fasteners to lock it in. This panel is now the anchor for the entire roof.
This visual breaks down the core workflow, from prep right through to the final touches.
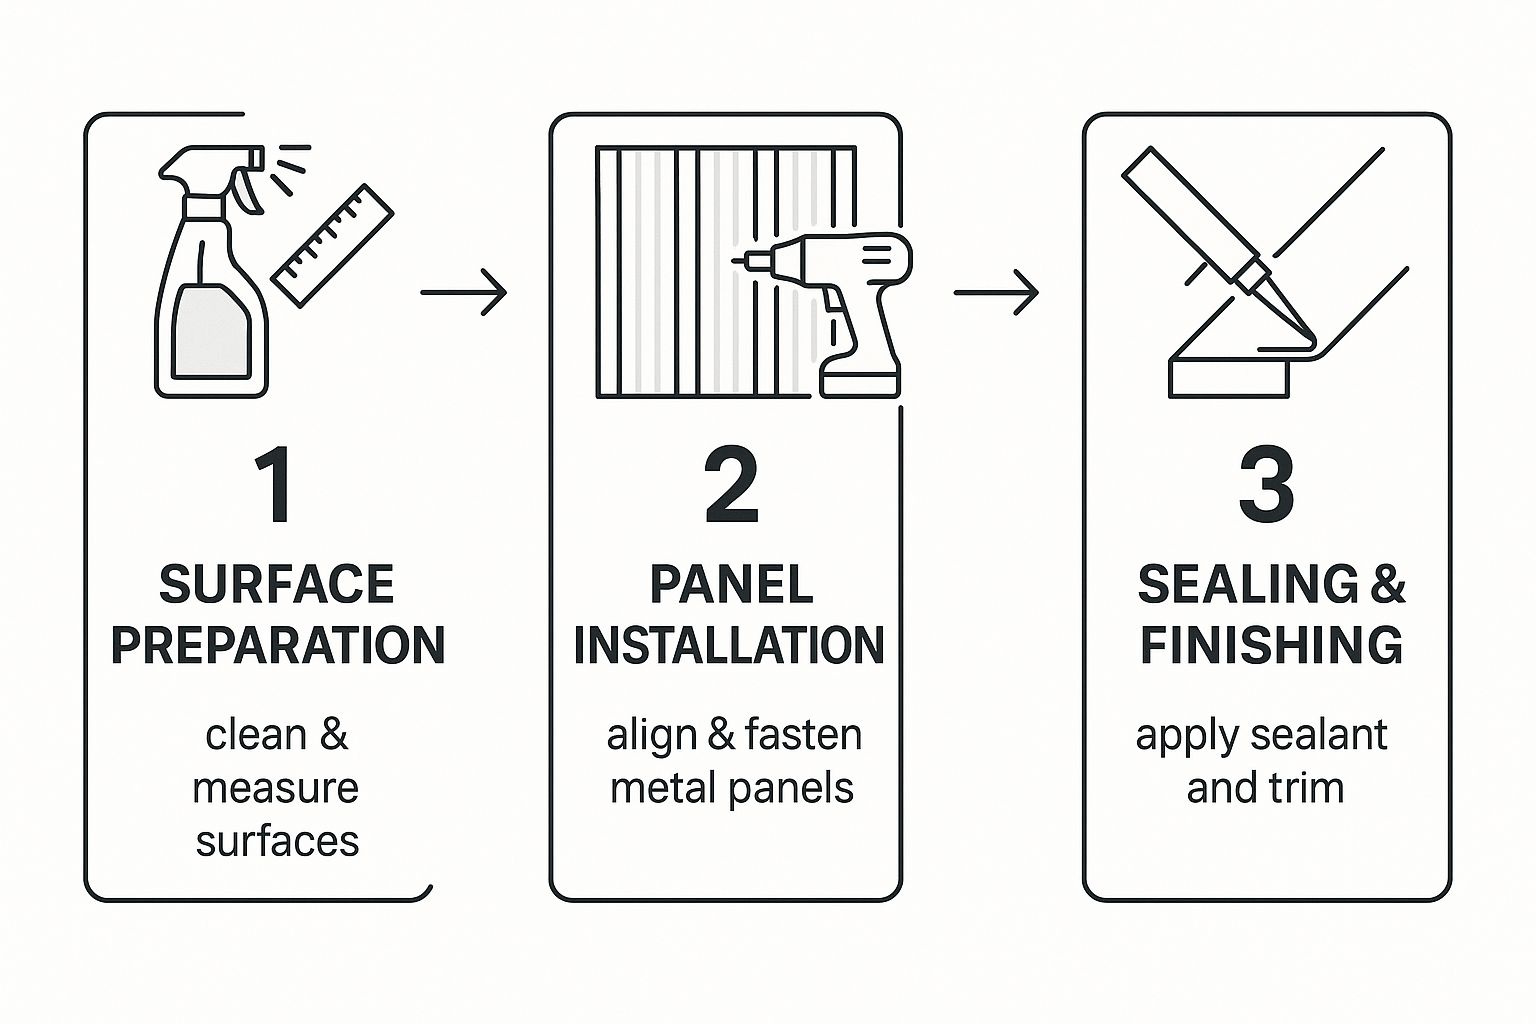
As you can see, a successful project is a chain of dependent steps. The quality of one stage directly sets up the success of the next.
Managing Overlaps and Fastening Patterns
From here, we lay each new panel so it overlaps the last one. For most common profiles like corrugated or trapezoidal, this is a simple one-rib overlap. The panels are smartly designed with an anti-siphon drain in the overlap, a small channel that stops water from being drawn sideways under the sheets. We make sure each panel is seated snugly into the last before screwing it down.
The fastening pattern is just as critical as the alignment. We use very specific patterns to brace the panels against wind uplift and to guarantee a watertight seal.
- At the Eaves and Ridge: Screws go into every pan (the flat, low section) of the sheet. This provides maximum strength where wind forces are at their most brutal.
- In the Field: Across the main body of the roof, we typically place screws in every second or third pan.
- On the Overlaps: A row of "stitching" screws is run down the overlapping rib to clamp the two panels together, blocking any path for wind-driven rain.
A pro-level detail is getting the screw torque just right. If you overtighten, you can crush the small neoprene washer, causing it to fail early and create a leak. If you under-tighten, you leave a gap for water to seep in. We use specialised screw guns with adjustable clutches to set every fastener to the manufacturer's exact specification, ensuring a perfect seal every time.
This attention to detail is part of a wider industry trend. The Australian roofing market, valued at USD 2.814 billion in 2024, is projected to hit USD 3.936 billion by 2033. This growth is fuelled by homeowners demanding durable, high-performance materials. You can read more about this market expansion on the IMARC Group website.
Cutting and Fitting Around Obstacles
Let’s be honest, almost every roof has something sticking out of it—vent pipes, chimneys, skylights. This is where a roofer's real skill comes into play.
Cutting panels to fit neatly around these penetrations requires careful measurement and the right tools. We use tools like nibblers and hand snips to make precise cuts without burning or damaging the panel's protective coating.
After cutting and fitting the panel, the job isn't done. We then install custom-made flashing around the object—a "boot" for a pipe, or a full set of head, apron, and side flashings for a chimney. This two-part system is what makes even the trickiest parts of a roof completely waterproof, giving you that flawless, long-lasting finish our team is known for.
Achieving a Watertight Finish with Flashing
The main field of the roof is done, and it looks fantastic. But the job is far from over. In fact, some of the most intricate and critical work is what comes next. These finishing touches, especially the flashing, are what truly define a professional metal roofing installation. They're your roof's primary defence at its most vulnerable points.
This is where a roofer's skill is really put to the test. Any gap, no matter how small, is an open invitation for water. A reliable roofing company understands that flashing isn't an afterthought; it’s a meticulously planned system of custom-fit metal pieces that directs water safely away from every joint, edge, and opening.
Sealing the Peak with Ridge Capping
Let's start at the very top. The ridge of your roof, where the two opposing planes meet, creates a long gap that's a major weak point if not sealed perfectly. This is the job of the ridge cap, a pre-formed metal component designed specifically to cover this peak.
Installing it properly is more than just screwing it down. First, we fit a vented foam closure strip along the ridge. This flexible material is profiled to perfectly match the ribs of your roofing panels, filling the voids. It's a clever piece of kit that lets the attic breathe while blocking out driving rain and pests.
With the closure strips in place, the ridge cap goes over the top and is fastened securely through the foam into the roof structure. This creates a strong, compressed seal—an impenetrable barrier along the entire length of your roof's peak.
The Fine Art of Valley Flashing
Roof valleys, where two roof sections meet at an angle, are designed to channel a massive amount of water. They're one of the highest-risk areas for leaks on any roof, which is why valley flashing demands absolute precision. There is simply no room for error here.
We begin by installing a wide, continuous piece of pre-bent metal flashing directly onto the underlayment. This runs all the way from the ridge down to the eave, creating a smooth, waterproof channel before a single roof panel is laid.
Next, we lay the roof panels, carefully cutting them at the correct angle to meet in the centre of the valley. Crucially, the panels are fastened down well outside the valley flashing area. The panels are then hemmed (folded under) to create a clean, crisp edge that helps guide water down the centre of the channel.
The single biggest mistake in a DIY installation is fastening panels through the valley flashing. Every one of those screw holes is a potential leak. The best and most reliable roofing companies know the valley must remain a solid, unpenetrated channel.
Protecting Gables and Wall Abutments
The angled edges of your roof are called gables. Leaving these ends exposed is not an option. They need to be sealed with gable or barge flashing. This is an L-shaped trim that covers the end of the panels and fastens to the side of the roof structure, giving a clean finish while blocking water from being blown in underneath the sheets.
Where a roofline runs into a vertical wall—think a second-storey addition or a brick chimney—we use a specific wall flashing. This is typically a two-part system designed for maximum protection.
- Apron Flashing: An L-shaped piece is fitted over the top of the roof panels and runs up the wall.
- Counter-Flashing: A second piece is embedded into the wall's mortar joint or siding above the apron flashing, folding down over it.
This two-layer approach is failsafe. Even if water somehow gets behind the counter-flashing, it just hits the apron flashing and runs safely back onto the roof, never getting near your building's interior.
Flashing Around Roof Penetrations
Chimneys, skylights, and vent pipes are the final pieces of the puzzle. Each one needs its own custom-made flashing kit designed to integrate seamlessly with the roof. For something like a chimney, this is usually a four-part system:
- An apron flashing at the front (the low side).
- Step flashing woven in with the roofing sheets along the sides.
- A cricket or back pan at the rear (the high side) to actively divert water around the structure.
Every piece must overlap the one below it in "shingle fashion," ensuring water is always shedding downwards. It’s this systematic, layered approach that a quality roofing company uses to guarantee every single joint on your roof is not just sealed, but built to stand up to the worst weather for decades.
Common Questions We Hear About Metal Roofing
Thinking about a new metal roof? It’s a big decision, and it’s natural to have plenty of questions running through your mind. A good, reliable roofer will always be happy to walk you through the details, but to get you started, we’ve put together answers to some of the questions we get asked most often.
Making an informed choice is key. After all, the Australian roofing industry is a massive part of our economy, pulling in around $3.8 billion in revenue in 2024. With all the building and renovating that’s been happening, it’s clear that homeowners are serious about investing in their properties. You can dive deeper into the Australian roofing industry's performance on IBISWorld. Getting this right means your investment truly pays off.
Can I Just Put a New Metal Roof Over My Old Shingles?
This is easily the question we hear the most. While it might seem like a tempting shortcut, laying a new metal roof directly over old asphalt shingles is something we, as a reliable roofing company, will almost always advise against.
The real problem is what you can't see. Your old shingles can trap moisture against the roof deck, creating a perfect environment for condensation and mould. This can slowly but surely rot the timber structure of your roof. Plus, if you don't remove the old layer, you lose the crucial chance to inspect the deck for any existing rot or weak spots.
A complete tear-off of the old roof is the only way to be certain you have a solid, dry, and sound foundation for your new metal roof. We believe in doing the job right for the long haul, not just taking the quickest or cheapest path.
How Can I Tell if a Roofing Company is Reliable?
Choosing the right installer is every bit as critical as picking the right roofing material. The best, most reliable companies won't hide their credentials or make it hard for you to see their past work.
Here’s what you should be looking for to spot a genuine professional:
- Proper Licensing and Insurance: They must be fully licensed and hold public liability insurance. Don’t be shy about asking to see their certificates.
- A Real Local Presence: Look for a company with a physical address and a solid history in your area. Fly-by-nighters are a huge red flag.
- Quotes with Detail: A professional quote is more than just a final number. It should break down the costs for materials and labour, and list the exact products they plan to use.
- A Guarantee on Their Work: The best companies will always back their installation with a workmanship warranty, which is separate from the warranty on the materials themselves.
What are the Biggest DIY Installation Mistakes?
The can-do Aussie spirit is fantastic, but metal roofing isn't a weekend project. It’s a specialised trade, and we’ve seen some costly DIY mistakes over the years, nearly all of them leading to one thing: water getting in.
The most common blunders we have to fix are:
- Botched Flashings: Getting the flashing wrong around chimneys, skylights, and valleys is the number one reason for leaks. It's a game of millimetres.
- Wrong Fastener Tension: Driving screws in too tight will crush the little rubber washer, which causes it to fail and leak. Not driving them in tight enough leaves a gap for water to creep under.
- Bad Cutting Methods: Using an angle grinder to cut metal sheets is a classic mistake. The heat and sparks burn off the protective coating, which leads to rust and will instantly void your material warranty.
This is exactly where a professional’s experience pays for itself. We know these little details inside and out, ensuring your roof is watertight and built to last from day one.
Your roof is one of the most vital parts of your home. For a flawless installation backed by over 20 years of hands-on experience from a reliable roofing company you can count on, look no further than the team at Commercial Roofers. We offer free, no-obligation quotes for homes and businesses all across Sydney. Get in touch today to secure your property with a high-quality metal roof. Find out more at https://commercialroofers.net.au.
Article created using Outrank